
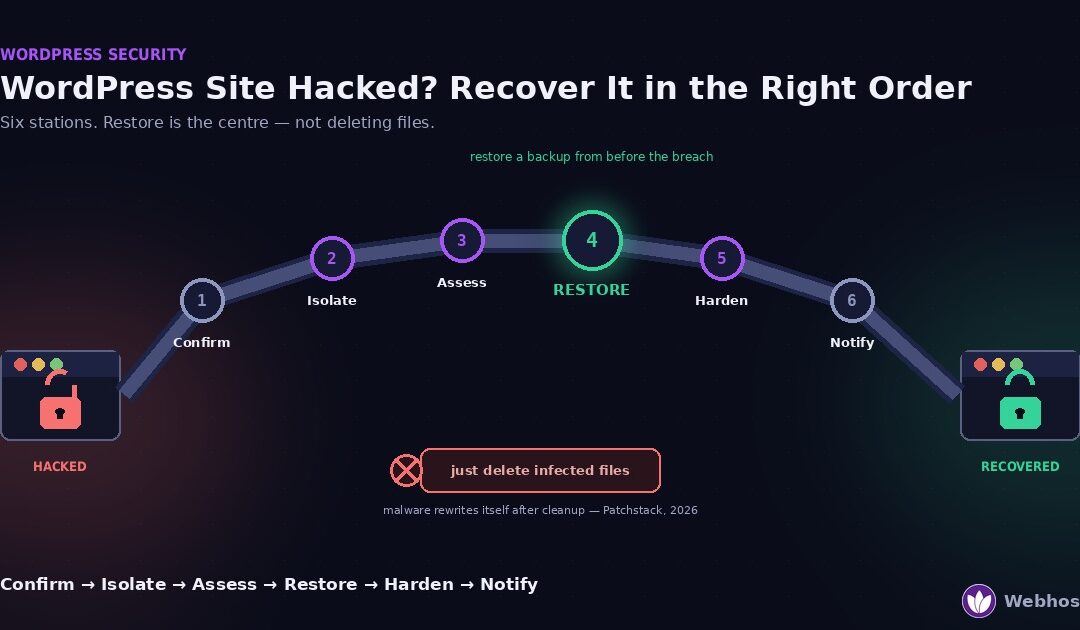
If your WordPress site was hacked, recover it in this order: confirm the hack is real, isolate the site and change every password, find how they got in, restore a backup from before the breach, harden the site, then clear Google’s warnings. Do not start by deleting files. Cleanup alone leaves the door open, and the malware comes back.
Most recovery guides teach the opposite. They send you hunting through files for infected code, one by one. However, modern malware hides copies of itself, and it rewrites what you deleted within hours. So this guide puts restoring a clean backup at the centre, and treats cleanup as the fallback.
In addition, we start with a question most guides skip. Was it actually hacked? Because half of the panics we see are not hacks at all, the first section rules those out before you change anything.
First: Confirm It Was Actually Hacked
“Hacked” is a conclusion, not a symptom. So before you touch the site, match what you see against the signs below. Each one tells you how sure to be, how urgent it is, and what to do first.
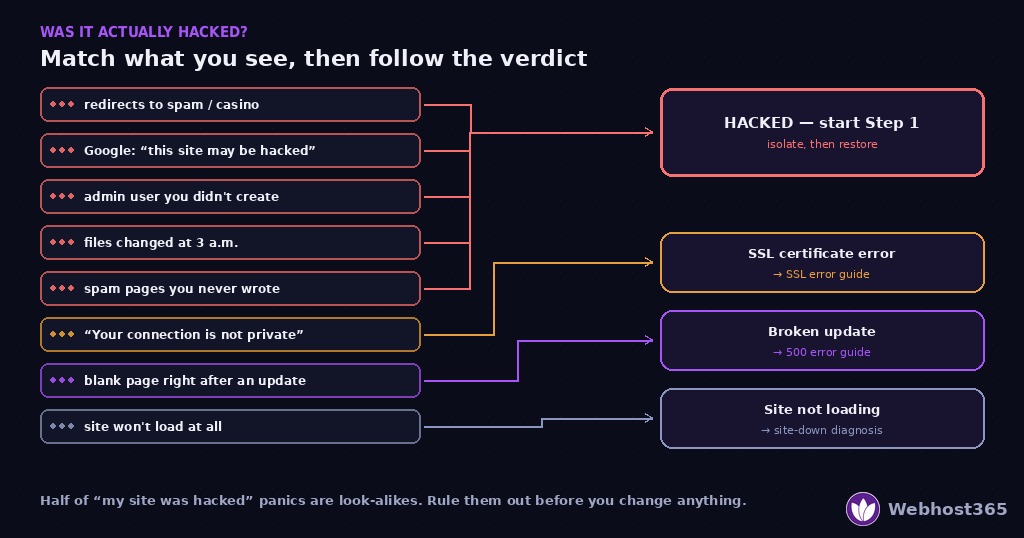
The eight real signs
Your site redirects to another site. Visitors land on a pharmacy, a casino, or a “you won a prize” page. This is the most common sign, and it is almost always a hack. Urgent: it is happening to every visitor right now.
Google labels the site. Search results show “This site may be hacked” or “This site may harm your computer”. Google found injected content or malware. Urgent, because clicks stop immediately.
Admin users you did not create. A new administrator with a strange name or email appears under Users. This is certain proof, because nothing creates admin users on its own.
Files changed when nobody was working. Core files, plugins, or wp-config.php show modification times at 3 a.m. Similarly, new PHP files appear inside wp-content/uploads/, where only images belong.
Pages you never wrote. Hundreds of spam pages for products you do not sell, often hidden from your menu but visible in search results. This is SEO spam, and it is a hack.
Blacklist warnings. Browsers, antivirus tools, or email providers flag your domain. Someone used your site or server to host or send something bad.
Your server sends spam. Your host warns you about outbound email volume, or your domain lands on a spam blocklist. A script on your site is mailing.
Defacement. Your homepage shows someone else’s message. This is the rarest sign today, because modern attackers prefer to stay hidden and profit quietly.
The three look-alikes that are not hacks
Several problems look like a hack and are not. Rule these out first, because each has its own fix.
First, a browser warning that says “Your connection is not private” is a certificate problem, not a breach. Our SSL error guide resolves it in minutes.
Second, a site that shows a blank page or a 500 error right after an update is usually a broken plugin. Our 500 error guide walks you through reading the error and fixing the one thing it names.
Third, a site that does not load at all is more often DNS, hosting, or an expired domain than an attacker. Start with our 5-minute site-down diagnosis instead.
Confirm with an outside scan
If one of the eight signs matches, get a second opinion from outside your site. A free external scanner loads your pages the way a visitor does and reports injected scripts, redirects, and blacklist status. It takes thirty seconds and needs no login.
Treat the result as a signal, not a verdict. A clean scan does not prove a clean site, because scanners only see what the front end shows. However, a flagged scan plus one of the signs above is confirmation enough to move to Step 1.
Step 1: Isolate — Stop the Bleeding
You have confirmed the hack. Now stop it from spreading, and do it before you investigate anything. Every minute the site stays live, visitors get redirected and the attacker keeps access.
Take the site off the public internet
Put the site into maintenance mode, or take it offline entirely at the hosting panel. If your host offers a suspend or “coming soon” toggle, use it. Otherwise, a single .htaccess rule that allows only your IP address does the job:
apache
order deny,allow
deny from all
allow from 203.0.113.45
Replace the address with your own. Visitors now see a blank denial — a 403 Forbidden — instead of the attacker’s redirect, and the attacker’s scripts stop earning.
Change every password, now
Attackers keep working because the credentials they stole still work. So rotate all of them before you look for the cause. In order: your WordPress admin password, every other admin account, the hosting control panel, FTP and SFTP, the database user in wp-config.php, and the email account attached to the admin user.
Then force every logged-in session to end. In WordPress, Users → Your Profile → “Log Out Everywhere Else” does it for you. For other users, a password change ends their sessions automatically. Finally, turn on two-factor authentication for every admin account, because a stolen password alone should no longer be enough.
Note the time, and do not delete anything yet
Write down when you first noticed the problem, and when the site last looked normal. Those two times define the window you will search in Step 2, and they decide which backup is safe to restore in Step 3.
Above all, resist the urge to start deleting suspicious files. They are your evidence. Their timestamps tell you when the attacker got in, and their contents tell you how. Delete them now, and you lose both — and you may still leave the real entry point untouched.
Step 2: Assess — Find How They Got In
Restoring a backup fixes the symptom. Finding the entry point fixes the cause. Skip this step, and you restore a clean site straight into the same open door.
The four ways in
Almost every WordPress compromise uses one of four routes. Knowing which one applies tells you what to look for.
First, an outdated plugin or theme. This is the big one. Patchstack’s State of WordPress Security in 2026 found that 91% of new vulnerabilities in 2025 were in plugins and 9% in themes, with only six in WordPress core. In other words, the software you added is the attack surface, not WordPress itself.
Second, a weak or reused password. Attackers try leaked password lists against /wp-login.php around the clock. A password that appeared in any past breach will eventually work.
Third, stolen credentials or a poisoned download. A “free” premium theme from an unofficial site, or a developer laptop with malware, hands over your keys directly.
Fourth, the host. On shared servers with weak isolation, a neighbour’s compromised account can reach yours. We cover that case in Section 7.
Look for what the attacker left behind
Start with recently changed files, using the time window from Step 1. Over SSH:
bash
find /path/to/site -type f -mtime -14 -not -path "*/cache/*" | sortRead the list carefully. Modified core files, changed .htaccess or wp-config.php, and any PHP file inside wp-content/uploads/ are all red flags. Then check the four other hiding places.
Unknown admin users. In WordPress, open Users and filter by Administrator. Alternatively, query the database directly, because attackers sometimes hide users from the admin list.
Rogue scheduled tasks. Attackers use WordPress cron to reinstall themselves. A plugin such as WP Crontrol lists every scheduled event, and an unfamiliar one is a backdoor.
Redirect rules. Open .htaccess and look for RewriteRule lines you did not write, especially ones that match search-engine referrers.
Fake plugins. List wp-content/plugins/ and compare it with what the admin shows. A folder that exists on disk but not in the plugin list is hiding on purpose.
Read the logs for the entry point
Your access log shows the first request that changed something. Search it for POST requests to unusual paths in the days before the changed-file timestamps:
bash
grep -E "POST .*\.php" /path/to/access.log | grep -v "wp-admin/admin-ajax" | head -50A POST to a plugin file that should never receive one, especially from one IP address repeatedly, is your entry point. Note the plugin. In Step 4, it either updates or leaves.
If you find nothing conclusive, that is still useful. It usually means the entry was a password, so the rotation in Step 1 already closed it.
Step 3: Restore — Don’t Just Clean
This is the step where most guides go wrong, and it is the reason this article exists. They tell you to find every infected file and delete it. That approach fails far more often than people admit.
Why cleanup alone fails
Modern malware does not live in one file. It plants copies in several places, adds a scheduled task to reinstall itself, and sometimes stores a loader in the database rather than on disk. Delete the obvious file, and the hidden copy rewrites it by morning.
That is not a theory. The same Patchstack report documents malware that rewrites itself after cleanup as a defining feature of the 2025 threat landscape. So a manual cleanup is a bet that you found every copy. Restoring a backup from before the breach is not a bet.
Pick the right backup
The right backup is the newest one that predates the compromise. That is why Step 1 told you to note the time, and Step 2 told you to find the earliest changed file.
Take the earliest suspicious timestamp from Step 2. Then choose the most recent backup taken before that time. If your host keeps daily backups — ours run daily with 30-day retention on paid managed plans — you will usually have a clean point within the last month. Our backup strategies guide explains how to check what your backups actually contain.
Restore files and database together
Restore both halves of the site from the same backup. A clean set of files with an infected database, or the reverse, leaves the attacker a way back.
After the restore, do three things immediately. First, apply the credential changes from Step 1 again, because the restore may have brought back old passwords. Second, update the plugin you identified in Step 2, or remove it. Third, run the external scan from Section 1 to confirm the site is clean before you reopen it.
When no clean backup exists
Sometimes every backup is already infected, or there are no backups at all. In that case, rebuild rather than clean.
Download a fresh copy of WordPress core and replace every core file. Delete every plugin and theme folder, then reinstall each one from its official source. Keep only two things from the old site: the wp-content/uploads/ folder and the database. Then scan both.
In uploads, delete any file that is not an image or a document — a .php file there is always malicious. In the database, search the posts and options tables for <script tags and base64_decode strings you did not add, and remove them. That is real work, and it is why a tested backup is worth more than any security plugin.
Step 4: Harden — Close the Door
Your site is clean and the entry point is known. Now make the next attempt fail. Hardening is six changes, and the first two matter more than all the rest combined.
Update everything, then keep it updated
Every plugin, every theme, and WordPress core, today. The entry point you found in Step 2 was almost certainly an outdated component, so this closes it.
Then turn on automatic updates for plugins and themes, not just for core. Remember the number from Step 2: attackers exploit new vulnerabilities within a median of five hours of disclosure. A weekly manual update round leaves a six-day window every week. Automatic updates close most of it.
Delete every plugin you do not use
This is the change most owners skip, and it is the most effective one. Because 91% of vulnerabilities live in plugins, every plugin you keep is a door. A deactivated plugin is still a door, since its files stay on disk and some can still be reached directly.
So go through the plugin list and delete, not deactivate, anything the site does not need. Most sites run twenty or thirty plugins and need ten. Fewer plugins means fewer doors, fewer updates, and less to go wrong. In addition, replace any plugin the developer stopped updating more than a year ago.
Lock down the accounts
Give every user the lowest role that does their job. An editor who only writes posts should be an Author, not an Administrator. Remove accounts for people who left.
Then require two-factor authentication for every administrator, if you did not already in Step 1. Also change the default admin username if it is still admin, because that is the first name every brute-force list tries.
Turn off in-dashboard file editing
WordPress lets administrators edit theme and plugin files from the dashboard. Attackers who gain admin access use exactly that editor to plant code. Disable it with one line in wp-config.php:
php
define( 'DISALLOW_FILE_EDIT', true );Similarly, block PHP execution inside the uploads folder, because Step 2 showed why that folder is a favourite hiding place. A short .htaccess file inside wp-content/uploads/ does it:
apache
<Files *.php>
deny from all
</Files>
Put a firewall in front of the site
A web application firewall inspects requests before they reach WordPress. It blocks known attack patterns and, importantly, can block exploits for a vulnerability before the plugin developer ships a patch. Given that 46% of vulnerabilities had no patch at disclosure, that virtual patching is the only protection during the gap.
Most managed hosts include this layer. On our cloud plans, malware scanning and firewall rules run at the platform level, so the protection exists before you install a single plugin. On a VPS, you run it yourself, and our Linux VPS hardening guide covers the server side.
Make backups you have actually tested
A backup you have never restored is a hypothesis. Restore one to a staging site once, while nothing is wrong, and confirm it comes up clean. That single test is the difference between the twenty-minute recovery in Step 3 and the rebuild-from-scratch path.
Step 5: Notify — Clear the Aftermath
The site is clean and hardened. However, the world does not know that yet. Google, browsers, and blocklists all still remember the hack, and they lift their warnings only when you ask.
Clear Google’s warning
Open Google Search Console and check the Security Issues report. It lists what Google found and sample URLs. Visit a few of those URLs from a device outside your network, because some malware hides itself from the site owner’s IP address.
Once you have confirmed they are clean, select Request a review in the report. Describe what you found and what you did — for example, “restored a backup from before the compromise, removed the vulnerable plugin, rotated all credentials”. Google says a review takes from a few days to a few weeks. Do not resubmit before you get a decision, because repeat submissions on an unfixed site slow the process down.
Clear the other blocklists
Google is not the only list. Check your domain against the major blocklists — browser safe-browsing services, antivirus vendors, and email reputation lists — and request removal from each one that flags you. Most have a simple form, and most clear within days once the site scans clean.
Rotate the keys the site holds
A compromised site exposes every secret stored in it. So rotate them all: payment-gateway keys, email-sending API keys, analytics and ads credentials, CDN tokens, and any third-party integrations. An attacker who kept a payment key does not need your site anymore.
Tell the people affected
If the site stored customer data — accounts, orders, form submissions — assume the attacker could read it. Many jurisdictions require you to notify affected users, and some set a deadline. We are not lawyers, so check the rules that apply to you. In every case, a short honest notice earns more trust than silence that customers discover later.
Resubmit and monitor
Finally, resubmit your sitemap in Search Console so Google recrawls the clean pages. Then watch the site for two weeks: the access log for repeat attempts from the same addresses, the file list for new changes, and the user list for new accounts. An uptime monitor with a keyword check alerts you if the homepage changes again. A clean site that stays clean for two weeks is recovered.
When It’s Your Host’s Fault (and Whether to Move)
Most WordPress hacks come through the site’s own plugins and passwords. Some do not. A few signs point at the hosting platform instead, and they change both the fix and the conversation you need to have.
Three signs it was the host
First, re-infection after a clean restore. You restored a backup from before the breach, rotated every credential, and updated everything — and the malware came back within days anyway. That pattern means the entry point is outside your site.
Second, every site on the server got hit at once. One site compromised is a plugin. A dozen unrelated sites compromised on the same day is the server.
Third, files changed with no request in your access log. If your site’s log shows nothing but the files changed anyway, something wrote to the disk from outside the web server. On a shared server, that is usually a neighbouring account with too much reach.
What to ask your host
Send the evidence, then ask three direct questions. Include the timestamps of the changed files, the entry point you found or failed to find, and whether you saw re-infection after a clean restore.
Then ask: Was there a server-level incident in this window? How are accounts isolated from each other on this server? And what changed on the platform between the restore and the re-infection? A competent host answers all three in the first reply, because they have the server logs you cannot see.
Whether to move
The honest answer is that it depends on the reply. A host that explains what happened, shows you the isolation model, and fixes the platform gap is worth staying with. A host that says “please update your plugins” to a question about server isolation has told you something important.
If you do move, our website migration guide covers the process. Move the clean, restored version of the site, never the compromised one, and rotate credentials once more after the move. We migrate sites free on every plan, and part of that process is a scan before the site goes live.
Why This Keeps Happening in 2026
If it feels like WordPress hacks are more frequent than they used to be, the data agrees. Patchstack’s State of WordPress Security in 2026, published in February, put numbers on it.
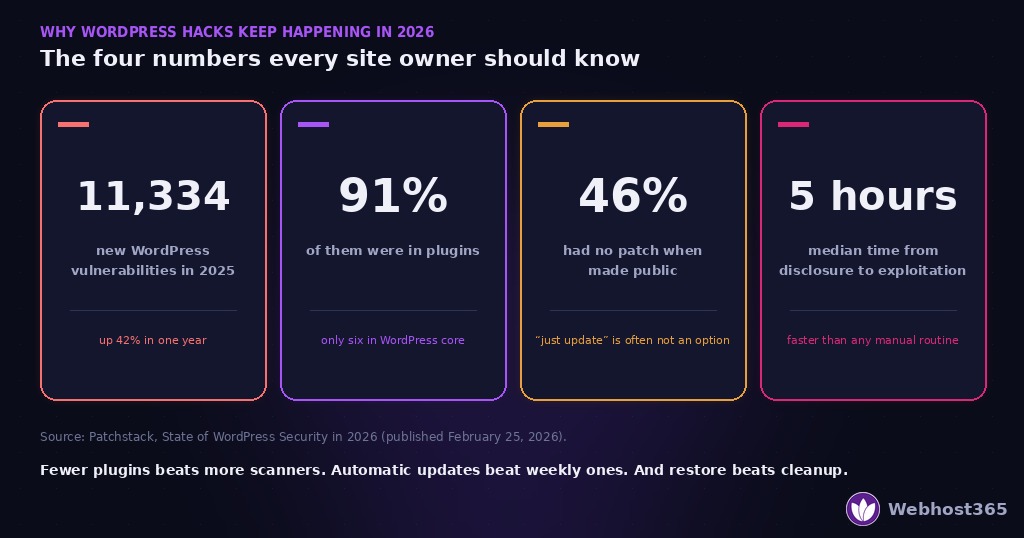
The four numbers that matter
| The finding | The number | What it means for your site |
|---|---|---|
| New vulnerabilities found in 2025 | 11,334 (up 42%) | More doors than ever, and the rate is rising |
| Share found in plugins | 91% (six in core) | Your plugin list is the attack surface |
| Had no patch at disclosure | 46% | Nearly half the time, “just update” is not an option yet |
| Median time to exploitation | 5 hours | Attackers move faster than a weekly update habit |
Independent coverage of the report in The Repository added two more findings worth knowing. Highly exploitable vulnerabilities rose 113% year on year. And in Patchstack’s testing, common hosting defences blocked only 12% of known WordPress-specific attacks.
What the numbers change
Put them together and three conclusions follow. First, plugin count is the risk, so deleting unused plugins does more than any scanner. Second, automatic updates are mandatory, because a five-hour window beats every manual routine. Third, updates alone are not enough, because nearly half of vulnerabilities go public unpatched — which is why a firewall with virtual patching sits in Step 4.
In short, the threat has become faster than human maintenance. The sites that stay clean in 2026 are the ones with fewer moving parts and automated defences, not the ones with the most diligent owners.
Final Thoughts
Here is the whole method in six steps. Confirm the hack is real, because half the panics are look-alikes. Isolate the site and rotate every password. Find how they got in, because you must close that door. Restore a backup from before the breach instead of hunting infected files. Harden the site: update, delete unused plugins, lock accounts, add a firewall. Then clear Google’s warnings and rotate every key the site held.
The one line to remember: restore beats cleanup, and fewer plugins beats more scanners.
And if you are on managed hosting, part of this list is already someone else’s job. On our WordPress plans, daily backups with 30-day retention mean a clean restore point always exists, and our support team will tell you plainly whether an incident was yours or ours — because a hack has a real cause, and hiding it from you helps nobody.
FAQ
Look for the eight real signs: redirects to other sites, a “this site may be hacked” label in Google, admin users you did not create, files modified when nobody was working, spam pages you never wrote, blacklist warnings, spam sent from your server, or defacement. Then rule out the look-alikes. A certificate warning, a blank page after an update, or a site that does not load at all are usually not hacks. Confirm with a free external scanner before you change anything.
Restore a backup from before the compromise whenever one exists. Modern malware plants copies in several places and rewrites itself after cleanup, which Patchstack’s 2026 report documents as a defining feature of current threats. Manual cleanup is a bet that you found every copy. Restoring a clean backup, then rotating every credential and closing the entry point, is not. Clean by hand only when no clean backup exists.
Yes, if you follow a fixed order and have a clean backup. Confirm, isolate, assess, restore, harden, notify — each step in this guide is achievable with control-panel or FTP access. The hard cases are sites with no clean backup, which need a rebuild from fresh WordPress files, and sites that re-infect after a clean restore, which usually point at the host rather than the site.
Google does not penalise you for being a victim, but it does warn users away from a hacked site, which stops your traffic just as effectively. The label lifts when you clean the site and request a review in the Security Issues report in Search Console. Google says reviews take from a few days to a few weeks. Rankings usually recover after the label lifts, provided the spam pages are gone and your sitemap is resubmitted.
Three possibilities. First, the vulnerability had no patch yet: 46% of WordPress vulnerabilities in 2025 were disclosed before a fix existed. Second, the entry was a password, not a plugin — a reused or weak admin password works no matter how current your software is. Third, the compromise came through the hosting platform, which shows up as re-infection after a clean restore or as every site on the server hit at once.
If the site stored personal data — accounts, orders, form submissions — assume the attacker could read it, and check the notification rules that apply to your country and industry. Many require notice, and some set a deadline. We are not lawyers. Beyond the legal question, a short honest notice earns more trust than a silence customers discover later.