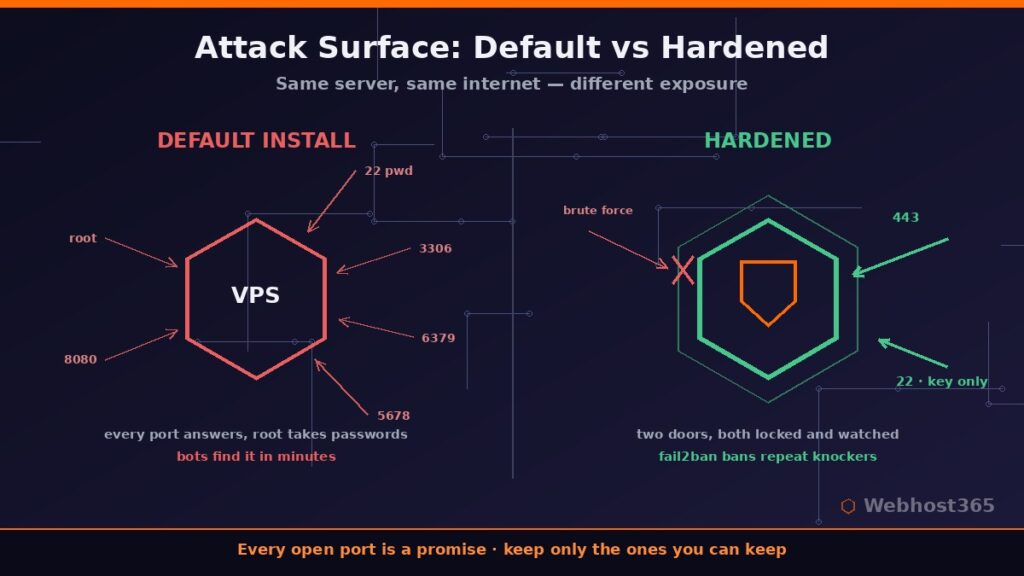
Boot a fresh VPS, wait ten minutes, and read your auth log. On our own fleet, a brand-new server with a public IP starts receiving SSH brute-force attempts within minutes of coming online — before it hosts anything, before anyone knows it exists. Nobody targeted you. Automated scanners sweep the entire IPv4 space continuously, probing every new address for default configurations and weak passwords.
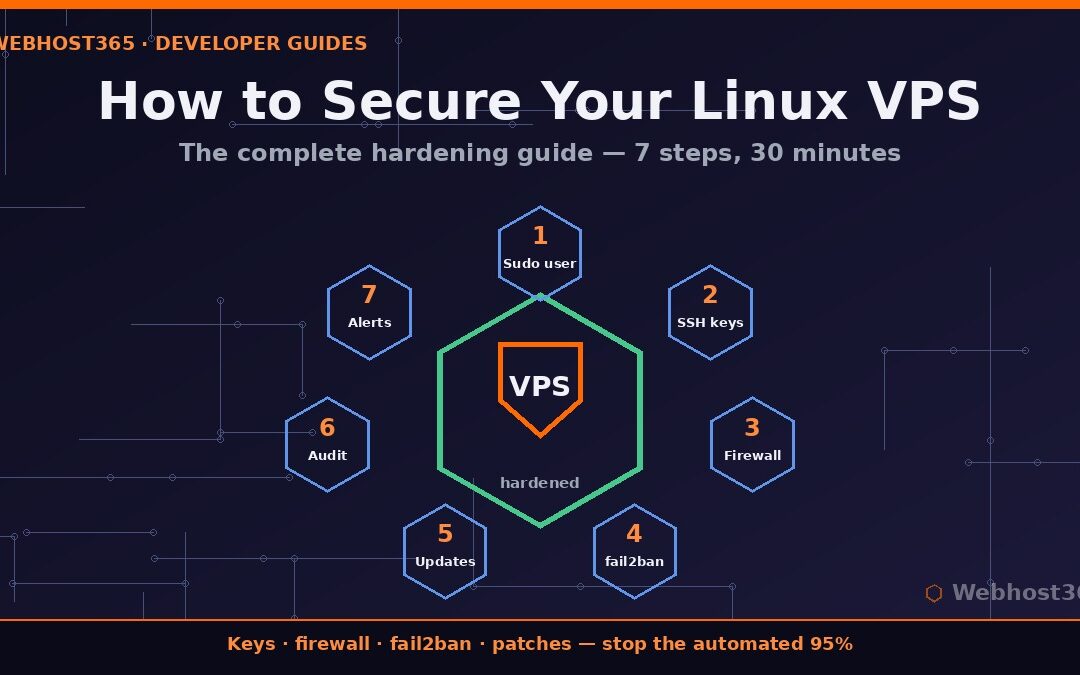
That is the honest starting point for anyone learning to secure a Linux VPS: the attacks are constant, automated, and entirely survivable. This guide walks through the exact hardening sequence I apply to every new server we deploy, in the order that matters, with every command shown and every choice explained. Budget about thirty minutes. By the end, the background noise in your logs becomes just that — noise bouncing off a locked door.
Before You Start: Know What Actually Attacks a VPS
Forget movie hackers. The realistic threat model for a small server is unglamorous: bots brute-forcing SSH passwords around the clock, scanners hunting for services left open on default ports, exploit scripts probing for unpatched software, and credential-stuffing attacks reusing passwords leaked from other sites. None of these adversaries is patient or clever. They are scripts playing a numbers game across millions of IPs.
That shapes the strategy to secure a Linux VPS, and it is refreshingly simple. First, reduce the attack surface so there is less to probe. Second, make the remaining entry points expensive to attack. Third, keep software patched so known exploits find nothing to exploit. Fourth, arrange to notice when something is wrong. The seven steps below follow exactly that order, and each one closes a specific door the bots are checking.
One assumption before we begin: the commands target Ubuntu and Debian, the most common VPS images, and they translate directly to most other distributions. Log in as root one last time — by the end of step two, that habit ends.
Step 1: Create a Non-Root User with Sudo
Working as root daily is the original sin of server administration. Every command carries full destructive power, every compromised session hands an attacker the entire machine, and every log entry says “root” instead of telling you who did what. The fix takes one minute:
adduser deploy
usermod -aG sudo deploy
Pick any username you like — attackers’ wordlists are full of “admin” and “ubuntu,” so an unusual name is a tiny bonus. Now verify the new account can actually elevate privileges:
su - deploy
sudo whoami
If that prints “root,” your sudo access works. Do not skip this test. The classic self-inflicted lockout is disabling root login in step two before confirming the replacement account works, and the only cure at that point is your provider’s rescue console.
Step 2: Lock Down SSH
SSH is the front door of your server and the single most attacked service on the internet. Securing it properly eliminates the overwhelming majority of the hostile traffic your VPS will ever see, which is why it comes before everything else when you secure a Linux VPS.
Switch to SSH Keys
Passwords can be guessed; a 256-bit key cannot. On your local machine — not the server — generate a modern Ed25519 keypair:
ssh-keygen -t ed25519 -C "deploy@yourserver"Then copy the public half to the server:
ssh-copy-id deploy@your-server-ipTest it: open a new terminal and SSH in as the deploy user. If you land in a shell without typing a password, the key is working. Your private key never leaves your machine; guard it accordingly.
Harden the SSH Daemon
With key access confirmed, edit the server’s SSH configuration:
sudo nano /etc/ssh/sshd_configSet these three lines, adding them if absent:
PasswordAuthentication no
PermitRootLogin no
PubkeyAuthentication yes
The first line makes every password-guessing bot on Earth permanently irrelevant to you. The second closes the most-attacked username outright. The full directive reference lives in the official sshd_config documentation if you want to go deeper.
A word on changing the SSH port, since every guide mentions it: moving SSH from port 22 to something obscure does not add real security — scanners find nonstandard ports in seconds. What it does add is quieter logs, which has genuine value when you start reading them in step seven. I run nonstandard ports on our fleet for exactly that reason, but treat it as housekeeping, not protection.
Restart Safely
Here is the operator habit that prevents lockouts: keep your current SSH session open, restart the daemon, and test the new rules from a second terminal.
sudo systemctl restart sshdIf the second terminal connects with your key and refuses passwords, the door is properly locked. Only then close the original session. From this point on, your server no longer speaks to password-guessing bots at all — they knock, get refused at the protocol level, and move on to softer targets.
Step 3: Firewall — Allow Only What You Serve
A firewall flips your server’s posture from “everything open unless closed” to “everything closed unless opened.” On Ubuntu and Debian, ufw makes this a five-command job, but the order of those commands matters enormously, because enabling a firewall that does not allow SSH disconnects you on the spot.
Set the default policy first, then punch holes only for what this server actually serves:
sudo ufw default deny incoming
sudo ufw default allow outgoing
sudo ufw allow OpenSSH
sudo ufw allow 80/tcp
sudo ufw allow 443/tcp
Allow OpenSSH before anything else — that line is your lifeline. The web ports apply only if this machine serves websites; a database-only or automation-only server should skip them entirely. Now enable and verify:
sudo ufw enable
sudo ufw status verbose
If you changed your SSH port in step two, allow that port number instead of the OpenSSH profile. The rule of thumb for anyone hardening a Linux VPS: every open port is a promise that something safe answers there. Three open ports means three promises to keep — thirty means you have lost track.
Application servers deserve one extra note. Services like n8n, dashboards, and APIs should never expose their own ports to the internet directly. Bind them to localhost and publish them through a reverse proxy on 443, so TLS, access control, and your firewall story all live in one place.
Step 4: fail2ban — Make Brute Force Expensive
Even with passwords disabled, hostile connections still arrive, fill your logs, and consume resources. fail2ban watches the auth log and temporarily bans IPs that fail repeatedly, turning an infinite guessing game into a few attempts followed by silence.
sudo apt install fail2banNever edit the shipped configuration directly — updates overwrite it. Create a local override instead:
sudo nano /etc/fail2ban/jail.localA sane starting jail looks like this:
[sshd]
enabled = true
maxretry = 4
findtime = 10m
bantime = 1h
Translation: four failures within ten minutes earns a one-hour ban. Start the service and confirm the jail is live:
sudo systemctl enable --now fail2ban
sudo fail2ban-client status sshd
Check back in a day and that status command will list banned IPs — on our edge fleet, a fresh node typically collects its first bans within hours. There is no better morale boost in server administration than watching the door slam automatically. The project’s official documentation covers extending jails to other services when you host more than SSH.
Step 5: Automatic Security Updates
Most successful server compromises do not involve clever zero-days; they exploit vulnerabilities that were patched months earlier on machines nobody updated. Automating security patches removes the human forgetfulness from that equation:
sudo apt install unattended-upgrades
sudo dpkg-reconfigure -plow unattended-upgrades
Answer yes, and Ubuntu’s unattended-upgrades will install security patches daily without your involvement. The default configuration applies security updates only — not feature upgrades — which is exactly the conservative behavior a production server wants. Application updates deserve human judgment; security patches do not need to wait for it.
Two refinements are worth making in /etc/apt/apt.conf.d/50unattended-upgrades. Enable the email or log notification so you know what changed, and decide your reboot policy: some kernel patches only take effect after a restart, and the config can either reboot automatically at a quiet hour or simply leave a flag. Check for that flag whenever you log in:
cat /var/run/reboot-required 2>/dev/nullA pending-reboot server is patched on disk but not in memory. On our fleet the rule is simple: the flag never survives the week.
Step 6: Reduce the Attack Surface
Every service listening on a public port is a doorway, and you cannot defend doorways you forgot exist. Audit what your server actually exposes:
sudo ss -tulpnRead the output ruthlessly. SSH, your web server, and little else should listen on public interfaces. Anything bound to 0.0.0.0 that does not need internet exposure — databases, Redis, application ports, admin panels — should either be removed, disabled, or rebound to 127.0.0.1 so only the server itself can reach it:
sudo systemctl disable --now servicenameOne trap deserves its own warning, because it bites almost everyone who learns to secure a Linux VPS and then installs containers: Docker publishes ports by manipulating iptables directly, which means it walks straight past your ufw rules. A container started with -p 5678:5678 is internet-reachable even though ufw shows nothing allowed. The fix is publishing to localhost only — -p 127.0.0.1:5678:5678 — and exposing through your reverse proxy, a pattern we covered in detail in our guide to deploying Docker on a VPS. I learned this one from a scanner finding a “firewalled” container port on our own infrastructure years ago; the lesson stuck.
Step 7: Know When Something Is Wrong
Hardening without visibility is locking the doors and never checking the windows. You do not need an enterprise SIEM — you need two habits and one automation.
Habit one: read your auth log occasionally. A single command shows who actually got in and who was refused:
sudo journalctl -u ssh --since todayHabit two: watch for change. Failed sudo attempts, logins at strange hours, unfamiliar IPs succeeding — these are the signals worth a closer look, and fail2ban’s logs give you the attack-side picture for free.
The automation: alerts should come to you, not wait to be found. The simplest robust pattern is a scheduled workflow that checks your indicators and fires a webhook alert to your chat when something deviates. Our collection of practical n8n workflow examples includes two purpose-built for exactly this — the SSL certificate expiry watch and the daily backup verification — and both run comfortably on a free instance.
Backups are the final layer, because hardening prevents but never guarantees. A server you can rebuild in an hour converts a catastrophe into an inconvenience, and the 3-2-1 backup strategy we documented is the standard worth meeting. Hardening protects the server you have; backups protect the business it runs.
The 30-Minute Checklist
Here is the entire guide compressed into the sequence I run on every new node. Work top to bottom — the order prevents lockouts.
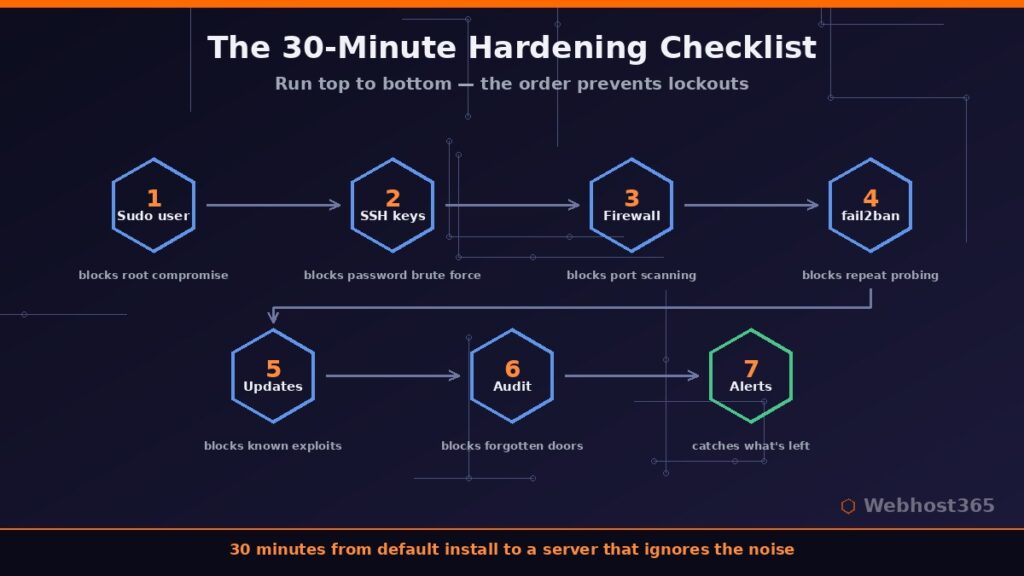
| Step | Action | What it blocks |
|---|---|---|
| 1. Sudo user | adduser + usermod, test sudo | Root compromise, anonymous logs |
| 2. SSH keys | ed25519 keys, no passwords, no root login | All password brute force |
| 3. Firewall | ufw deny incoming, allow SSH/80/443 | Port scanning, stray services |
| 4. fail2ban | sshd jail in jail.local | Repeated probing, log noise |
| 5. Auto updates | unattended-upgrades, security only | Known-exploit attacks |
| 6. Surface audit | ss -tulpn, bind internal to localhost | Forgotten doorways, Docker bypass |
| 7. Visibility | log habits + webhook alerts + backups | Silent compromise |
Print it, script it, or just run it from memory — after the third server it becomes muscle memory anyway.
Conclusion: Hardening Is a Habit, Not a Project
The honest summary of how to secure a Linux VPS fits in one sentence: stop the automated 95 percent with keys, a firewall, fail2ban, and patches — then stay observant for the rest. None of the seven steps requires deep expertise, all of them together take half an hour, and the result is a server where the constant background scanning of the internet simply stops mattering. Security is not a product you install once; it is the small set of defaults and habits this guide just handed you.
What it does require is a server where you hold root and make the rules. Our Linux VPS 365 plans start at $4.99 per month with full root access, NVMe storage, and AMD EPYC processors — everything in this guide applies out of the box, and your renewal price stays exactly what you signed up at. Spin one up, set a thirty-minute timer, and put this checklist to work.
FAQ: Securing a Linux VPS
Follow seven steps in order: create a sudo user, switch SSH to key-only authentication with root login disabled, enable a default-deny firewall, install fail2ban, turn on automatic security updates, audit listening services, and set up basic log and alert habits. The full sequence takes about thirty minutes on a fresh server.
It is optional housekeeping, not security. Scanners locate SSH on any port within seconds, so the protection comes from keys and fail2ban, not the port number. The genuine benefit is dramatically quieter logs, which makes real anomalies easier to spot.
Keys make password guessing futile, but bots still hammer the port, bloat your logs, and waste connections. fail2ban silences them at the network level and also protects other services — web logins, mail, panels — that keys do not cover. The two measures complement rather than replace each other.
Security patches should install automatically every day via unattended-upgrades. Application and feature upgrades deserve a human decision on your own schedule — weekly or monthly works for most servers — plus a prompt reboot whenever the reboot-required flag appears after kernel updates.
For a typical hardened VPS, no — the measures in this guide address the actual threat model. Malware scanning earns its place when your server stores user-uploaded files or serves a CMS with plugins, where tools like ClamAV add a useful layer. Keys, firewall, patches, and visibility come first in every case.