
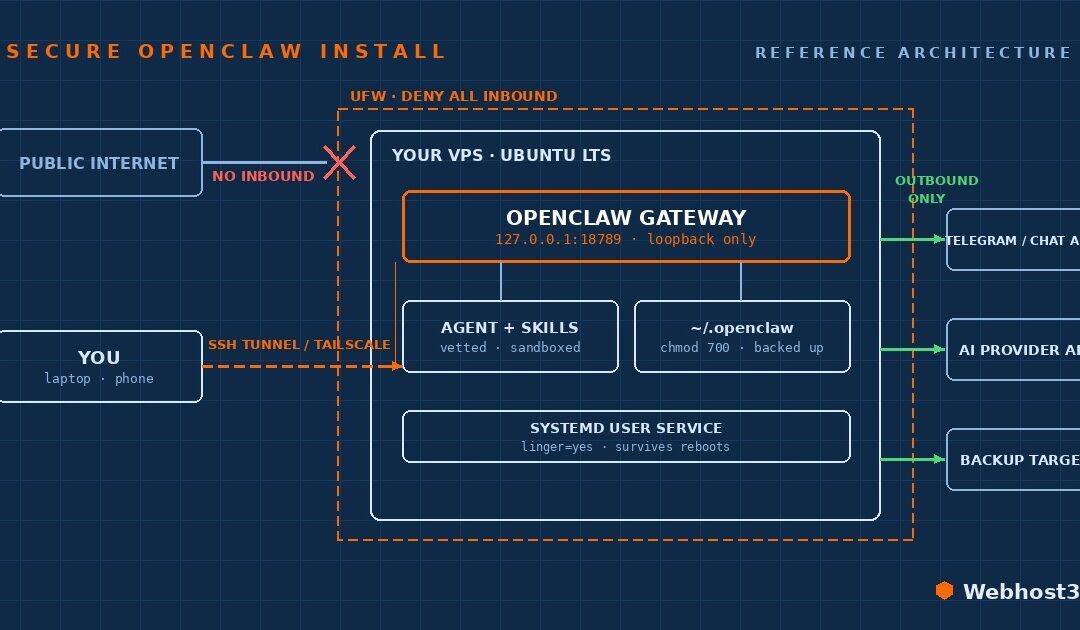
Installing OpenClaw on a VPS securely takes about thirty minutes: harden the server first — SSH keys only, a firewall allowing nothing but SSH, a dedicated non-root user — then run the installer and keep the gateway and dashboard private rather than exposed to the internet. The order matters more than the commands: this guide does the hardening before the install, because retrofitting security onto a live agent is how most compromised instances started.
OpenClaw’s installer is famously a single command. That’s the good news, and it’s also precisely the problem: the distance between “installed” and “installed safely” is where tens of thousands of people went wrong in the project’s first year. This guide walks you through how to install OpenClaw on a VPS with the security decisions built into the steps themselves, not bolted on as an afterthought you’ll get to someday.
A note on where this advice comes from. At Webhost365 we run OpenClaw as a managed, multi-tenant service, which means hardening instances is not a weekend hobby for us but the day job. What follows is the distilled, single-server version of the checklist we use in production, written for anyone setting up their own box, whatever provider it lives on.
Why “the Secure Way” Is Part of the Title
Think about what an OpenClaw instance actually holds once it’s doing useful work: a shell on your server, read and write access to files, your AI provider keys, tokens for your chat channels, and a persistent memory of everything you’ve told it. That’s a wonderful amount of capability, and a terrible thing to leave unlocked.
The project’s history makes the stakes concrete. Older versions bound the gateway’s control port to every network interface by default, and enough people installed, saw it work, and moved on that internet-wide scans in early 2026 found tens of thousands of instances reachable from the public internet, a portion of them wide open to remote code execution. Add a community skill marketplace where independent audits have flagged malicious packages, and you have the two failure modes responsible for nearly every real OpenClaw incident: an exposed gateway, and untrusted code invited inside.
Here’s the encouraging part. Neither failure mode requires anything exotic to prevent. The fixes are boring, well-understood Linux hygiene applied in the right order, and the project itself is open source and moving fast on safety. Boring, applied early, is exactly what this guide delivers.
What You Need Before You Start
A VPS running Ubuntu LTS. Any provider works, and every command here also behaves on Debian. For sizing, treat 2 vCPU cores and 4 GB of RAM as the comfortable floor for a personal agent; step up to 8 GB if you plan on heavy browser automation or running local models alongside, and give it 20 GB of disk so updates and logs never fight for space. Nothing below assumes a particular host, and nothing requires Docker: the installer runs natively and brings its own Node.js runtime.
An API key from your AI provider. One planning note so it doesn’t surprise you later: since April 2026, consumer chatbot subscriptions no longer power third-party agents, so budget for metered API access or a local model from the start.
A channel plan. Decide where you’ll talk to your agent. Telegram is the gentlest first channel on a server: creating a bot takes two minutes, and it needs no port forwarding, which suits our no-public-exposure approach perfectly.
SSH access and about forty-five minutes. That’s the whole shopping list. Two things are deliberately absent from it: we will not expose anything to the public internet, and we will not run the agent as root. Those two omissions are the spine of everything that follows, and by the end you’ll be able to verify both with single commands.
Prepare the Server: Ten Minutes of Boring Hygiene
Whether your box is a fresh Oracle instance from our free OpenClaw hosting guide or a VPS you just spun up elsewhere, it arrives the same way: a root login and a wide-open future. The next ten minutes close that gap, and everything in this section is standard Ubuntu hygiene you’ll reuse on every server you ever run.
Log in as root once, update everything, and create the user your agent will live as:
apt update && apt upgrade -y
adduser claw
usermod -aG sudo claw
On our fleet, agent users carry no sudo at all; on a personal box, one sudo user you actually use beats a root account you forget to disable. If you want the stricter split, create a second user without the sudo group and run the agent there.
Now put your SSH key on the new account. From your local machine:
ssh-copy-id claw@your-server-ipConfirm you can log in as claw with the key, and keep that session open while you lock the door behind you. Edit /etc/ssh/sshd_config so these two lines read:
PermitRootLogin no
PasswordAuthentication no
Then apply and test from a second terminal before closing anything:
sudo systemctl restart sshFinally, the firewall. Deny everything inbound except SSH:
sudo ufw default deny incoming
sudo ufw default allow outgoing
sudo ufw allow OpenSSH
sudo ufw enable
Run sudo ufw status verbose and read it once. That deny-by-default line is your safety net for the rest of this guide: even if a service inside the box misbehaves, nothing reaches it from outside.
Install OpenClaw
Everything so far was preparing the ground. Now, logged in as claw and never as root, you install OpenClaw on a VPS the way the project intends, with its official installer:
curl -fsSL https://openclaw.ai/install.sh | bashIf piping a script from the internet into your shell makes you twitch, good instinct: download it first, read it, then run it. What it does is unexciting in the best way, fetching its own Node.js runtime and the OpenClaw CLI into your user’s home, with no root required on Linux. The getting started docs cover platform variations if your setup is unusual.
Then start the guided setup:
openclaw onboardThe wizard walks you through the pieces you prepared earlier: your AI provider key, a model choice, and your first channel. Take the defaults unless this guide says otherwise; they’re sensible. One default worth appreciating rather than removing: the wizard generates a gateway access token even for local-only use, so other processes on the box can’t quietly talk to your agent without it.
The Binding Check That Matters Most
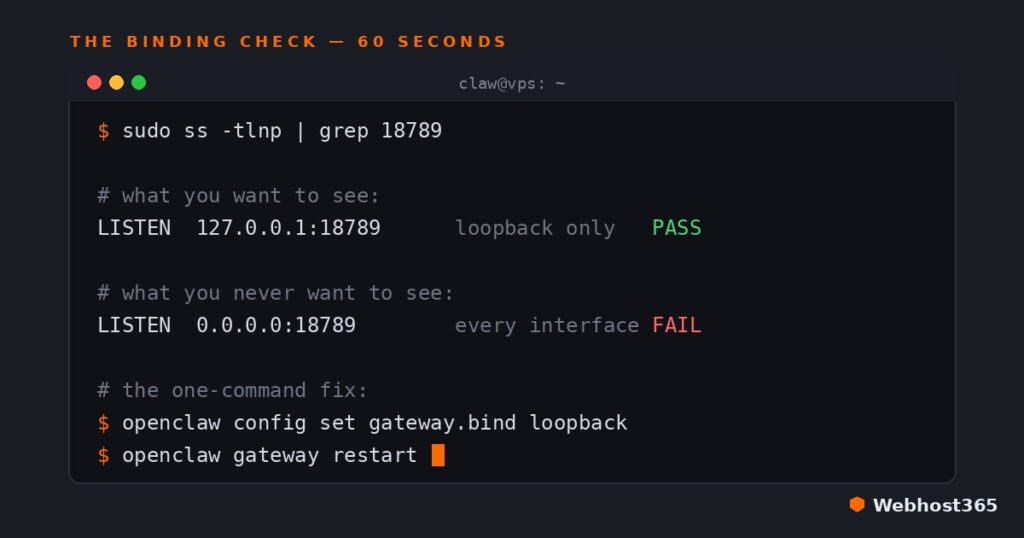
Before you connect a single channel, spend sixty seconds confirming the one setting that separated the tens of thousands of exposed instances from everyone else. Ask the server what’s listening on the gateway port:
sudo ss -tlnp | grep 18789What you want to see is the gateway bound to loopback only:
127.0.0.1:18789What you never want to see is 0.0.0.0:18789 or [::]:18789, which means every interface, including the public one. Current releases default to loopback and will even refuse to start a non-loopback bind without authentication configured, so a fresh install should pass this check on the first try. Run it anyway. Older installs, migrated configs, and copied-over Docker setups are exactly where surprises live.
If the check fails, the fix is one command and a restart:
openclaw config set gateway.bind loopback
openclaw gateway restart
The setting lives in ~/.openclaw/openclaw.json under the gateway key if you prefer editing directly, and the gateway configuration reference documents every mode. And remember your firewall from the last section: with inbound denied by default, even a misbound gateway has a second wall between it and the internet. Defense in depth means never needing to be lucky twice.
Reaching Your Agent Privately
The first question everyone asks after they install OpenClaw on a VPS: if the gateway only listens on localhost, how do I open the dashboard from my laptop? The answer is never “open a port.” It’s one of three private paths, ranked here from simplest to most comfortable.
An SSH tunnel costs nothing and uses software you already have. One command from your laptop bridges the server’s loopback to yours:
ssh -L 18789:127.0.0.1:18789 claw@your-server-ipWhile that session is open, http://127.0.0.1:18789 in your local browser is your agent’s interface, exactly as if it ran on your own machine. Perfect for occasional check-ins; tedious as a daily habit.
Tailscale is the daily-driver answer. Install it on the server and your devices, and they share a private encrypted network no one else can reach; your SSH and tunnel commands work over it unchanged, with no public exposure anywhere. OpenClaw treats this as a first-class citizen: the same configuration reference we linked earlier documents a native tailnet bind mode and a serve mode that publishes the interface to your private network only, while the gateway itself stays bound to loopback.
A public reverse proxy with authentication is the option we list only to rank it last. It can be done carefully, but for a personal agent it trades your strongest guarantee, unreachability, for convenience the first two options already provide. Skip it unless a hard requirement forces your hand.
One modern bonus: the official mobile apps pair to your own gateway, so put your phone on the same Tailscale network and the private path covers you from anywhere.
Keep It Running: Boots, Crashes, and Log-Outs
Right now your gateway dies with your SSH session. The CLI fixes that by installing itself as a systemd user service, but headless servers hide a trap: user services only run while their user has a login session. The fix is one command called lingering, and skipping it is the single most common reason a fresh OpenClaw server “randomly stops” the moment you disconnect. Enable it first, then install the service:
sudo loginctl enable-linger claw
openclaw gateway install --systemd
If the installer complains about a missing user bus, log out and back in once, then rerun it. From here the gateway survives reboots, crashes, and closed laptops, and two commands answer the only questions that matter, is it alive and what did it just do:
openclaw gateway status
journalctl --user -u openclaw-gateway -f
Bookmark the second one. Every debugging session for the rest of this guide starts there.
Connect Your First Channel
Time to give the agent a doorbell. In Telegram, message @BotFather (verify the handle exactly), send /newbot, follow the prompts, and copy the token it hands you. That token goes into ~/.openclaw/openclaw.json:
{
  channels: {
    telegram: {
      enabled: true,
      botToken: "paste-your-token-here",
      dmPolicy: "pairing"
    }
  }
}
Restart the gateway so the channel loads, then send your bot any message; bots can’t speak first, so this opening message from you is mandatory. Because the DM policy is pairing, the bot replies not with an answer but with a pairing code. That’s a security feature earning its keep: nobody talks to your agent until you vouch for them on the server itself.
openclaw pairing list telegram
openclaw pairing approve telegram <CODE>
Codes expire after an hour, so approve while it’s fresh. Send one more message and this time the agent answers. Notice what never happened in this section: no port opened, no firewall rule added, no webhook exposed. Telegram’s default transport is long polling, meaning your server dials out to Telegram and nothing dials in. The doorbell works, and the door stays locked.
Skills Without Regrets
Skills are how OpenClaw goes from clever to useful, and ClawHub is where thousands of them live. Treat it exactly like what it is: a package registry where anyone can publish, which means every skill is untrusted code until you’ve read it. Independent audits keep finding malicious packages and prompt-injection attempts in community skills, and none of that should surprise anyone who lived through the same era in every other package ecosystem.
The vetting rules that keep you out of trouble are short. Install few: every skill is capability you now have to account for. Read the source before installing; skills are small, and ten minutes of reading beats a compromised server. Prefer widely used, recently maintained skills over clever obscure ones. And watch what a skill asks to touch, because a weather skill that wants shell access is telling you everything you need to know.
One more lever most people skip: OpenClaw supports sandboxed tool execution as an alternative to full system access, and the tool-execution section of the official docs covers the switch. On a personal server, sandboxed-by-default with exceptions you consciously grant is the posture that matches everything else in this guide. On our fleet, skills are allowlisted per tenant; your personal equivalent is simply a short list you’ve actually read.
Scope the Keys
An agent can only leak what it holds, so hold less. Give OpenClaw its own API keys rather than reusing ones from other projects, set spending caps at the provider dashboard, and grant each integration the minimum scope that makes it work: a calendar token that can read but not delete, a repository token limited to the repos the agent genuinely needs. If part of your workload runs on local models instead, that entire category of key disappears from the box; our guide to choosing a VPS for Ollama covers when that trade makes sense.
Then lock the room where everything lives. Your config, channel tokens, and the agent’s memory all sit under ~/.openclaw, so make it readable by its owner alone:
chmod 700 ~/.openclaw
chmod 600 ~/.openclaw/openclaw.json
Two commands, and every other account on the box just lost the ability to read your agent’s secrets.
Updates Without Surprises
OpenClaw moves fast, which cuts both ways on a server: updates carry security fixes you want promptly, and updates carry change you don’t want discovering at 3 a.m. The project resolves this tension with release channels. The dev channel is for people who enjoy churn. The stable channel is the sensible default. And as of mid-2026 there’s an extended-stable track built for exactly what you’re running, a long-lived deployment that values predictability over novelty; check openclaw update --help for the current channel identifiers, then switch with:
openclaw update --channel stableWhatever channel you choose, give updates a rhythm instead of a reflex: a monthly window where you read the release notes, update deliberately, and then rerun the sixty-second binding check from earlier. Configuration defaults can evolve between versions, and the check that took one minute is how you make sure an update never quietly changed your exposure.
Back Up the Agent’s Brain
Here’s the mental model: the server is replaceable, the state is not. Everything that makes your agent yours, its configuration, channel tokens, and accumulated memory, lives in ~/.openclaw, and a fresh VPS plus that directory equals your agent resurrected. So back up the directory nightly and ship it off the box:
0 3 * * * tar -czf /home/claw/backups/openclaw-$(date +\%F).tar.gz -C /home/claw .openclawThat cron line (the escaped \% is required in crontabs, a classic gotcha) produces a dated archive at 3 a.m.; copy it to object storage or a second machine by whatever tool you already trust. If you’ve pointed the agent at a separate workspace directory, include it. Two caveats earn their place here. First, these archives contain live tokens, so encrypt them or store them somewhere exactly as locked down as the server itself. Second, a backup you’ve never restored is a hope, not a backup: extract one onto a scratch directory once, confirm the config and memory files are really inside, and you’ll never have to find out during an emergency.
The Five-Minute Verification Checklist
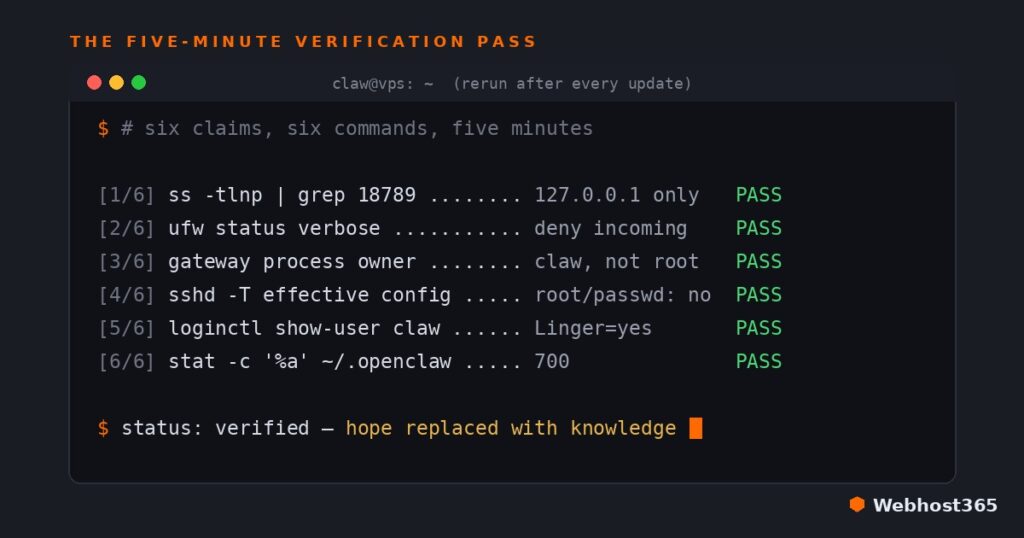
Before you call it done, prove it. Each line below is one claim this guide made and one command that verifies it; the whole pass takes five minutes, and it’s the same pass to rerun after every update. Anyone can install OpenClaw on a VPS — this list is the difference between hoping it’s secure and knowing.
- The gateway is loopback-only. Run
sudo ss -tlnp | grep 18789and confirm the only listener is127.0.0.1:18789. Any0.0.0.0or[::]entry fails the check. - The firewall denies by default. Run
sudo ufw status verboseand read three things: status active, default deny incoming, and OpenSSH as the only allow rule. - The agent runs unprivileged. Run
ps -o user= -p $(pgrep -f openclaw | head -1)and expectclaw, neverroot. - SSH is actually hardened. Run
sudo sshd -T | grep -E 'permitrootlogin|passwordauthentication'— this prints the effective config, not the file you think you edited — and expectnoon both lines. - It survives your logout. Run
openclaw gateway statusfor the service state, thenloginctl show-user claw | grep Lingerand expectLinger=yes. - Secrets are locked down. Run
stat -c '%a %U' ~/.openclawand expect700 claw. Then open your dashboard and read your installed skills list once; any name you don’t recognize is your finding.
Six green checks and you’re running an instance that would have sailed through every scan that made headlines.
Final Thoughts
If working through this guide was satisfying, congratulations: you now own your agent’s security posture outright, and the monthly rhythm of update, verify, and back up will keep it that way. That’s a genuinely good place to be, and the checklist above means you never have to wonder.
If instead this read like a second job you didn’t apply for, that’s an equally honest outcome, and it’s exactly the gap our managed OpenClaw hosting exists to close: isolation, loopback-only gateways, hardening, updates, and backups as someone else’s day job, with a free tier to start on. Same destination, different driver.
Either way, the three rules travel with you: keep the gateway private, treat skills as untrusted code, and hold fewer secrets than you think you need. Everything else in this guide is those three rules with commands attached.
Two things pair naturally with this setup. Size the box first with the OpenClaw requirements guide and its calculator, then budget your monthly running costs — hosting is the predictable part, and tokens are where the real variation lives. When you’re ready to get more out of the same server, the same hardened base extends to running OpenClaw and n8n together on one VPS, with the automation engine kept entirely on the loopback interface.
FAQs
Yes, and this guide deliberately doesn’t use it. The official installer runs natively on Linux and brings its own Node.js runtime, which keeps the moving parts to a minimum. Docker is a legitimate alternative if containers are already your workflow, but note that container networking changes how the gateway’s binding behaves, so the loopback check matters even more there.
No. The installer and the agent both run happily as a regular user, and this guide runs everything as a dedicated non-root account. The only places sudo appears are server preparation itself: creating users, configuring SSH, and enabling the firewall. If you ever find the agent process owned by root, treat it as a misconfiguration worth fixing the same day.
Treat 4 GB as the comfortable floor for a personal agent, paired with 2 vCPU cores and 20 GB of disk. Plan for 8 GB or more if you’ll use heavy browser automation or run local models on the same box. Smaller instances can technically start the gateway, but headroom is what keeps an always-on agent stable, so size before you install OpenClaw on a VPS rather than after the first crash.
Our advice is simply don’t. Current releases refuse non-loopback binds without authentication, which is real progress, but an unreachable service is categorically safer than an authenticated one. An SSH tunnel covers occasional access and Tailscale covers daily use, including from your phone, so public exposure buys convenience you already have and risk you don’t need.
Pick a release channel that matches how much change you want, with stable or the extended-stable track being the right call for servers, then update on a monthly rhythm rather than on impulse: read the release notes, run the update, and rerun the binding check from this guide. That last step is the habit that ensures no update ever silently changes your exposure.
Less than people think. Any provider whose instance meets the sizing above works, because the security posture comes from the configuration in this guide, not the logo on the invoice. Choose on the things that genuinely differ: price, network quality, and support. And if you’d rather the whole checklist be someone’s job instead of your hobby, that’s what managed OpenClaw tiers are for.