GitHub works, until it doesn’t. The free tier is generous and the platform is woven into every developer’s muscle memory, so most of us never question it. Then the questions start arriving anyway: per-seat pricing that creeps up as your team grows, telemetry you can’t turn off, the unease of your private code sitting on infrastructure you don’t control, and the knowledge that it may be training someone’s AI. None of this means GitHub is bad. It means it is someone else’s computer, running on someone else’s terms. For the cost of a small VPS, you can run your own Git server instead and own the whole thing.
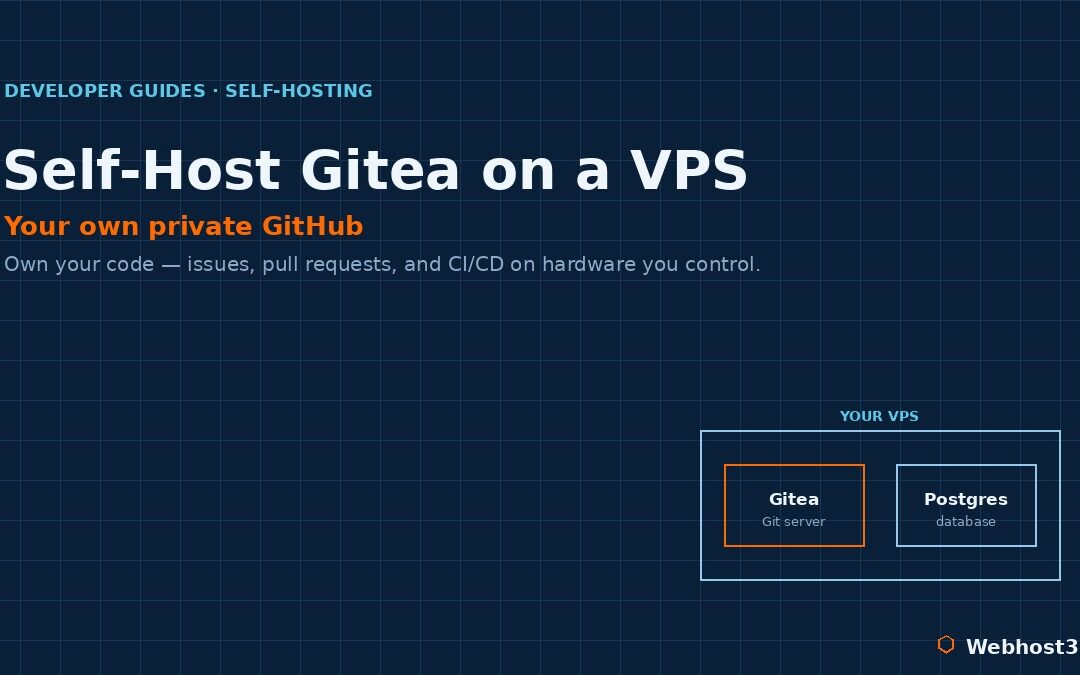
That server is Gitea, and this guide walks through deploying it from a blank VPS to a working private Git platform in about fifteen minutes. You will get repositories, issues, pull requests with code review, a wiki, and CI/CD — the GitHub experience you already know — running entirely on hardware you control. Better still, you will see how to migrate your existing GitHub repositories across in a single click, bringing their issues and history with them. No lock-in on the way in, and none on the way out.
What Is Gitea, and Why Self-Host a Git Server?
Gitea is a lightweight, open-source Git service written in Go. If you have used GitHub or GitLab, you already know how to use it — the interface gives you repositories, issues, pull requests with review and branch protection, a wiki, webhooks, OAuth login, organisation and team management, a built-in container and package registry, and a CI/CD system compatible with GitHub Actions. It is a remarkably complete platform that happens to fit in a single binary.
The reason to self-host comes down to ownership. Your code lives on your server, not someone else’s, which matters for privacy, for compliance, and for the simple peace of mind of controlling your own infrastructure. There are no per-seat fees, so a growing team does not mean a growing bill. Nothing phones home about your activity. And because Gitea is so light, the whole thing runs comfortably on a modest, inexpensive server rather than demanding the heavy resources a platform like a self-hosted GitLab would.
It suits a clear set of people. Solo developers who want a private home for their projects, small teams tired of per-user pricing, agencies keeping client code separate and in-house, and anyone with compliance or air-gapped requirements that rule out a public SaaS. If you already enjoy running your own services — the same instinct behind self-hosting tools like Coolify or Supabase — Gitea is one of the most rewarding additions to that stack, because version control sits at the centre of everything else you build.
Gitea vs Forgejo: A Quick, Honest Note
Before we deploy, one piece of context you will run into the moment you start reading about Gitea. In 2022, the project was forked into a community-governed alternative called Forgejo, which is run by Codeberg, a German non-profit, and the two codebases have diverged since then. The short version: Gitea is the original, with commercial backing and a more active codebase, while Forgejo prioritises community governance and a copyleft licence. Both are excellent, and the Docker setup in this guide works for either one with only a change of image name. This guide uses Gitea, but if community governance matters to you, know that Forgejo is a drop-in alternative you can choose instead.
What You’ll Need
The requirements are modest, which is part of Gitea’s appeal. You need a Linux VPS running Ubuntu or Debian, with around 1GB of RAM and 20GB of storage to start — Gitea itself idles in the hundreds of megabytes, so this is comfortable headroom rather than a tight fit. also you need Docker and Docker Compose installed; if you have not set those up yet, our guide on deploying Docker on a VPS covers it. You want a domain or subdomain pointed at the server, something like git.yourdomain.com. And you need basic comfort in a terminal — enough to edit a file and run a command. That is the whole list.
Step 1: The Docker Compose File
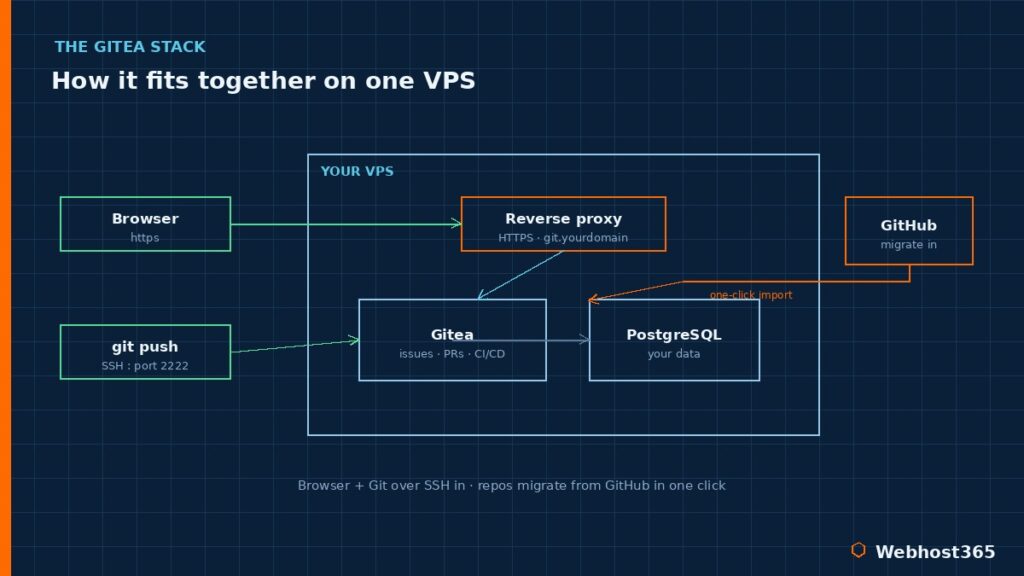
We will run Gitea alongside a PostgreSQL database, both as containers defined in a single Docker Compose file. Gitea can use SQLite for a quick test, but PostgreSQL is the right choice for anything you intend to keep, so we start as we mean to go on. Create a directory for the service, and inside it a docker-compose.yml file:
services:
  gitea:
    image: gitea/gitea:1.25
    container_name: gitea
    restart: unless-stopped
    environment:
      - GITEA__database__DB_TYPE=postgres
      - GITEA__database__HOST=db:5432
      - GITEA__database__NAME=gitea
      - GITEA__database__USER=gitea
      - GITEA__database__PASSWD=change-this-password
    volumes:
      - ./gitea-data:/data
    ports:
      - "3000:3000"
      - "2222:22"
    depends_on:
      - db

  db:
    image: postgres:16
    container_name: gitea-db
    restart: unless-stopped
    environment:
      - POSTGRES_USER=gitea
      - POSTGRES_PASSWORD=change-this-password
      - POSTGRES_DB=gitea
    volumes:
      - ./postgres-data:/var/lib/postgresql/data
A few things are worth understanding here rather than copying blind. The image tag is pinned to a specific version rather than “latest”, so an unexpected update never surprises you — you upgrade deliberately. The two volumes keep your repositories and your database on the host disk, so your data survives the containers being recreated. The database credentials must match between the two services. And the ports line is where the one real gotcha lives, which is the whole of the next step.
Step 2: The SSH Passthrough Gotcha
Look again at that ports mapping: "2222:22". This is the detail that trips up almost everyone deploying Gitea, and understanding it now saves an hour of confusion later.
Git can talk over HTTPS or over SSH, and most people want SSH for pushing and pulling. The problem is that SSH uses port 22, and your VPS is already using port 22 for your own administrative login — the very session you used to set this up. You cannot have both the host and the Gitea container listening on port 22, so something has to give.
The simplest solution, and the one I recommend for most setups, is the one in the file above: map Gitea’s internal SSH port to a different port on the host, here 2222. Your own server SSH keeps port 22, and Gitea answers on 2222. The one thing you must do alongside this is tell Gitea about it, so the clone URLs it shows people are correct. Set the SSH port in Gitea’s configuration to 2222, and your repository clone commands will include it automatically. There is a more advanced approach — an SSH passthrough shim that lets git@git.yourdomain.com work on port 22 without clashing with your admin login — and it produces tidier clone URLs, but it is more moving parts. For a first deployment, the alternate-port method is clean, reliable, and easy to reason about.
Step 3: Start It and Finish the Web Setup
With the file saved, bring the stack up from inside its directory:
docker compose up -dDocker pulls the images and starts both containers. Give it a moment, then open http://your-server-ip:3000 in a browser. Gitea greets you with a one-time installation screen, and a few fields here matter more than the rest.
The database section should already be filled from your environment variables — confirm the type is PostgreSQL and the host reads db:5432, the service name from your Compose file. Set the server and application URL to match how you will actually reach Gitea, which after the next step will be your HTTPS domain. Then expand the administrator account section and create your admin user right here, on this screen.
This is the single most important thing to get right at setup: if you skip it, the first person to register becomes the admin, which is exactly the kind of open door you do not want on a server holding your source code. While you are at it, once your account exists, disable open registration in the settings so the wider internet cannot create accounts on your instance. The official Gitea documentation covers every configuration option in depth if you want to go further.
Step 4: Put It Behind HTTPS
Right now Gitea answers on port 3000 over plain HTTP, which is fine for testing and wrong for anything real. You never want to expose the raw application port to the internet. Instead, you put a reverse proxy in front of it to handle HTTPS and forward traffic to Gitea internally.
A reverse proxy terminates the secure connection on your domain and passes the request along to Gitea on port 3000, so visitors reach https://git.yourdomain.com while the application port stays private. Caddy is the easiest option here because it obtains and renews a free Let’s Encrypt certificate automatically with almost no configuration, though Nginx and Traefik do the job equally well if you already run one. If the concept is new to you, our explainer on what a reverse proxy is covers how it fits together. Once the proxy is live, update Gitea’s application URL to the https address so that links and clone URLs are generated correctly, and your Git server is properly secured.
Step 5: Migrate Your Repositories from GitHub
This is the step that turns “I should try self-hosting” into “I have moved”, and it is genuinely a one-click affair. Gitea does not just copy your code — it brings the surrounding work with it.
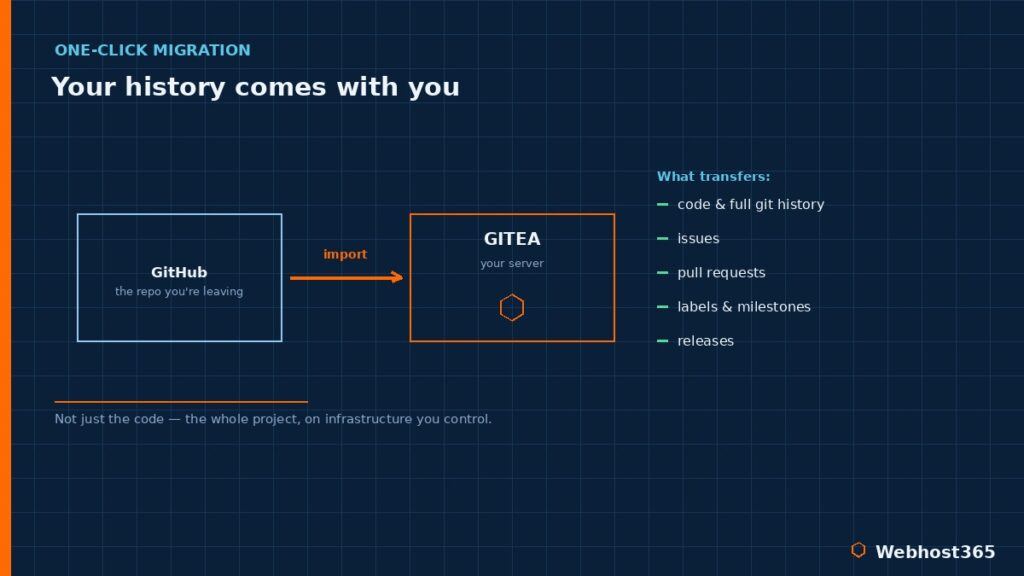
Log in, choose to create a new repository, and select the Migration option, or go to the migration tool directly. Paste the URL of the GitHub repository you want to bring across, and supply a GitHub personal access token so Gitea can read private repos. Then choose what to import. This is the part people do not expect: Gitea can pull in not only the Git history but the issues, pull requests, labels, milestones, and releases too, reconstructing the project on your own server rather than leaving its history behind.
The same tool works with GitLab, Bitbucket, and other sources, so whatever you are leaving, your history comes with you. If you would rather keep a foot in both camps for a while, Gitea can also mirror a repository, keeping a synced copy that updates automatically. Either way, the lock-in that makes leaving a platform feel impossible simply is not there.
Going Further: CI/CD, Registry, and Backups
With Gitea running and your repositories migrated, three capabilities are worth knowing about as you settle in, none of which requires another platform.
Gitea has built-in CI/CD through Gitea Actions, which is compatible with GitHub Actions — many existing workflow files run with little or no change. You add a runner, point it at your instance, and your pipelines build, test, and deploy on your own hardware. Gitea also includes a built-in package and container registry, so you can push Docker images, npm packages, or PyPI packages straight to your own server rather than reaching for a third-party service. The official Docker documentation is a useful companion if you lean into the container side of this.
The third thing is not optional, and it is backups. Gitea has a built-in dump command that packages your repositories, database, and configuration into a single archive, and you should pair it with a regular dump of the PostgreSQL database. The reassuring part is what your data actually is underneath: your repositories are plain Git, and your issues and metadata live in a documented PostgreSQL schema. There is no proprietary format holding you hostage, which means your backups are genuinely portable and your escape route is always open. Our guide on website backup strategies covers building this into a routine rather than leaving it to memory.
Conclusion: Own Your Code
A self-hosted Gitea instance gives you the GitHub experience you already know — repositories, issues, pull requests, CI/CD, a registry — running on infrastructure you control, for the price of a small VPS rather than a per-seat subscription that grows with your team. Your code stays private, nothing phones home, and because your data is plain Git and a standard database, you are never locked in. The whole thing takes about fifteen minutes to stand up, and the GitHub migration tool means you can bring your existing projects, history and all, in a single click.
The one ingredient it needs is a reliable server with full control, and that is exactly what Linux VPS 365 provides. Every plan gives you dedicated KVM resources, full root access, NVMe storage, and a Docker-ready environment, with free automated backups and snapshots so your Git server is protected from day one. The t3.small at $9.99 per month comfortably runs Gitea for a solo developer or a small team, while the c4.medium at $19.99 gives a busy team the headroom for Actions runners and a package registry alongside it. Your renewal price always matches your signup price. Spin up a server, give it fifteen minutes, and your code comes home.
FAQ: Self-Hosting Gitea
Yes. Gitea is free and open-source software with no licence fees and no per-user pricing, so the only cost is the server you run it on. That is the core appeal versus a hosted platform — a growing team does not mean a growing bill, because you pay for a server, not for seats.
Very little. Gitea is written in Go and idles in the range of 100 to 256MB of RAM, so a VPS with 1GB is comfortable for a solo developer or small team. Heavier use — many concurrent users, CI/CD runners, and a package registry — benefits from 2GB or more, but the baseline requirement is genuinely modest.
Yes, and it is a one-click process. Gitea’s built-in migration tool imports a repository along with its issues, pull requests, labels, milestones, and releases, not just the code. It works with GitHub, GitLab, Bitbucket, and other sources, and it can also mirror a repository to keep a synced copy updated automatically.
They share a common origin. Forgejo is a community-governed fork of Gitea created in 2022, run by the Codeberg non-profit, and the two codebases have diverged since. Gitea is the original with commercial backing and a more active codebase; Forgejo emphasises community governance and a copyleft licence. Both deploy almost identically with Docker.
Yes. Gitea Actions is a built-in CI/CD system compatible with GitHub Actions, so many existing workflow files run with little or no modification. You install a runner and point it at your instance, and your build, test, and deploy pipelines run on your own hardware rather than a third-party service.
It can be very secure, because you control the whole environment. The essentials are to create your admin account at setup and disable open registration, put Gitea behind HTTPS with a reverse proxy, keep the server hardened with SSH keys and a firewall, and keep the image updated. Done properly, your private code is safer on a server you control than on infrastructure you do not.