There was a time when deploying an app meant git push heroku main and walking away. Then Heroku killed its free tier, and the platforms that replaced it learned the same trick: Vercel, Railway, and the rest bill per seat and per usage, and the number on the invoice climbs in lockstep with your success. The deploy experience is wonderful. The pricing model is a treadmill you cannot step off, because the moment your side project gets real traffic, the platform that made it easy starts charging like it owns it.
Self-hosted Coolify gives you the deploy experience without the treadmill. Coolify is an open-source platform-as-a-service you run on your own VPS — you connect a Git repository, push your code, and it builds your app into a container, configures the routing, issues a free SSL certificate, and puts your site live, exactly the way a managed platform does. The difference is that it all happens on a server you own, for a flat monthly fee that does not move when your traffic does. This guide walks through standing it up: the one-command install, your first deployment, managed databases, and the honest limits of running your own platform. Budget under an hour from a blank server to your first app live with HTTPS.
What Is Coolify, and Why Self-Host a Platform?
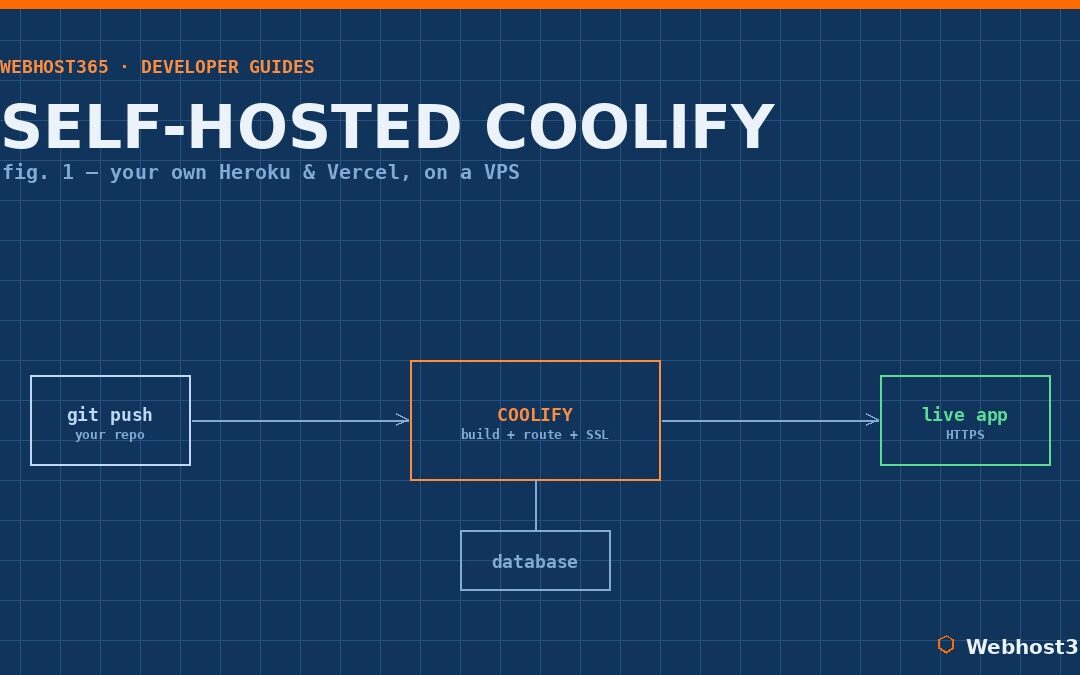
It helps to be precise about what Coolify actually does, because “platform-as-a-service” is a phrase that hides the magic. Under the hood, Coolify wraps Docker and a reverse proxy — Traefik or Caddy, your choice — in a clean web dashboard. When you connect a Git repository and push to it, Coolify pulls the code, builds it into a container, configures the proxy to route your domain to that container, requests a Let’s Encrypt certificate so the site is served over HTTPS, and runs periodic health checks to make sure it stays up. If a deploy fails or a container goes unhealthy, it tells you. That is the entire Heroku experience, reconstructed on infrastructure you control, and it is open source under the Apache 2.0 license — free forever to self-host, with a community of over 300,000 users behind it.
The reason to self-host it is the same logic that runs through every good self-hosting decision, applied one level up the stack. Managed platforms bill by seats, by build minutes, by bandwidth, by function invocations — a dozen meters that all tick upward as you grow. A VPS costs a flat fee, and Coolify lets you deploy unlimited applications onto it with no per-app charge and no vendor lock-in. It is the same flat-versus-metered economics that makes self-hosting a backend like Supabase compelling, except here it covers the deployment layer itself: every app, every database, every preview environment, all on one bill that does not surprise you.
The honest counterpoint belongs right here. Managed platforms like Vercel give you a global edge network, automatic scaling across regions, and a genuinely zero-operations experience that a single VPS does not replicate on its own. If you need worldwide low-latency delivery with no infrastructure to think about, that is what you are paying for, and it can be worth it. Self-hosted Coolify wins decisively on cost, control, and ownership; it asks in return that you run one server and keep it healthy. For the enormous middle ground of side projects, client work, internal tools, and growing apps that do not yet need a global CDN, that trade is overwhelmingly in your favor.
Sizing the VPS
Coolify needs more headroom than its bare minimum suggests, and being honest about that up front saves you a frustrating first day. The official floor is 2 CPU cores, 2 GB of RAM, and 30 GB of disk — but Coolify itself consumes around 1 GB of RAM before you deploy a single app, which leaves almost nothing on a 2 GB box once you actually build something. And builds are the catch: Coolify uses Nixpacks to compile your source into a container, and compiling a Node, Go, or Python project is genuinely CPU-intensive. Undersize the server and your first deploy crawls.
The real-world sweet spot is 4 cores and 8 GB of RAM with room to spare for your apps. For reference, Coolify’s own documented production example runs on 8 GB and 4 cores and comfortably hosts several Node applications, a handful of static sites, an analytics tool, a newsletter platform, and multiple databases at once. Here is how that maps to a sensible choice.
| VPS 365 tier | Specs | Best for |
|---|---|---|
| c4.medium — $19.99/mo | 4 core / 8GB / 80GB NVMe | The recommended starting point: smooth builds, several apps |
| c4.large — $39.99/mo | 6 core / 12GB / 160GB NVMe | Heavier use: many apps, bigger databases, more headroom |
There is one more factor that matters more for Coolify than for almost anything else you would self-host: dedicated CPU. Because every deploy is a build, and builds spike the processor, sharing physical cores with noisy neighbours can turn a 30-second build into a multi-minute wait. VPS 365 gives you dedicated KVM cores, so your build performance stays consistent no matter what anyone else on the hardware is doing — which, for a machine whose whole job is building and deploying, is exactly the property you want. The same sizing instinct from our guide to the best VPS for Ollama applies: headroom and consistent compute beat a big core count on paper.
Step 1: Prepare a Fresh VPS
Coolify is happiest on a clean server, because it installs and manages its own Docker, its own reverse proxy, and its own directory structure — and a box with other software already on it invites conflicts. Start with a fresh VPS running a supported Ubuntu LTS release (the automatic installer works with 20.04, 22.04, and 24.04), with SSH access and curl available, which it almost always is by default.
Before you install anything that will face the internet, harden the server. This machine is about to run every application you deploy and every database behind them, so it is not a place to skip the basics. Work through our guide on how to secure your Linux VPS first: SSH keys instead of passwords, a default-deny firewall, and fail2ban are the thirty-minute baseline. One Coolify-specific note on the firewall — you will need ports 80 and 443 open for your deployed apps and their SSL, your SSH port, and port 8000 for the Coolify dashboard itself, which you can restrict to your own IP once you are set up. Everything else stays closed.
Step 2: Install Coolify
This is the step that always surprises people with how little there is to it. Coolify ships a single installation script that does the entire job, so from your freshly prepared server, run one command:
curl -fsSL https://cdn.coollabs.io/coolify/install.sh | sudo bashThat is the whole install. Behind the scenes the script does a remarkable amount of work for you: it installs the essential tools, installs Docker Engine, configures Docker’s logging and daemon settings, creates Coolify’s directory structure under /data/coolify, sets up the SSH keys it uses to manage servers, and starts Coolify itself. The official Coolify installation documentation covers the details and the environment-variable options if you want to customize it, but for most people the bare command above is all it takes.
Two caveats worth knowing. If you are on a non-LTS Ubuntu release or a less common distribution, the automatic script may not run, and Coolify provides a manual installation path in the same documentation for exactly that case. And one hard rule: Docker installed via snap is not supported, so if your server happens to have the snap version, remove it and let Coolify’s script install the proper Docker Engine. When the script finishes, it prints the URL where Coolify is now running — typically your server’s IP address on port 8000.
Step 3: Create Your Admin Account Immediately
This step takes ten seconds and is the most important security action in the entire guide, so do it the moment the installer finishes. Open the URL the script gave you — http://your-server-ip:8000 — in your browser, and you will land on a registration page.
Register your administrator account right now, before anything else. Here is why the timing genuinely matters: that first registration page is open, and the first person to reach it becomes the administrator of your Coolify instance — which means full control over the server and everything you will ever deploy on it. Coolify’s own documentation flags this in bold for good reason. If you install Coolify and wander off to make coffee before registering, you are running a brief window in which anyone who finds your server’s address and port could claim it. Create your account immediately, choose a strong password, and that window closes. With dedicated admin access established, the platform is yours and the rest of the setup is pure upside.
Step 4: Connect a Server and a Git Source
With your account created, Coolify needs to know two things: where to deploy, and where your code lives. The first is already half-done — Coolify can manage the very server it runs on, so the machine you just installed it on is available as a deployment target out of the box. If you later want to deploy to other servers, you add them over SSH and manage a whole fleet from the one dashboard, but for your first app the local server is all you need.
The second connection is your code. In the dashboard you link a Git source — GitHub or GitLab — by authorizing Coolify to read your repositories, either through a GitHub App for the smoothest experience or with a deploy key for a single repo. This is the wiring that makes push-to-deploy work: once Coolify can see your repository, it can pull your code, watch for new commits, and rebuild automatically whenever you push. That connection, made once, is what turns a manual deploy into the effortless workflow you came here for.
Step 5: Deploy Your First App
Now the payoff. Create a new resource in Coolify and point it at the repository you just connected, or pick from the 280-plus one-click templates that cover everything from Next.js to Laravel to Ghost. Coolify inspects your code, builds it into a container — using Nixpacks to detect the language and assemble the image automatically, or your own Dockerfile if you have one — and deploys it.
The parts that used to be tedious are handled for you. Coolify configures its reverse proxy to route traffic to your new container, and it requests a Let’s Encrypt certificate so the app is served over HTTPS from the first request. To get going without even owning a domain yet, Coolify can generate a free address that points straight at your server with working SSL, so you can see your app live in minutes; when you are ready, you switch to your own domain without redeploying anything. From that point on, the workflow is the one the whole platform exists to deliver: you push a commit to the connected branch, and Coolify rebuilds and redeploys on its own. No SSH, no manual container commands, no certificate renewals to remember — just git push and your change is live.
Step 6: Add a Managed Database
Almost every real app needs a database, and this is where self-hosting a platform genuinely rivals the managed experience. From the same dashboard, you provision a database with one click — Coolify offers PostgreSQL, MySQL, MariaDB, MongoDB, Redis, and ClickHouse — and each one runs as its own container on a private Docker network alongside your apps.
The elegant part is how your application reaches it. Because the database and your app share Coolify’s internal network, your app connects to the database by its container name, with no public port exposed to the internet and no firewall rule to open. The database simply is not reachable from outside the server, which is exactly what you want for it, and your app finds it automatically by name. This is the Heroku add-on experience — spin up a database, connect your app, done — running entirely on your own machine, with the data living on your disk rather than in a provider you rent it from. Deploy a backend like self-hosted Supabase or any of the apps from our self-hosting guides through this same flow, and you start to see why one well-sized VPS running Coolify can replace a stack of paid services.
Custom Domains, SSL, and the Reverse Proxy
When you are ready to put an app on your own domain, the process is short. Point your domain’s DNS at your server’s IP address, add the domain to your application’s settings in Coolify, and the platform handles the rest — it requests a Let’s Encrypt certificate for that domain and configures the routing automatically. Within moments your app answers on your domain over HTTPS, with no certificate files to install and no renewals to track, since Coolify renews them for you.
What makes this work behind the scenes is the reverse proxy that Coolify runs for you — Traefik by default, with Caddy as an option. It sits in front of every app you deploy, reading the incoming domain and routing each request to the right container, terminating SSL for all of them at once. If the idea of one component fronting many private services is new, our reverse proxy explainer walks through exactly what it does and why it belongs there; Coolify simply manages it so you never have to write a proxy config by hand. The result is that adding your fifth or fiftieth app is the same effortless step as the first.
Honest Limits and Keeping It Healthy
A guide worth trusting tells you where the edges are. Coolify is under fast, active development and ships updates frequently — sometimes weekly — and while most upgrades are smooth, some are not. The discipline that protects you is simple: before any upgrade, back up the entire /data/coolify directory, and especially its .env file, which holds every secret your instance depends on. Coolify also has built-in scheduled backups worth enabling, and the broader 3-2-1 approach from our website backup strategies guide applies to your deployed apps and their databases just as much as to a website. One specific caution from 2026: a disclosed vulnerability affected some installations after certain Linux kernel updates, so check Coolify’s documentation for the patched version before performing OS-level kernel upgrades on a production server.
Day to day, the issue you are most likely to meet is a container showing as “unhealthy.” That simply means an app failed its health check — it crashed on startup, listened on the wrong port, or took longer to start than the check allowed. The fix is almost always in the deployment logs, which Coolify puts one click away in the dashboard; read them first and the cause is usually obvious. And the honest structural limit: this is one server. Coolify does not, by itself, give you the multi-region edge network and hands-off automatic scaling that a platform like Vercel sells. If global low-latency delivery with zero operations is a hard requirement, a managed platform still wins. For everything else, one healthy VPS running your own platform is the better deal.
Conclusion: Your Own Platform, Your Own Bill
Self-hosted Coolify hands you the thing the managed platforms made addictive — git push and your app is live, with automatic SSL, managed databases, and previews — and removes the thing that made them painful, the meter that climbs with every bit of success. Install it with one command, register your admin account immediately, connect a repository, and deploy: under an hour to a private platform that runs unlimited apps for a flat fee you control. Every project you ship onto it after that is just another push.
What it needs underneath is a VPS with real compute, because a platform whose whole job is building and deploying wants consistent power. Our Linux VPS 365 plans fit it well: the c4.medium at $19.99 per month with 4 cores and 8 GB of RAM is the recommended starting point for smooth builds and several apps, while the c4.large at $39.99 with 12 GB suits heavier use and bigger databases. Crucially, every plan gives you dedicated KVM cores — so your builds stay fast no matter who else is on the hardware — along with full root access, free automated backups, and one-click snapshots, and your renewal price never moves from your signup price. Spin up a box and run your own platform this weekend.
FAQ: Self-Hosted Coolify
Yes. Coolify is open source under the Apache 2.0 license and completely free to self-host; your only cost is the VPS it runs on. There is an optional paid cloud version if you would rather not manage the server yourself, but the self-hosted software has no license fee and no per-app or per-seat charges.
The official minimum is 2 CPU cores and 2 GB of RAM, but Coolify itself uses around 1 GB before you deploy anything, so 2 GB leaves very little room for builds. A server with 4 cores and 8 GB of RAM is the comfortable real-world starting point, since building containers is processor-intensive and benefits from headroom.
For most projects, yes. Coolify delivers the same core workflow — connect a Git repository, push to deploy, automatic SSL, managed databases — on a server you own. What it does not replicate on its own is a managed global edge network and hands-off multi-region scaling, so very large or latency-critical apps may still prefer a managed platform.
Yes. Coolify provisions and renews Let’s Encrypt certificates automatically for every app and domain through its built-in reverse proxy. You can also start with a free generated subdomain that comes with working SSL, then switch to your own custom domain later without redeploying.
Yes. Once you connect a GitHub or GitLab source, Coolify watches your repository and redeploys automatically whenever you push to the connected branch. It builds your code into a container using Nixpacks or your own Dockerfile, then routes traffic to it with SSL, all without manual steps.
It runs production workloads for a large user base and is dependable when sized and maintained well. Because it updates frequently, the keys to a stable production instance are pinning your upgrades to deliberate moments, backing up the /data/coolify directory beforehand, and monitoring your apps’ health checks.