Firebase is wonderful right up until the invoice arrives. It bills you for reads, for writes, for storage, for bandwidth — a dozen metered dimensions that stay invisible while you build and then spike at the worst possible moment: the month your app actually succeeds. Plenty of teams have watched a viral week turn into a four-figure bill, and discovered too late that the data they thought was theirs lives entirely inside someone else’s pricing model.
Self-hosted Supabase is the way out. Supabase is the leading open-source Firebase alternative — a full backend with a Postgres database, authentication, instant APIs, realtime subscriptions, and file storage — and the entire stack runs on a VPS you control for a flat monthly fee that does not move when your traffic does. This guide walks through standing it up properly: the Docker Compose stack, the security steps that genuinely matter, exposing it safely, and the honest limits of running it yourself. Budget about an hour from a blank server to a working backend.
Why Self-Host Supabase?
Three reasons, and they compound.
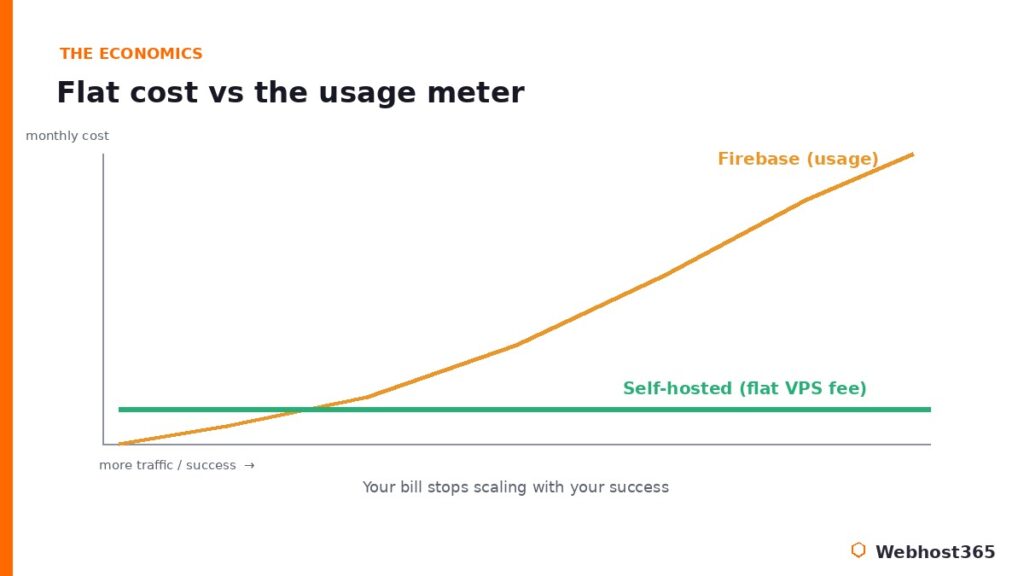
Cost is the one people feel first. Managed backends bill by usage, so your expense scales with your success — exactly backwards from what a growing project wants. A self-hosted instance on a VPS costs the same whether it serves a hundred requests a day or a million; you pay for the box, not the traffic. It is the same flat-versus-metered economics we walked through for language models in our comparison of the OpenAI API versus self-hosted LLMs, and it lands just as hard for a backend.
Data ownership is the one that matters most in the long run. With self-hosted Supabase, your database and every file live on infrastructure you administer. The Docker Compose stack does not phone home or collect telemetry, so there is no third-party processor in the path of your users’ data — a property that turns a compliance headache into a one-line answer. And because the heart of it is plain PostgreSQL rather than a proprietary store, your data is never trapped: it is a standard database you can dump, migrate, and query with tools you already know.
Control is the third. No rate limits you did not set, no surprise deprecations, no feature locked behind a higher tier. You run the version you chose, on the resources you chose, for as long as you choose.
The honest counterpoint, because it matters: managed Supabase and Firebase genuinely win when you want zero operations, automatic scaling, and the platform-only conveniences. Self-hosting trades that hands-off comfort for control, predictable cost, and ownership. If your project is tiny and you never want to think about a server, managed is the pragmatic call. For everyone who wants the bill and the data under their own roof, read on.
What You’re Actually Running
“Supabase” is not one program; it is a handful of best-in-class open-source pieces wired together, and understanding the shape of it makes everything that follows obvious. Here is the whole cast in plain English.
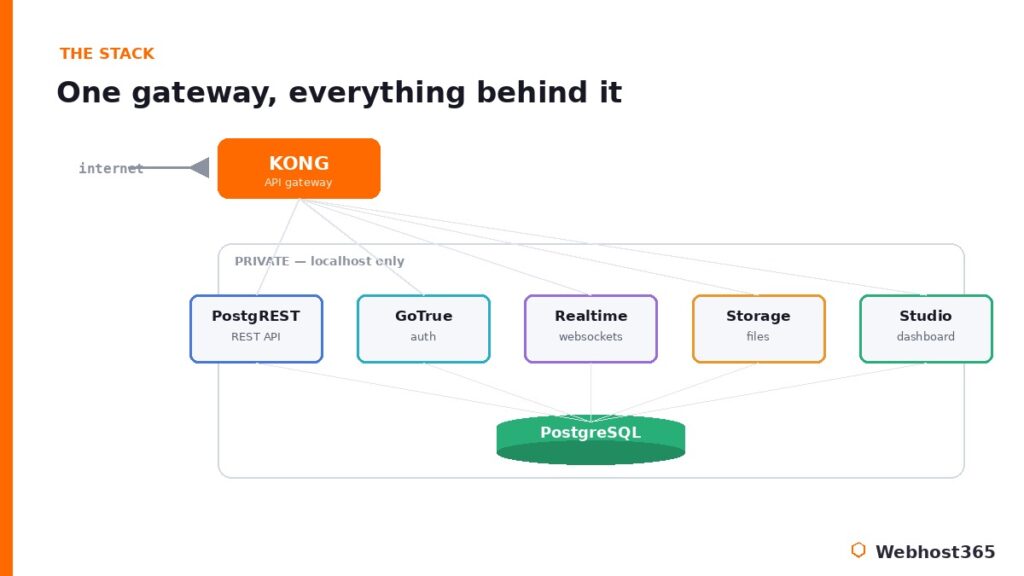
At the center sits PostgreSQL, a production database that has been trusted for decades — this is where your data actually lives, and everything else is a layer around it. GoTrue handles authentication: sign-ups, logins, tokens, password resets. PostgREST reads your database schema and instantly exposes it as a REST API, with no endpoint code to write. Realtime pushes live database changes to subscribed clients over websockets. Storage manages file uploads with the same auth rules as the rest of your data. Studio is the dashboard — the familiar table editor, SQL runner, and auth manager you would recognize from managed Supabase.
Tying them together is Kong, an API gateway that acts as the single front door. This is the most important architectural fact to hold onto: in a correct setup, Kong is the only component exposed to the internet, and every other service stays private behind it. When we secure the stack later, that principle is the entire game — one guarded door, everything valuable behind it. The official Supabase self-hosting documentation describes the full Docker Compose stack, and the rest of this guide is essentially the practical, secured path through it.
Sizing the VPS
Because you are running roughly a dozen services side by side, Supabase needs more breathing room than a single-purpose app. The official guidance is a useful floor: a minimum of 4 GB of RAM and 2 CPU cores, with 8 GB and 4 cores recommended for production. Here is how that maps to a real choice.
| VPS 365 tier | Specs | Best for |
|---|---|---|
| t3.nano — $4.99/mo | 2 core / 4GB / 25GB NVMe | The documented minimum; light use, side projects |
| t3.small — $9.99/mo | 3 core / 6GB / 55GB NVMe | Comfortable starting point for a real app |
| c4.medium — $19.99/mo | 4 core / 8GB / 80GB NVMe | Production-recommended headroom |
The honest read: the 4 GB t3.nano will run the full stack and is fine for development or a low-traffic side project, but Postgres plus a dozen services leaves it with little spare memory. For anything you actually depend on, the 6 GB t3.small is the comfortable real-world starting point, and the 8 GB c4.medium gives you the production headroom Supabase itself recommends. The same logic we laid out for sizing AI workloads in our guide to the best VPS for Ollama applies here too: with a multi-service stack, RAM headroom and fast NVMe storage matter far more than raw core count.
Step 1: Prepare the VPS and Install Docker
Start with a fresh Ubuntu VPS and install Docker, since the entire Supabase stack is containerized. Update the system, then install Docker Engine and the Compose plugin from Docker’s official repository:
sudo apt update && sudo apt upgrade -y
curl -fsSL https://get.docker.com | sh
sudo usermod -aG docker $USER
Log out and back in so the group change takes effect, then confirm both tools answer:
docker --version
docker compose version
If you want the longer, more deliberate walkthrough of installing and running containers in production, our guide on how to deploy Docker on a VPS covers it step by step.
Now the security gate, and it is not optional. This server is about to hold your entire database — every user record, every file, every secret your application knows. A self-hosted backend on an unhardened box is a breach waiting to happen, so before going further, work through our guide on how to secure your Linux VPS: SSH keys, a default-deny firewall, and fail2ban are the baseline, and they take about thirty minutes. Hardening the server that holds your database is part of the job, not an afterthought.
Step 2: Clone Supabase and Generate Your Secrets
Supabase ships an official Docker Compose configuration in its main repository. Clone it and move into the docker directory:
git clone --depth 1 https://github.com/supabase/supabase
cd supabase/docker
cp .env.example .env
That last command creates your environment file from the example, and this is where the single most important security step of the entire guide lives. The .env.example file contains placeholder secrets that are public knowledge — anyone who has read the Supabase repository knows them. Launching with those defaults is the number-one mistake people make self-hosting Supabase, and it effectively leaves your database wide open.
Before you start anything, generate fresh, unique values for every secret: POSTGRES_PASSWORD, JWT_SECRET, ANON_KEY, and SERVICE_ROLE_KEY. Supabase provides a key-generation helper for the JWT-derived values, and the official repository documents the current process. Open .env and replace each placeholder. One practical trap worth flagging: keep POSTGRES_PASSWORD to letters and numbers only — special characters like @, !, and # break the database connection string parsing and produce confusing failures later. A long alphanumeric string is both safe and trouble-free.
Treat the finished .env file as the keys to your kingdom, because that is exactly what it is. Never commit it to version control, and back it up somewhere private and separate from the server.
Step 3: Launch the Stack
With your secrets in place, starting Supabase is a single command. From the docker directory, bring the whole stack up in the background:
docker compose up -dThe first run pulls roughly a dozen images, so it takes a few minutes; subsequent starts are quick. When it finishes, check that everything came up healthy:
docker compose psYou want to see every service in a running or healthy state. If one is restarting in a loop, its logs name the cause — almost always a secret you missed in .env, which is why Step 2 matters so much. Inspect any troubled service with docker compose logs servicename, fix the value, and recreate.
Once the stack is healthy, the Studio dashboard is reachable through the Kong gateway. Studio is the familiar Supabase control room: a table editor, a SQL runner, auth management, and storage browsing, all pointed at your own Postgres. One immediate task before you do anything else: set the dashboard username and password in your .env to your own values if you have not already. Leaving the default Studio credentials in place would undo all the care you took generating database secrets, so close that door now.
Step 4: Expose It Safely Behind a Reverse Proxy
Here is where the Kong principle from earlier pays off. In a correct deployment, the only component that faces the internet is Kong’s gateway port — every other service binds to localhost and is invisible from outside the box. Never publish the raw Postgres, Auth, or Storage ports to the world; doing so hands attackers a direct line to your database.
The right way to expose your backend is to put a reverse proxy in front of Kong, terminating HTTPS on port 443 and forwarding to the gateway locally. This gives you a proper TLS certificate, a single public entry point, and a clean firewall story. If the reverse-proxy concept is new, our reverse proxy explainer covers what it does and why it sits where it does; the official Supabase guide also offers a Traefik-based variant if you prefer that proxy.
On the firewall, the rule follows directly: allow 443 (and your SSH port), and nothing else. The hardening steps from Step 1 already set up a default-deny firewall, so you are simply opening the one door your reverse proxy needs. The result is the architecture we have been building toward the whole time — one guarded, encrypted entrance, your entire backend private behind it.
Step 5: Connect Your Application and Protect Your Data
With the stack live and exposed over HTTPS, your application talks to it exactly as it would to managed Supabase. You point your frontend at your own API URL and supply the anon key you generated, and the auto-generated REST endpoints, realtime subscriptions, auth flows, and storage all behave identically. The whole appeal of self-hosting is that nothing about your application code has to change — only where it points.
const supabase = createClient(
  "https://api.yourdomain.com",
  "your-anon-key-from-env"
)
That parity is what makes self-hosted Supabase a real Firebase alternative rather than a compromise: the same developer experience, on infrastructure you own.
The final responsibility that comes with ownership is backups. A self-hosted database is yours to protect, and the approach is refreshingly standard PostgreSQL practice: regular pg_dump exports for the database, plus snapshots of the Docker volumes that hold your storage files. VPS 365 includes free automated backups and one-click live snapshots, which cover the volume side automatically, and a scheduled pg_dump handles the database. Whichever route you take, follow the discipline from our website backup strategies guide: a backup you have never restored is only a hope, so test a restore before you need one.
The Honest Limits of Self-Hosting
A credible guide names what you give up, and self-hosted Supabase has real boundaries worth knowing before you commit.
It runs as a single project. The self-hosted Studio does not support multiple organizations or projects the way the managed platform does, so one stack equals one project; running several means several stacks. Some platform-only features simply are not part of the open-source distribution either: database branching, managed point-in-time recovery, the hosted analytics suite, and the platform management API live on managed Supabase and do not come down with the Docker stack. And the operational truth underneath all of it is that updates, backups, monitoring, and uptime are now your job. The flat bill is real, but it is paid partly in attention.
None of this is a dealbreaker for most projects, and for many it is irrelevant. But if you need many isolated projects under one roof, automatic point-in-time recovery without setup, or a genuinely zero-operations experience, managed Supabase earns its fee and is the honest choice. Self-hosting wins decisively on cost at scale, data ownership, and control; it does not win on convenience, and pretending otherwise would not help you decide.
Conclusion: Your Backend, Your Database, Your Bill
Self-hosted Supabase gives you the entire modern backend — Postgres, auth, instant APIs, realtime, and storage — as an open-source Firebase alternative that runs on a server you own, for a price that stays flat no matter how far your app climbs. Clone the repo, generate real secrets, launch the stack, guard it behind a reverse proxy, and point your app at it: roughly an hour of work for a backend with no metered surprises and no third party holding your data. The economics only improve as you grow, which is the opposite of how usage-billed platforms treat success.
What it all rests on is a capable VPS with room for the stack. Our Linux VPS 365 plans fit the workload precisely: the t3.small at $9.99 per month with 6 GB of RAM is the comfortable starting point for a real application, while the c4.medium at $19.99 with 8 GB gives you the production headroom Supabase recommends. Every plan includes full root access, KVM virtualization, free automated backups, and one-click snapshots — exactly the foundation a self-hosted database wants — and your renewal price never moves from your signup price. Spin up a box and own your backend this afternoon.
FAQ: Self-Hosted Supabase
The software is fully open source and free to run; your only cost is the server it lives on. On a VPS you pay a flat monthly fee regardless of how many requests your backend serves, which is the core advantage over usage-billed managed platforms. There are no per-read, per-write, or per-storage charges.
The official minimum is 4 GB of RAM with 2 CPU cores, and 8 GB with 4 cores is recommended for production. Because the stack runs roughly a dozen services alongside PostgreSQL, 6 GB is a comfortable real-world starting point, with 4 GB suitable for development or light side projects.
Yes. The self-hosted stack provides production parity with the core managed platform, running the same PostgreSQL, auth, API, realtime, and storage services. You are responsible for securing it, backing it up, and keeping it updated, but the software itself is the same one powering production applications everywhere.
Self-hosting runs a single project with no multi-organization support, and several platform-only features are unavailable: database branching, managed point-in-time recovery, the hosted analytics suite, and the platform management API. Everything in the core backend — database, auth, APIs, realtime, storage, and Studio — is fully present.
Use standard PostgreSQL practice: scheduled pg_dump exports for the database itself, plus snapshots of the Docker volumes that hold your storage files. On VPS 365, free automated backups and one-click live snapshots cover the volume side, and a scheduled pg_dump handles the database. Always test a restore before you rely on it.
Yes, though it takes planning, since the data models differ — Firebase’s document store maps onto Supabase’s relational PostgreSQL tables. The migration is most straightforward for apps that already think in structured records, and the payoff is a standard SQL database you fully own rather than a proprietary one you rent.