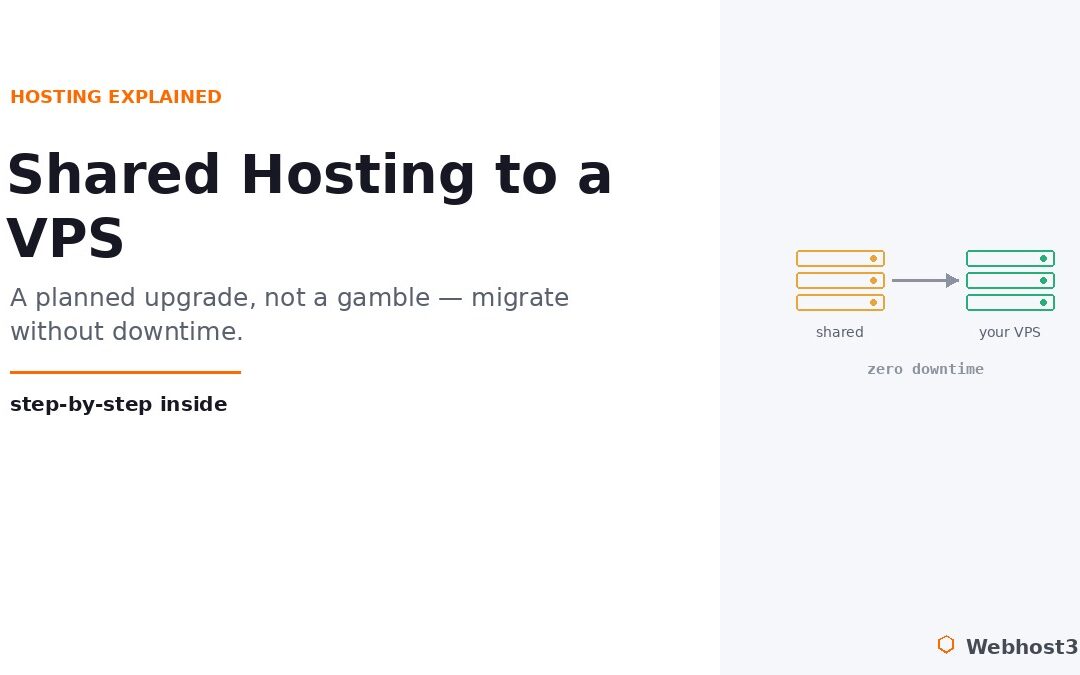
Migrating a live website terrifies people, and the fear is always the same: hours of downtime, a half-copied database, email that silently stops working, and visitors greeted by an error page during the one window you cannot afford it. That fear is what keeps sites stranded on shared plans they have long outgrown. The reassuring truth is that a shared-to-VPS migration, done in the right order, is a calm and planned upgrade you can finish in an afternoon with downtime measured in seconds, not hours. The secret is not speed. It is sequence.
This guide walks through that sequence end to end: how to know you actually need a VPS, how to set one up and move your site onto it, and the one technique that makes the whole thing essentially zero-downtime. Just as important, it covers the quiet failures that catch people out — the email records left pointing at the old server, the SSL warnings, the backups that turn out not to restore — so your move is the boring, successful kind.
First, Are You Sure You Need a VPS?
Before planning a migration, it is worth being honest about whether you need one, because moving to a VPS you do not need trades a small bill for a larger one and some genuine operational responsibility. Migrate for real reasons, not on a hunch.
The signals that you have genuinely outgrown shared hosting are specific. Your pages stay slow even after you have optimized images, enabled caching, and cleaned up your code — the sign you are hitting the server’s resource ceiling rather than your own. You see recurring 500 or 503 errors, which on shared hosting usually mean your account is bumping against the CPU or memory limits the host enforces. Traffic spikes take your site down instead of merely slowing it. Or you need something shared hosting simply will not give you: root access, a custom software stack, a specific service, or guaranteed resources that are not shared with the noisy neighbor next door.
If, on the other hand, your site is slow because it is unoptimized — a bloated theme, no caching, oversized images — a VPS will not fix that, and you will have spent more to carry the same problem to a bigger room. It is worth confirming where the bottleneck really is first. Our guide on whether a VPS is the right move compares the options, and if you are unsure about sizing, our WordPress hosting requirements by traffic guide and our RAM calculator help you tell whether you have outgrown your plan or just need to tune it. Once you are confident the resources are the real limit, migrating is the right call.
The Golden Rule: Build and Test Before You Switch
Everything that follows hangs on a single principle, so it is worth stating plainly before any steps: keep your old server serving traffic while you build and fully test the new one, and change DNS last.
Most migration horror stories come from doing this backwards — switching the domain to a new, half-configured server and then scrambling to finish the setup while visitors hit errors. The safe way inverts that. Your live site stays exactly where it is, untouched and serving everyone, for the entire setup. You provision the VPS, move the files and database, and test the result thoroughly, all without a single visitor noticing, because as far as the world is concerned nothing has changed yet. Only when the new server is confirmed working do you point the domain at it. DNS is the final step, not the first — and once you internalize that, migration stops being a gamble and becomes a checklist.
Step 1: Audit and Back Up Everything
You cannot move what you have not catalogued, so the first task is a complete inventory of what your site actually consists of. Most people remember the files and the database and forget half of the rest.
Write down everything: your website files, every database, all your email accounts, your cron jobs, the PHP version you run, any .env files or application secrets, your SSL certificates, the full set of DNS records (the A and AAAA records, but also MX for mail and the SPF, DKIM, DMARC, and other TXT records that keep email trusted), and every third-party integration — payment gateways, SMTP providers, analytics, webhooks, and APIs. Each of these is something that can break after a move if you did not know it was there.
With the inventory done, back all of it up. Files, databases, configuration, and certificates, copied somewhere safe and separate from the old server. And here is the honest part most guides skip: a backup you have never restored is not a backup, it is a hope. Open the database dump and confirm it is complete; check the file archive actually extracts. Our website backup strategies guide covers doing this properly, and the discipline matters more during a migration than at any other time, because this backup is your ultimate safety net if anything goes wrong.
Step 2: Lower Your DNS TTL — Days Ahead
This is the step that makes the eventual switch fast, and it has to happen first because of how DNS caching works. Every DNS record carries a TTL, or time-to-live, telling resolvers around the world how long they may cache it before checking again. A typical record has a TTL of several hours, which means that after you change it, some visitors keep reaching the old address for hours.
So, a day or two before you plan to migrate, lower the TTL on your A and AAAA records (and your MX records, if your mail is moving too) from its usual value down to 300 seconds:
; before — cached for hours
example.com.    14400   IN   A   203.0.113.10
; after — cached for 5 minutes
example.com.    300     IN   A   203.0.113.10
Then wait. The catch that trips people up is that the old, long TTL must expire across the internet before the new short one is honored everywhere — so you lower the TTL, then wait at least as long as the old TTL was (several hours) before you trust the 300-second value globally. Do this early and the actual cutover later propagates in minutes; skip it and your migration drags out over hours. It is also what makes a fast rollback possible if you ever need one.
Step 3: Set Up and Harden the New VPS
Now, with the old site still happily serving everyone, you build the new home. Provision your VPS and recreate your environment on it: install the same web server, the same or a newer PHP version, and your database engine, matching what your application expects. Recreate your cron jobs, and set up any services your site relies on.
Two things deserve real attention here. First, harden the server before it ever holds your data or faces the public, because a VPS gives you control and, with it, responsibility for security that a shared host used to handle for you. Work through our guide on how to secure your Linux VPS — SSH keys, a default-deny firewall, and fail2ban are the baseline, and the right time to do it is now, on an empty server, not after your live site is on it. Second, this is the moment the upgrade starts paying off: dedicated CPU and memory that belong to you alone, rather than a slice shared with every other account on a crowded machine. That is the whole reason you are moving.
Step 4: Transfer Your Files and Database
With the new server ready, copy your site onto it. Because the old server is still live and serving every visitor, this transfer has zero impact no matter how long it takes — which means you can do it carefully rather than in a panic.
For the files, rsync over SSH is the right tool, because it preserves permissions, ownership, timestamps, and symlinks, and it can resume if interrupted. From the new VPS, pull your site across:
rsync -avz -e ssh olduser@old-server-ip:~/public_html/ /home/user/public_html/The -a flag is the important one: it preserves all the file attributes that a careless copy would flatten, as the rsync documentation describes. For the database, export it on the old server and import it on the new one:
# on the old server
mysqldump -u dbuser -p dbname > backup.sql
# on the new server, after copying the file across
mysql -u dbuser -p dbname < backup.sql
Once both are across, update your application’s configuration to point at the new database — the credentials on the new server, not the old. One practical tip: do this bulk transfer now, and then, just before you cut over in the next steps, run the rsync once more to catch any files that changed in between. The second pass is quick and keeps the new site perfectly current.
Step 5: Test on the New Server — Before You Touch DNS
This is the most important step in the entire migration, and the one that makes it genuinely zero-downtime. You are going to browse your real website on the new VPS, exactly as a visitor would, while the rest of the world still reaches the old server untouched. The trick is your computer’s hosts file, which lets you override DNS for your machine alone.
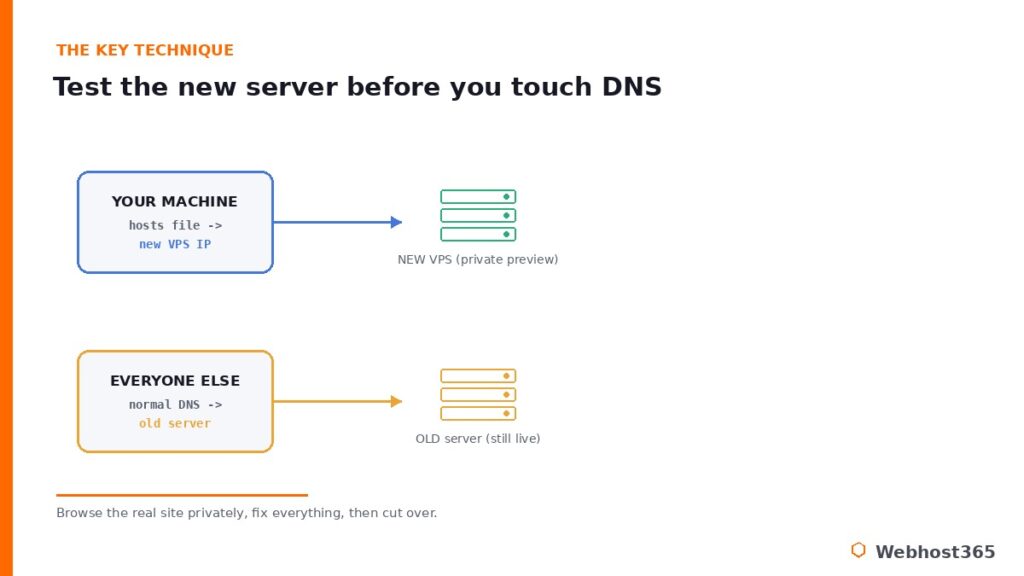
Find your new VPS’s IP address, then add a line to your hosts file pointing your domain at it. The file lives at C:\Windows\System32\drivers\etc\hosts on Windows (open your editor as Administrator) and at /etc/hosts on Mac and Linux:
198.51.100.20 example.com www.example.comSave it, and your browser now loads example.com from the new VPS, while every other person on the internet still hits the old shared server through normal DNS. Now test everything as if you were a visitor. Click through your pages, log in, submit a form, run a test order through checkout if you have a store, load the admin area, and confirm the padlock shows a valid SSL certificate with no mixed-content warnings. Anything broken, you fix here — calmly, privately, with the live site still safely serving the world from the old server. This is the whole point of the build-and-test-first approach: every problem surfaces while it is harmless. When every check passes, remove the line from your hosts file and you are ready for the only step visitors will ever be affected by.
Step 6: Cut Over DNS
This is the switch, and thanks to the preparation it is almost an anticlimax. In your DNS management panel, update the A record — and the AAAA record if you use IPv6 — for both your root domain and your www subdomain, pointing them at your new VPS’s IP address. Save, and you are done.
Because you lowered the TTL to 300 seconds days ago, most of the world starts resolving to the new server within five to fifteen minutes. The reason the earlier groundwork matters shows up right here: had you skipped the TTL step, this same change would crawl out over hours instead. You can watch it happen with any global DNS propagation checker, which shows resolvers around the world picking up the new address.
If your email is moving to the new server as well, this is where the records you inventoried in Step 1 become critical. Update the MX records, and make absolutely sure the SPF, DKIM, and DMARC records are replicated exactly on the new setup before you switch — these are what tell the world your mail is legitimate, and a missing one means your email quietly lands in spam folders or bounces. If your mail is staying with its current provider, leave the MX and mail-related records exactly as they are; only the website’s A records change. Getting this distinction right is the difference between a clean move and a week of mysterious email problems. The principles here follow standard DNS practice, which authorities like the Cloudflare DNS learning center explain well.
Step 7: Keep the Old Server Running
Do not cancel your shared hosting the moment DNS flips. Leave it running, untouched, for at least 48 hours, and this is not caution for its own sake — it is the final piece of the zero-downtime design.
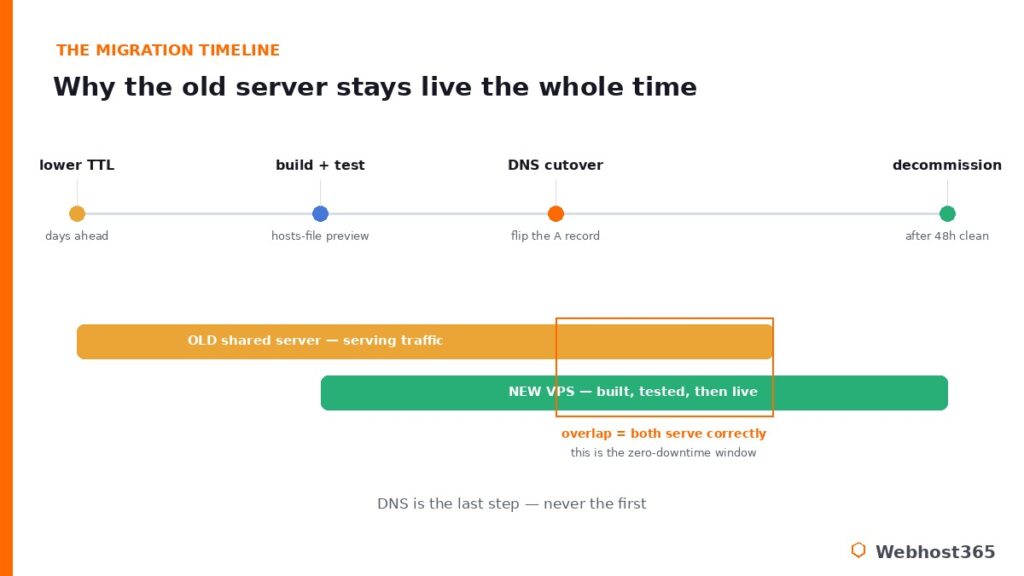
During those hours, DNS is propagating unevenly across the world. Visitors whose resolvers have updated reach your shiny new VPS; visitors whose resolvers are still holding the old cached record reach the old shared server — which is still live, still serving the same site. Both groups get a working website. Nobody sees an error. That overlap window, where both servers answer correctly, is exactly what makes the migration seamless rather than a hard switch with a gap in the middle. It is also your instant rollback: if something does surface on the new server, you simply point DNS back, and because of the low TTL, visitors return to the old server within minutes. Once 48 hours have passed and your monitoring is clean, you can safely decommission the old account.
Don’t Forget: The Post-Migration Checklist
The migration is done, but a handful of follow-ups prevent the silent failures that show up days later. Run through these once the new server is live.
Test your email thoroughly — send and receive from several external providers like Gmail and Outlook, and watch for bounces over the next day or two. Confirm your SSL certificate is valid across the site with no mixed-content warnings or redirect loops. Check any place your application hardcodes a server IP or path and update it. Verify your cron jobs are actually firing on the new server, not just present.
Log into Google Search Console, resubmit your sitemap, and watch the coverage report so Google recrawls cleanly; Google’s guidance on site moves covers what to monitor when your URLs stay the same but the host changes. Finally, once everything has been stable for a few days, raise your DNS TTL back to a normal value so you are not carrying the overhead of constant lookups. That last boring list is what separates a migration that looks done from one that genuinely is.
Conclusion: A Planned Upgrade, Not a Gamble
The whole reason migration feels dangerous is that people picture flipping a switch and hoping. Done properly it is the opposite of that: you back up everything, lower your TTL days ahead, build and harden the new server while the old one keeps serving, test the new site privately through your hosts file, and only then cut over — with the old server standing by as a fallback. Sequence turns a gamble into a routine, near-zero-downtime upgrade. The fear was never really about migration; it was about doing it in the wrong order.
When you are ready to make the move, our Linux VPS 365 plans are built for exactly this step up. The c4.medium at $19.99 per month, with 4 cores and 8 GB of RAM, is where most sites outgrowing shared hosting land comfortably, while the t3.small at $9.99 is a lighter first step up. Every plan gives you full root access, dedicated KVM resources that are yours alone, NVMe storage, free automated backups, and snapshots — and our 24×7 team can help with the migration itself. Your renewal price always matches your signup price. Move up when your site is ready, and do it the calm way.
Done in the right order, effectively none. By building and testing the new server before changing any DNS, lowering your TTL in advance, and keeping the old server running during propagation, visitors are always served by a working server — the new one if their DNS has updated, the old one if it has not. The overlap is what makes it seamless.
The hands-on work is usually an afternoon, though a large site’s file and database transfer can run longer in the background. Because the old server stays live throughout, that transfer time costs you nothing in downtime. The actual DNS cutover, with a lowered TTL, propagates to most visitors within five to fifteen minutes.
When shared hosting is genuinely the bottleneck: pages stay slow after you have optimized and cached, you hit recurring 500 or 503 errors from resource limits, traffic spikes take you down, or you need root access and a custom stack. If the slowness is from an unoptimized site rather than the server, fix that first — a VPS will not cure it.
Not if you do it well. Because your domain and URLs stay the same, there is no redirect mapping to manage, and a faster server typically improves Core Web Vitals, which helps rankings. Resubmit your sitemap in Search Console after the move and monitor coverage; a clean migration to faster hosting is usually an SEO positive, not a risk.
Both paths exist. A confident user with SSH access can follow this process directly, and many hosts, including Webhost365, offer migration help from their support teams. If you are not comfortable with the command line or DNS, ask your new host to handle the transfer — it is a common request and the safest route if you are unsure.
That depends on whether your mail is moving. If email stays with its current provider, leave the MX, SPF, DKIM, and DMARC records exactly as they are and only change the website’s A records. If mail is moving to the new server too, replicate all of those records exactly before cutting over the MX, then test sending and receiving from external accounts and watch for bounces for a day or two.