Hosting an MCP server is only half the picture. The other half — and arguably the more interesting half — is building one. Last week we walked through how to self-host a Model Context Protocol server on a VPS: the architecture, the deployment, the security choices that matter once your endpoint is reachable from the internet. This guide is what comes before that. We are going to build an MCP server from a blank folder, step by step, in roughly an hour of focused work.
The server we will build is a Content Helper — three tools that count words, generate URL slugs, and extract heading structure from markdown, plus a style-guide resource the AI can read for editorial rules. It is deliberately chosen over the usual calculator or hello-world example for two reasons. First, it is genuinely useful — the kind of server you might actually keep using after the tutorial ends. Second, it exercises every core pattern you need to know to build any MCP server: input validation with Zod, structured response formatting, resources with URI templates, and the JSON-RPC lifecycle. By the time you finish, you will know enough to build a server for your own internal tools, your own CRM, your own CMS, your own anything.
We run this kind of server in production at Webhost365 — a slightly larger relative of the one in this tutorial bridges Claude Desktop to our WordPress publishing pipeline, automating much of the workflow behind this blog. The patterns here are not theoretical; they are the ones we ship. What follows is everything you need: prerequisites and project setup, the SDK primitives explained plainly, three working tools, a resource, end-to-end testing with the MCP Inspector, and a clean hand-off to Claude Desktop. The deployment-to-production part lives in the hosting guide — by the end of this tutorial you will have a server ready to be deployed by it.
What You’ll Build
The Content Helper is a small, single-file MCP server written in TypeScript that exposes three tools and one resource. The whole thing comes out to roughly 150 lines of code, fits in a single project folder, and runs on any machine with Node.js installed. Once you connect it to Claude Desktop, you can ask the assistant questions like “how long is this draft and what’s a good slug for the title?” and watch it invoke the right tools without you specifying which ones to call.
Here is what each piece does:
word_count— takes a string of text, returns the word count, character count (with and without spaces), and an estimated reading time in minutes. Useful for editorial work, content briefs, social media drafts.to_slug— takes a string, returns a URL-safe lowercase slug with hyphens. Handles punctuation, accented characters, and common edge cases. The kind of thing every CMS needs and every developer rewrites from scratch.extract_headings— takes a markdown document, returns a structured outline of all H2, H3, and H4 headings with their levels and text content. Useful for table-of-contents generation, document analysis, and content audits.style_guide— a resource (not a tool) that exposes a small set of editorial style rules the AI can read on its own initiative. Active voice over passive, Oxford comma, sentence-case headings, no em-dashes in body copy, that sort of thing.
That combination demonstrates almost everything you need to know to build a production MCP server. The tools cover input validation with Zod, structured output, async handlers, and tool descriptions written for LLM consumption rather than human consumption. The resource shows how to expose passive data the AI can pull when relevant, with URI templates that let you parameterise what gets returned. Once you understand these patterns, swapping in your own logic — a database query, an API call, a file operation — is a small change rather than a fresh learning curve.
The example is also small enough to fit in your head. You will not be wrestling with framework boilerplate or business-logic distractions; every line either teaches an MCP concept or implements one of the four capabilities above. That is deliberate. The goal is not to ship the Content Helper; the goal is to have you walk away understanding MCP well enough to build whatever server your work actually needs.
MCP Server Anatomy: Tools, Resources, and Prompts
Before we write any code, it helps to know what an MCP server is actually made of. The protocol defines three primitives — tools, resources, and prompts — and the distinction between them is the single concept that confuses new builders the most. Get this right and the rest of the SDK reads like plain English.
Tools are actions the AI can invoke. When the language model decides it wants to do something — query a database, send a message, write a file, count words — it calls a tool. Tools have side effects, take typed inputs, return structured outputs, and the AI explicitly chooses when to use them based on the tool’s description and the user’s request. Think of tools as functions you are exposing to the AI: they are verbs.
Resources are data the AI can read. Where a tool is “do this thing for me,” a resource is “here is some information you can refer to if you need it.” Resources are passive — they do not run code on the AI’s behalf, they just expose content (a file, a database record, a configuration document, a knowledge base entry) under a URI. The AI can list available resources, read them, and use what it finds as context. Think of resources as nouns: documents, records, settings.
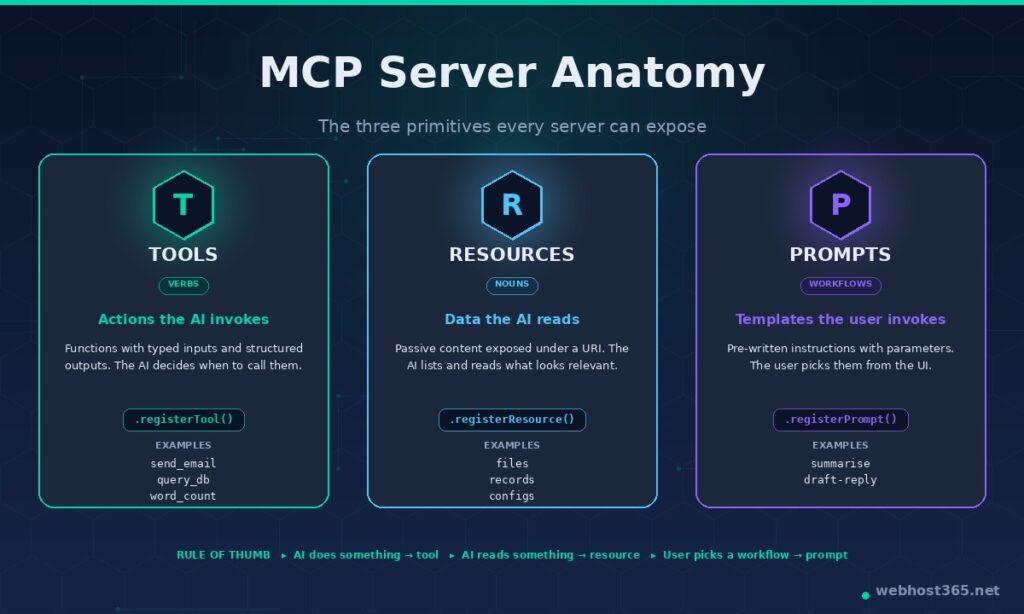
Prompts are parameterised templates the AI can use. A prompt is a pre-written instruction or template that the user (or the host application) can invoke with parameters filled in. Prompts are useful for canned workflows — “summarise this in our brand voice,” “draft a release announcement following our format” — where you want to encode a particular pattern and let the AI execute it consistently. In practice, prompts are the least-used primitive of the three; most production servers expose tools and maybe a resource or two, and skip prompts entirely.
Here is the quick comparison:
| Primitive | What it does | Who initiates | Side effects | Typical example |
|---|---|---|---|---|
| Tool | Performs an action | The AI model decides | Yes | send_email, query_database, word_count |
| Resource | Exposes readable data | The AI reads when relevant | No | A file, a record, a config document |
| Prompt | Provides a template | The user invokes | No | “Summarise in brand voice” template |
A useful rule of thumb when designing your own server: if the AI does something, it is a tool. If the AI reads something, it is a resource. If the user picks a workflow, it is a prompt. When in doubt, lean toward tools — they are the most flexible, the best supported across clients, and the most commonly invoked. The Content Helper we are about to build follows exactly this hierarchy: three tools for actions, one resource for reference data, and no prompts.
Prerequisites and Project Setup
The Content Helper needs four things on your machine: Node.js, npm, a code editor, and an MCP-aware client to test against. Anything modern works — we will use Claude Desktop because the setup is the easiest, but Cursor, VS Code with the MCP extension, or ChatGPT Desktop all work the same way once your server is built.
For the runtime, install Node.js 20 LTS or newer. The MCP SDK targets modern Node.js and uses ES modules natively, so older versions will fail in confusing ways. Verify your version:
bash
node --version  # should print v20.x or higher
npm --version
Now create the project. Make a fresh folder, initialise an npm package, and install the three dependencies you need:
bash
mkdir content-helper-mcp && cd content-helper-mcp
npm init -y
npm install @modelcontextprotocol/sdk zod
npm install -D typescript @types/node tsx
The @modelcontextprotocol/sdk package is the official TypeScript SDK — it handles JSON-RPC framing, capability negotiation, and transport management so you only have to write your tool logic. zod is the schema-validation library the SDK uses for input types; if you have not used Zod before, the gist is that it lets you define a TypeScript type and a runtime validator in one go. typescript, @types/node, and tsx are development dependencies — tsx lets you run TypeScript files directly without a separate build step during development.
Now the critical part. Create a tsconfig.json in the project root:
json
{
  "compilerOptions": {
    "target": "ES2022",
    "module": "NodeNext",
    "moduleResolution": "NodeNext",
    "esModuleInterop": true,
    "strict": true,
    "outDir": "dist",
    "rootDir": "src",
    "declaration": false,
    "skipLibCheck": true
  },
  "include": ["src/**/*"]
}
The "moduleResolution": "NodeNext" setting is the single most important line in this file. The MCP SDK is ESM-only, which means it uses native ECMAScript modules rather than CommonJS. If moduleResolution is set to the default "node", your imports of @modelcontextprotocol/sdk will compile fine but fail at runtime with cryptic errors about missing exports. This is the most common bug in every existing MCP tutorial. Set it once, correctly, and move on.
While you are in the project root, open the auto-generated package.json and add one line: "type": "module". This tells Node.js to treat .js files as ES modules by default, which is what the SDK expects.
json
{
  "name": "content-helper-mcp",
  "version": "1.0.0",
  "type": "module",
  "scripts": {
    "dev": "tsx src/server.ts",
    "build": "tsc",
    "start": "node dist/server.js"
  }
}
Finally, create a src/ folder and an empty src/server.ts file inside it. That is the entire scaffolding done. Your project structure should look like this:
content-helper-mcp/
├── node_modules/
├── src/
│   └── server.ts
├── package.json
├── tsconfig.json
└── package-lock.json
With the project set up, the next section writes the first tool.
Writing Your First Tool
Open src/server.ts and start with the imports. We need the McpServer class, the StdioServerTransport, and Zod for schema validation:
typescript
import { McpServer } from "@modelcontextprotocol/sdk/server/mcp.js";
import { StdioServerTransport } from "@modelcontextprotocol/sdk/server/stdio.js";
import { z } from "zod";
Notice the .js extensions on the imports even though the files are TypeScript. This is a quirk of ESM: at runtime the compiled output will be .js, and TypeScript’s NodeNext resolution requires you to write the import paths the way they will exist at runtime, not the way they look in source. The SDK enforces this throughout.
Now instantiate the server. The McpServer class is the high-level entry point — it gives you registerTool, registerResource, and registerPrompt methods and handles all the protocol-level wiring underneath:
typescript
const server = new McpServer({
  name: "content-helper",
  version: "1.0.0",
});
The name and version show up in the client’s connector list, so pick something descriptive. Capabilities (tools, resources, prompts) are detected automatically based on what you register; you do not need to declare them up front.
Now the first tool. word_count takes a string of text and returns word, character, and reading-time stats. Here is the full registration:
typescript
server.registerTool(
  "word_count",
  {
    description:
      "Count words, characters, and estimated reading time in a piece of text. " +
      "Useful for editorial work, content briefs, and social media drafts where " +
      "length matters.",
    inputSchema: {
      text: z
        .string()
        .min(1)
        .describe("The text to analyse"),
    },
  },
  async ({ text }) => {
    const words = text.trim().split(/\s+/).filter(Boolean).length;
    const charsWithSpaces = text.length;
    const charsWithoutSpaces = text.replace(/\s/g, "").length;
    const readingMinutes = Math.max(1, Math.ceil(words / 225));

    return {
      content: [
        {
          type: "text",
          text:
            `Words: ${words}\n` +
            `Characters (with spaces): ${charsWithSpaces}\n` +
            `Characters (no spaces): ${charsWithoutSpaces}\n` +
            `Estimated reading time: ${readingMinutes} minute(s)`,
        },
      ],
    };
  },
);
Three things deserve attention here. The description is what the LLM reads when it decides whether to invoke this tool. Vague descriptions get ignored; specific descriptions with use cases get called. “Counts words in text” is too thin — the model has no idea when it is supposed to use you. “Count words, characters, and estimated reading time… useful for editorial work…” tells the model both what the tool does and when reaching for it makes sense. Treat tool descriptions like API documentation written for an AI, because that is exactly what they are.
The input schema is a Zod object. Each field gets a Zod validator and an optional .describe() call that becomes the parameter documentation the LLM sees. Zod handles runtime validation automatically — if a client passes a non-string text, the SDK rejects the call before your handler runs and returns a clean error to the client. You do not need to write input validation yourself; Zod is doing it.
The handler returns a content array. Every MCP tool response is a structured array of content blocks, even when you are returning a single string. The type: "text" block is by far the most common; the protocol also supports image and resource blocks for richer responses, which we will not need here.
Finally, connect the server to a transport and start listening. Add this at the bottom of the file:
typescript
const transport = new StdioServerTransport();
await server.connect(transport);

// IMPORTANT: never log to stdout in a stdio server.
// stdout is reserved for JSON-RPC messages — anything else corrupts the protocol.
// Always use console.error() for diagnostic output.
console.error("Content Helper MCP server running on stdio");
That comment is not decoration; it is the single most important line in the entire file. The stdio transport uses standard output to send JSON-RPC messages to the client. If you console.log() anything — a debug message, a request dump, a “server started” banner — that text gets injected into the JSON-RPC stream, the client cannot parse what it receives, and the server silently fails to register. The symptom is “my server does not appear in Claude Desktop” with no error message anywhere. Use console.error() for everything diagnostic; it goes to stderr, which the client ignores. Burn this rule into your reflexes — every experienced MCP developer has lost an hour to it at least once.
Run your server to make sure it starts cleanly:
bash
npm run devYou should see Content Helper MCP server running on stdio printed to your terminal, and nothing else. The process will sit there waiting for a client to connect over stdin. Press Ctrl+C to stop it. If you got a startup error, the most likely culprits are a typo in the import paths, a missing "type": "module" in package.json, or an npm install that did not complete — re-check those three and try again.
You now have a working MCP server with one tool. The next section adds the two remaining tools, then we move on to the resource.
Adding More Tools
The pattern from the first tool repeats for every tool you add. Register a name, give it a sharp description, define an input schema with Zod, write the handler, return a content array. Most of the work in building an MCP server is just writing the tool logic; the protocol scaffolding stops being interesting after the first one.
The second tool, to_slug, turns a string into a URL-safe slug. The kind of thing every CMS needs, every developer has rewritten three times, and that an AI can now call directly when it is helping with editorial work. Add this below the word_count registration:
typescript
server.registerTool(
  "to_slug",
  {
    description:
      "Convert a string to a URL-safe lowercase slug with hyphens. Handles " +
      "punctuation, accented characters, and consecutive spaces. Useful when " +
      "generating slugs for blog post URLs, file names, or any identifier that " +
      "needs to be web-safe.",
    inputSchema: {
      text: z
        .string()
        .min(1)
        .describe("The string to convert into a slug"),
      maxLength: z
        .number()
        .int()
        .min(1)
        .max(200)
        .optional()
        .describe("Optional maximum slug length (truncates at word boundary)"),
    },
  },
  async ({ text, maxLength }) => {
    let slug = text
      .normalize("NFKD")                         // split accented chars
      .replace(/[\u0300-\u036f]/g, "")          // strip diacritics
      .toLowerCase()
      .replace(/[^a-z0-9\s-]/g, "")             // drop everything non-alphanumeric
      .trim()
      .replace(/\s+/g, "-")                      // spaces to hyphens
      .replace(/-+/g, "-");                      // collapse repeated hyphens

    if (maxLength && slug.length > maxLength) {
      slug = slug.slice(0, maxLength).replace(/-[^-]*$/, "");
    }

    return {
      content: [{ type: "text", text: slug }],
    };
  },
);
A few things to notice that you will reuse across every tool you ever write.
Optional parameters use .optional() on the Zod field. The maxLength parameter is not required — if the client does not pass it, the handler receives undefined and you handle that case in the logic. This is the standard pattern for tools that have sensible defaults but accept overrides.
Multiple constraints chain naturally. The maxLength field has .int().min(1).max(200) chained together — Zod validates all three at runtime. If a client tries to pass 500 or -3 or 1.5, the SDK rejects the call and returns an error to the client without your handler ever running. This is why Zod is worth the dependency: input validation that would normally be a tedious pile of if statements is now declarative.
Descriptions still carry the weight. The description tells the AI when to reach for this tool — “useful when generating slugs for blog post URLs, file names, or any identifier that needs to be web-safe” — and that wording is what makes the difference between Claude picking up the tool and ignoring it. Spend more time on descriptions than you think is reasonable.
The third tool, extract_headings, parses a markdown document and returns a structured outline. Useful for table-of-contents generation, content audits, and giving an AI a quick map of a long document before it dives in. This one returns a more interesting payload — a list of objects, not just a string:
typescript
server.registerTool(
  "extract_headings",
  {
    description:
      "Parse a markdown document and extract all H2, H3, and H4 headings into a " +
      "structured outline. Returns each heading with its level and text. Useful " +
      "for generating tables of contents, auditing document structure, or giving " +
      "an AI a quick map of a long document.",
    inputSchema: {
      markdown: z
        .string()
        .min(1)
        .describe("The markdown content to analyse"),
    },
  },
  async ({ markdown }) => {
    const lines = markdown.split("\n");
    const headings: { level: number; text: string }[] = [];

    for (const line of lines) {
      const match = line.match(/^(#{2,4})\s+(.+?)\s*$/);
      if (match) {
        headings.push({
          level: match[1].length,
          text: match[2],
        });
      }
    }

    if (headings.length === 0) {
      return {
        content: [
          { type: "text", text: "No H2, H3, or H4 headings found in the document." },
        ],
      };
    }

    const formatted = headings
      .map((h) => `${"  ".repeat(h.level - 2)}H${h.level}: ${h.text}`)
      .join("\n");

    return {
      content: [
        { type: "text", text: `Found ${headings.length} headings:\n\n${formatted}` },
      ],
    };
  },
);
This handler does one extra thing the first two did not: it handles the empty-result case explicitly. If the markdown has no headings, returning an empty list would be confusing to the AI — it has no way to tell whether the tool failed, parsed nothing, or hit an edge case. Returning a clear “no headings found” message keeps the interaction interpretable. Whenever a tool can legitimately return nothing, return a meaningful message instead.
All three tools share the same response shape — a content array with type: "text" blocks — because that is the lingua franca of MCP responses. The protocol does support type: "image" and type: "resource" blocks for richer outputs, but in practice the vast majority of tools return text, and text is what every client knows how to render. Stay with text unless you genuinely need something else.
Adding Resources to Your MCP Server
Tools are for actions; resources are for data. The Content Helper exposes one resource — an editorial style guide that the AI can read on its own initiative when it is doing writing-related work. The AI does not call a resource the way it calls a tool. Instead, it lists what is available and reads what looks relevant, the same way a human consultant would skim a brief before answering a question.
Resources are identified by a URI. The URI scheme is yours to choose; what matters is that it is unique within your server. For the style guide, we will use style://guide/editorial. Add this to src/server.ts:
typescript
server.registerResource(
  "style-guide",
  "style://guide/editorial",
  {
    title: "Editorial Style Guide",
    description:
      "Webhost365 editorial style rules covering voice, punctuation, " +
      "formatting, and common house preferences. Read this when writing or " +
      "editing content for the brand.",
    mimeType: "text/plain",
  },
  async (uri) => ({
    contents: [
      {
        uri: uri.href,
        mimeType: "text/plain",
        text: [
          "WEBHOST365 EDITORIAL STYLE GUIDE",
          "",
          "VOICE",
          "- Active voice over passive in 90% of sentences.",
          "- Sentence-case headings, never title case.",
          "- Second person ('you') for instructions; first-person plural ('we') for brand statements.",
          "",
          "PUNCTUATION",
          "- Oxford comma in all lists of three or more.",
          "- En-dash (–) for ranges; em-dash (—) only when no cleaner alternative exists.",
          "- Single space after periods, never double.",
          "",
          "FORMATTING",
          "- Prefer prose over bullet lists when fewer than four items.",
          "- Code blocks for any inline command or file path.",
          "- Never bold an entire sentence for emphasis — rewrite instead.",
          "",
          "AVOID",
          "- 'In today's fast-paced world…' and its variants.",
          "- 'Game-changer', 'leverage' as a verb, 'utilise' when 'use' will do.",
          "- Claims of superiority without specifics.",
        ].join("\n"),
      },
    ],
  }),
);
A resource registration takes four arguments: a stable identifier, the URI, a metadata block, and a read handler. The handler returns a contents array — note the plural, distinct from the content array a tool returns. A single resource can return multiple content blocks if the underlying data has several parts; most of the time you will return one.
Resources can also be dynamic, using URI templates with parameters. If we wanted to expose individual rule categories rather than the whole style guide at once, we could register a templated resource like style://rule/{category} and pull the right section based on the parameter. The pattern looks like this:
typescript
server.registerResource(
  "style-rule",
  new ResourceTemplate("style://rule/{category}", { list: undefined }),
  {
    title: "Editorial Style Rule by Category",
    description: "Read a specific style guide section by category name " +
      "(voice, punctuation, formatting, avoid).",
  },
  async (uri, { category }) => {
    const rules = getRulesForCategory(category);  // your lookup function
    return {
      contents: [{
        uri: uri.href,
        mimeType: "text/plain",
        text: rules,
      }],
    };
  },
);
You would need to add ResourceTemplate to your imports — import { McpServer, ResourceTemplate } from "@modelcontextprotocol/sdk/server/mcp.js" — and write the getRulesForCategory helper. We are not adding the templated version to the Content Helper because the static resource is enough to demonstrate the concept, but the pattern is identical to tools with parameters once you have seen it once.
The rule of thumb for choosing between a tool and a resource is the one from the anatomy section: if the AI does something, it is a tool. If the AI reads something, it is a resource. A function that queries a database is a tool. A document the AI can pull for context is a resource. When in doubt, pick a tool — tools are better supported across clients and more flexibly composable. Resources are an optimisation for cases where the data is genuinely passive reference material.
Adding Prompts (Briefly)
Prompts are the third MCP primitive and the least-used of the three. A prompt is a parameterised template that the user (or the host application) can invoke to start a particular workflow — “summarise this in our house voice,” “draft a release announcement following our format,” that kind of thing. The AI does not pick a prompt on its own initiative the way it picks a tool; the user surfaces the prompt through the client’s UI and the prompt expands into the message that gets sent to the model.
For completeness, here is what registering one looks like:
typescript
server.registerPrompt(
  "draft-blog-intro",
  {
    title: "Draft a blog post intro",
    description:
      "Generate an opening paragraph for a blog post following the Webhost365 " +
      "voice — hook in the first sentence, problem statement in the second, " +
      "preview of the article in the third.",
    argsSchema: {
      topic: z.string().describe("What the blog post is about"),
      audience: z.string().optional().describe("Who the post is for"),
    },
  },
  ({ topic, audience }) => ({
    messages: [
      {
        role: "user",
        content: {
          type: "text",
          text:
            `Write a three-sentence introduction for a blog post about ${topic}` +
            (audience ? ` targeted at ${audience}.` : ".") +
            ` Follow the Webhost365 voice: open with a concrete hook, state the ` +
            `problem the reader cares about, and preview what the article will ` +
            `cover. Avoid generic openings.`,
        },
      },
    ],
  }),
);
A prompt returns a messages array — pre-built messages that get inserted into the conversation when the prompt is invoked. The user can fill in topic and audience through the client’s prompt-picker UI, and the template expands accordingly.
In practice, you can build a perfectly useful MCP server without ever registering a prompt. Most production servers — including ours at Webhost365 — expose tools and maybe a resource or two, and skip prompts entirely. They are worth knowing about so you recognise them when reading documentation, but if the Content Helper is the first server you ever build, leave the prompt example out and lose nothing.
We will not be adding the prompt to our actual file. The complete src/server.ts you have now — three tools and one resource — is the working server we are about to test.
Testing Your Server with MCP Inspector
Before connecting the server to Claude Desktop or any other real client, test it with the MCP Inspector. The Inspector is an official debugging tool from the MCP team that gives you a web UI for inspecting servers — listing their tools and resources, invoking calls manually, and watching the raw JSON-RPC traffic. It catches roughly nine out of ten bugs before any real client gets involved, which matters because Claude Desktop aggressively caches capabilities and will happily show you stale tool definitions for an entire session if you do not restart it carefully.
Run the Inspector against your server with a single command. From the project root:
bash
npx @modelcontextprotocol/inspector tsx src/server.tsThe first argument after inspector is the command that launches your server — in this case tsx src/server.ts to run the TypeScript file directly. The Inspector spawns your server as a subprocess, opens a stdio connection to it, and starts a local web UI you can reach at http://localhost:6274 (the port shows in the terminal output).
Open the URL in your browser. You will see a panel labelled “Server Info” with the name and version you set in McpServer({...}). Below that, the Inspector exposes three tabs — Tools, Resources, Prompts — corresponding to MCP’s three primitives. Click into Tools and you should see all three of your tools listed with their descriptions and input schemas. If the descriptions look exactly like what you wrote, the registration is working.
Click on word_count and the Inspector shows a form for the input schema. Type a paragraph into the text field, hit Run Tool, and the response appears below: word count, character counts, reading time. Do the same for to_slug (“My First MCP Server Tutorial” should slug to my-first-mcp-server-tutorial) and extract_headings (paste any markdown with ## and ### lines). The Resources tab works the same way — click style-guide and the editorial rules render in the response panel.
If any of those fail, the Inspector shows the error inline rather than swallowing it the way a real client might. Common issues at this stage: a typo in the Zod schema, a handler that throws instead of returning a content array, a tool that logs to stdout and corrupts the stream. The Inspector’s raw-message view (under the gear icon) shows the JSON-RPC traffic verbatim, which is invaluable when something is mysteriously not working.
Get every tool and the resource working in the Inspector before moving on. A server that works in the Inspector will work in Claude Desktop; a server that fails in the Inspector will fail everywhere. Use the cheap, fast feedback loop while you can.
Connecting to Claude Desktop
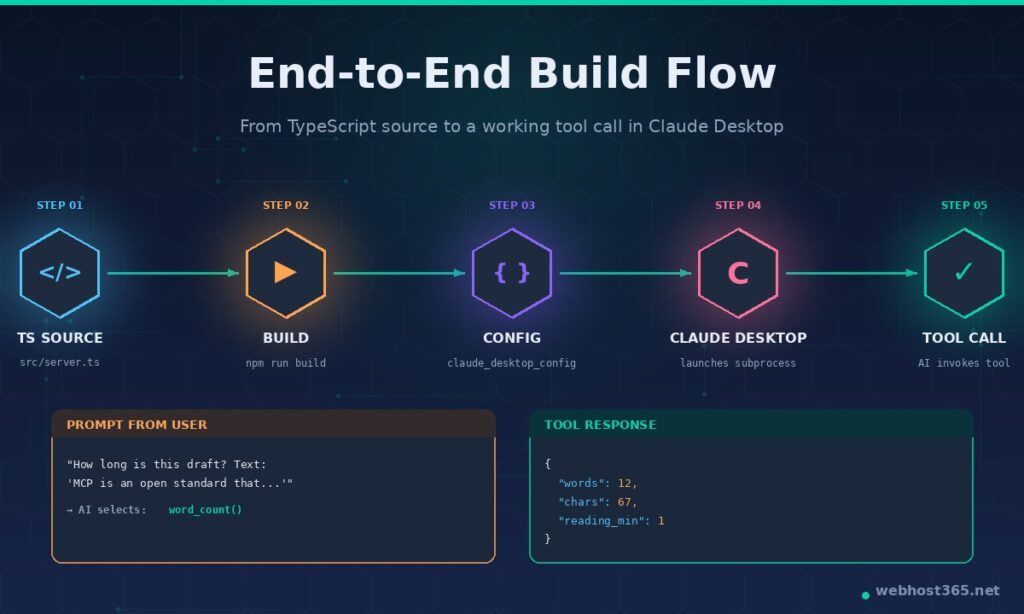
Once the Inspector confirms your server is working, connecting it to Claude Desktop is a matter of two steps: build the TypeScript to JavaScript, then add a config entry that tells Claude where to find the compiled file.
Build the project first. From the project root, run:
bash
npm run buildThat invokes tsc (the TypeScript compiler) using the settings in tsconfig.json and writes the compiled output to dist/server.js. Verify the build worked:
bash
ls dist/
# should show server.js
If you see dist/server.js, you have a runnable artefact. The file inside is plain Node.js — Claude Desktop will execute it directly with no TypeScript involved.
Now find Claude Desktop’s config file. The location depends on your operating system:
- macOS:
~/Library/Application Support/Claude/claude_desktop_config.json - Windows:
%APPDATA%\Claude\claude_desktop_config.json - Linux:
~/.config/Claude/claude_desktop_config.json
If the file does not exist yet, create it. Open it in your editor and add an mcpServers block:
json
{
  "mcpServers": {
    "content-helper": {
      "command": "node",
      "args": ["/absolute/path/to/content-helper-mcp/dist/server.js"]
    }
  }
}
Three details to get right. The path must be absolute — ~/projects/... and relative paths do not work because Claude Desktop launches the process from its own working directory, not yours. Use the full path starting from the filesystem root (/Users/you/... on macOS, C:\\Users\\you\\... on Windows with double backslashes for JSON escaping). The command is node, not tsx — Claude Desktop should be executing your compiled JavaScript, not your TypeScript source. The server key ("content-helper") is the name that will appear in Claude’s UI — pick something readable; this is what you will see in the tool indicator.
Save the file and fully quit Claude Desktop. Closing the window is not enough on macOS or Windows — use Cmd+Q (macOS), right-click the system tray icon and choose Quit (Windows), or kill the process. MCP config is read once at startup; if you skip the full quit, the new server will not appear no matter how many times you reload the chat.
Reopen Claude Desktop. The connector indicator (a small icon near the chat input on most builds) should now show your server in its list. Open a new chat and try a prompt that should trigger one of the tools:
“How long is this draft? It says: ‘The Model Context Protocol is an open standard that gives AI applications a clean way to expose tools and data to language models.'”
Claude should recognise that word_count is the right tool, invoke it, and return the analysis in the response. The first time it does this is genuinely satisfying — you have just given an AI a capability it did not previously have, on your own infrastructure, using your own code. Try the other tools the same way:
“What’s a good URL slug for the title ‘How to Build Your Own MCP Server: A Step-by-Step Tutorial’?”
“Here’s a markdown document. Can you extract the heading structure?” [paste any markdown]
If the tools work, congratulations — your MCP server is live in production from the client’s perspective. If they do not, the troubleshooting section a few sections down covers the most common failures.
The same configuration pattern works for Cursor, VS Code with the MCP extension, ChatGPT Desktop, and any other MCP-aware client — the file location and JSON shape vary slightly, but the idea is the same: tell the client how to launch your server’s compiled binary, restart the client, use the tools.
Error Handling and Validation
Most of the error handling in your MCP server is already done — by Zod, by the SDK, and by the protocol itself. Zod rejects invalid inputs before they ever reach your handler. The SDK catches uncaught exceptions and converts them into protocol-level errors the client can display. The protocol itself defines structured error responses that clients know how to render. The work left for you is small but important: deciding which errors to throw and which to return as structured content.
The simplest pattern is to throw an error when the request is genuinely invalid, and let the SDK convert it into a JSON-RPC error response:
typescript
async ({ text }) => {
  if (text.length > 100_000) {
    throw new Error("Text exceeds 100,000 character limit");
  }
  // ... handle normally
}
The SDK catches the throw, packages it as an error response with the error message, and the client surfaces it to the user. Claude Desktop displays it inline in the chat; the AI sees it and decides whether to retry, reformulate, or explain the failure to the user.
The alternative pattern is to return an error as a content block when the call technically succeeded but produced a result the AI should know about:
typescript
async ({ markdown }) => {
  const headings = extractHeadings(markdown);
  if (headings.length === 0) {
    return {
      content: [{
        type: "text",
        text: "No H2, H3, or H4 headings found in the document."
      }],
    };
  }
  // ... return real result
}
This is what we are already doing in extract_headings. The difference matters: a thrown error tells the AI “this call failed, decide what to do next”; a structured “no results” content block tells the AI “this call succeeded with a meaningful but empty result.” The first is for genuine failures; the second is for valid responses that happen to be empty.
There is a third option — returning an error content block with the isError flag set:
typescript
return {
  content: [{ type: "text", text: "Cannot parse: input is not valid markdown" }],
  isError: true,
};
Use this when the call failed in a way the AI needs to know about (so it can retry or recover) but you do not want the host application to surface it as a protocol-level exception. In practice, throwing is usually clearer; the isError flag is most useful when you want the AI to receive structured failure information without involving the client’s error UI.
The one thing you should never do is let exceptions escape unhandled. An uncaught error in a handler does not crash the SDK — it gets caught and turned into a response — but if your handler is doing async work (a database call, an HTTP request), make sure you await everything and wrap external calls in try/catch when failure is plausible. A handler that throws three layers deep into a forgotten unhandled promise rejection produces “Unknown error” responses that take much longer to debug than a simple try/catch would have prevented.
Zod is doing the heavy lifting for input validation, but you can add semantic validation in the handler when the schema is not enough. The to_slug tool, for example, could legitimately reject inputs that are entirely whitespace — Zod’s .min(1) only checks character count, not content:
typescript
async ({ text }) => {
  if (text.trim().length === 0) {
    throw new Error("Input must contain at least one non-whitespace character");
  }
  // ... slugify
}
The split is worth internalising: Zod validates types and shape; your handler validates meaning. Together they cover the input space, and the SDK handles everything that goes wrong downstream.
From stdio to Streamable HTTP for Production
Everything we have built so far uses stdio transport — the server runs as a subprocess of Claude Desktop, the two processes talk through standard input and output, and the server only exists for the duration of the host’s session. This is the right transport for development and for personal-use servers. It is the wrong transport for anything you want to share, host remotely, or run on a VPS.
Switching to Streamable HTTP is straightforward. The server logic — tools, resources, schemas, handlers — does not change. Only the transport setup at the bottom of the file changes. Replace the stdio block with an HTTP server:
typescript
import { StreamableHTTPServerTransport } from "@modelcontextprotocol/sdk/server/streamableHttp.js";
import express from "express";
import { randomUUID } from "node:crypto";

// ... your server, tool, and resource registrations stay exactly the same ...

const app = express();
app.use(express.json());

const transport = new StreamableHTTPServerTransport({
  sessionIdGenerator: () => randomUUID(),
});

await server.connect(transport);

app.post("/mcp", (req, res) => transport.handleRequest(req, res, req.body));
app.get("/mcp", (req, res) => transport.handleRequest(req, res));
app.delete("/mcp", (req, res) => transport.handleRequest(req, res));

app.listen(3000, "127.0.0.1", () => {
  console.error("Content Helper MCP server listening on 127.0.0.1:3000");
});
You will need one extra dependency:
bash
npm install express
npm install -D @types/express
A few things to call out. The server binds to 127.0.0.1, not 0.0.0.0. The Node.js process should only be reachable from the same machine; an Nginx reverse proxy in front of it handles TLS, authentication headers, and the connection from the outside world. Binding directly to a public interface is a security mistake even in development. The same /mcp endpoint handles POST, GET, and DELETE — Streamable HTTP uses all three methods for different parts of the lifecycle, so all three need to be wired to the transport. Session IDs are generated automatically by the transport using the sessionIdGenerator callback; the SDK handles session correlation across requests without further work from you.
That is the entire code change. The same server, the same tools, the same resource — now reachable over HTTPS by any MCP client that supports remote servers. Clients connect to https://your-domain.com/mcp instead of launching a local subprocess, present a bearer token for authentication, and the rest of the interaction is identical.
The deployment piece — actually getting this running on a VPS, with Nginx in front, TLS through Let’s Encrypt, systemd keeping the process alive, bearer-token authentication, rate limiting, monitoring — is everything we covered in the MCP Server Hosting guide. The eight-step deployment process there picks up exactly where this section leaves off: you have an HTTP-mode MCP server, now you put it into production. Read that guide once and you will have a complete picture from “blank folder” to “live server reachable by any client on the internet.”
Common Pitfalls
A short list of the failures that cost the most time, in roughly the order new builders encounter them.
The server starts cleanly but does not appear in Claude Desktop. Almost always the config file. Check the path is absolute, the JSON is valid (a missing comma will make Claude silently skip the entire mcpServers block), and that you fully quit and reopened Claude Desktop — not just closed the window. If the JSON parses and the path resolves, run the file manually with node /your/absolute/path/dist/server.js to make sure it actually starts; a runtime error there explains why Claude cannot launch it either.
Imports throw “Cannot find module” or “Unknown file extension”. ESM configuration is wrong somewhere. The three settings that need to agree: "type": "module" in package.json, "moduleResolution": "NodeNext" in tsconfig.json, and .js extensions in your import paths even though the source files are .ts. Missing any of the three produces a different error message, all of them confusing.
The server connects but tools never get called. Tool descriptions are too vague for the model to know when to use them. “Counts words” is a description; “Count words, characters, and estimated reading time. Useful for editorial work, content briefs, and social media drafts” is a description that actually triggers invocations. The model picks tools based on the description alone — invest the writing time.
“Server transport closed unexpectedly” or similar protocol errors. Something in your server is writing to stdout. The most common culprits are a stray console.log(), a third-party library that logs on import, or an error message that ends up on stdout instead of stderr. Audit every place your code produces output and route it through console.error(). The protocol uses stdout for JSON-RPC messages exclusively; anything else corrupts the stream.
Tool calls hang forever, or time out after exactly 60 seconds. Almost certainly a synchronous handler doing slow work, or an async handler that forgot to await something. The MCP SDK is async-native; every tool handler should be async, every external call should be awaited, and any blocking computation should be moved off the event loop with setImmediate or a worker thread. The 60-second timeout you sometimes see is the client giving up on a server that has not responded.
Changes to your code do not show up. You forgot to rebuild. The TypeScript source in src/server.ts is not what Claude Desktop runs — it runs the compiled JavaScript in dist/server.js. After every code change, run npm run build and fully restart Claude Desktop. During development, the Inspector run against tsx src/server.ts is faster because it skips the compile step, but Claude Desktop always wants the built output.
Capability changes do not propagate to the client. Claude Desktop caches the tool list at session start. If you add a new tool and the existing session does not see it, that is expected — close the chat, open a new one, and the new tool will appear. This bites everyone exactly once.
Resource reads work in the Inspector but not in Claude Desktop. Resource support varies by client. Claude Desktop currently surfaces resources through a specific UI affordance rather than automatic context inclusion, and not every client treats resources the same way. If a tool would work, prefer a tool — the support matrix is more even.
The pattern across all of these: the SDK is well-behaved when you give it what it expects. Almost every “weird” bug traces back to ESM configuration, stdout pollution, missing await, or a stale build. Once you have these reflexes, an MCP server is one of the simpler kinds of production code you will ever write.
Frequently Asked Questions
Yes. The official Python SDK is fully supported and ships the same primitives — tools, resources, prompts, and both stdio and Streamable HTTP transports. The API surface is similar enough that translating between the two SDKs is mostly mechanical. The reason this tutorial leads with TypeScript is ecosystem size — the TypeScript SDK has roughly an order of magnitude more npm downloads than the Python SDK has on PyPI, the tooling is more mature, and almost every reference server in the official registry is TypeScript. For data-science-heavy servers (anything involving NumPy, Pandas, scikit-learn, or ML model inference), Python is the better choice. For everything else, TypeScript is the path of least resistance.
Plain JavaScript works. The SDK is written in TypeScript but ships compiled JavaScript with type definitions, and you can call every function from a .js file without any TypeScript involved. You lose type checking for tool inputs and outputs, which makes Zod schemas marginally less useful, but the protocol-level behaviour is identical. If you are already comfortable in JavaScript and not interested in adding TypeScript to your toolchain, write your server in JavaScript and skip the build step entirely. The tradeoff is that more bugs will show up at runtime rather than during compilation.
Node.js 20 LTS is the practical minimum. The SDK uses native ECMAScript modules and a handful of recent platform APIs that older versions do not support. Node.js 18 will install the package but fail at runtime with module-resolution errors. Node.js 22 is the current LTS at the time of writing and is the version we use in production at Webhost365. If you are picking a version for a fresh project, pick 22.
You generally cannot, and this is by design. MCP clients negotiate capabilities at session start — the list of tools, resources, and prompts is exchanged once during the initialize handshake and cached for the duration of the session. If you add a new tool or change an existing tool’s schema, you need to either start a new chat session (in clients like Claude Desktop) or restart the client entirely (if the same chat needs to see the change). The protocol does support a tools/list_changed notification that lets a server announce changes mid-session, but client support for handling this notification is uneven; do not rely on it as a substitute for proper deployment hygiene.
Not as a built-in protocol feature. MCP is a client-server protocol, and servers do not have a native way to invoke each other. If your workflow needs cross-server coordination, the standard pattern is to let the AI host do the orchestration — Claude calls a tool on server A, takes the result, then calls a tool on server B. For programmatic chaining without a model in the loop, you would write a workflow engine that acts as an MCP client to both servers and stitches the calls together itself. n8n, LangGraph, and similar orchestration tools all support this pattern.
Several models are emerging. Per-call billing wrapped around your server’s authentication layer is the most common — issue scoped bearer tokens to paying users, log every tool invocation against the token, bill at the end of the month. Subscription pricing with rate-limited tiers works well for general-purpose servers (free tier with 100 calls per day, paid tiers with higher limits). For B2B servers exposing proprietary data or workflows, flat per-seat licensing is often the cleanest model. The protocol itself does not include billing primitives — MCP is plumbing, not a marketplace — so the monetisation layer lives in your authentication and logging code.
McpServer and Server classes?McpServer is the high-level, recommended API — what we used throughout this tutorial. It provides registerTool, registerResource, and registerPrompt methods with built-in schema validation through Zod and automatic capability negotiation. Server is the lower-level class it is built on top of, which exposes raw request handlers (setRequestHandler keyed by JSON-RPC method name). For 99% of servers, McpServer is what you want. The lower-level Server class only matters when you need to handle a JSON-RPC method that the high-level API does not yet expose — an edge case most builders will never encounter. Older tutorials and documentation often show the Server class because McpServer was added later; the newer API is the one to learn.
No. The SDK handles framing, message parsing, ID correlation, capability negotiation, and transport management. Your code only deals with tool inputs, tool outputs, and the logic in between. The JSON-RPC layer is genuinely transparent — you can write a complete production server without ever reading a JSON-RPC message by hand. If you do want to inspect the raw protocol traffic for debugging, the MCP Inspector exposes it in a raw-messages view, and bumping the SDK’s log level shows every request and response in your terminal. But neither is necessary for normal development.
Conclusion
You now have everything you need to build an MCP server from a blank folder: project setup with the ESM configuration that trips up nine out of ten tutorials, three working tools that demonstrate input validation and structured responses, a resource that shows how to expose passive reference data, hands-on testing with the MCP Inspector, and a clean connection to Claude Desktop. The Content Helper is a small server, but every pattern in it scales — the next server you build, for your CRM, your internal API, your CMS, follows the same shape with different logic in the handlers.
What changes in production is the transport and what surrounds it. The stdio server in this tutorial runs as a subprocess of Claude Desktop on your laptop; the Streamable HTTP variant we sketched in Section 12 runs as a long-lived process on a VPS, behind an Nginx reverse proxy, with bearer-token authentication and the rest of the security layer that comes with internet-facing infrastructure. That is the entire scope of the MCP Server Hosting guide — the eight-step deployment process there picks up exactly where this tutorial ends.
If you are ready to host the server you just built, our Linux VPS 365 gives you the AMD EPYC processors, NVMe SSD storage, and root-level control that running an MCP server in production actually needs — starting at $4.99/mo, with enough headroom on the same VPS to add a vector database, a self-hosted LLM, or whatever else your AI stack grows into. The real value of MCP comes from the servers nobody else can write — the ones connected to your data, your tools, your workflows. The work pays for itself the first time an AI assistant takes an action against a system that no public model could have known about.