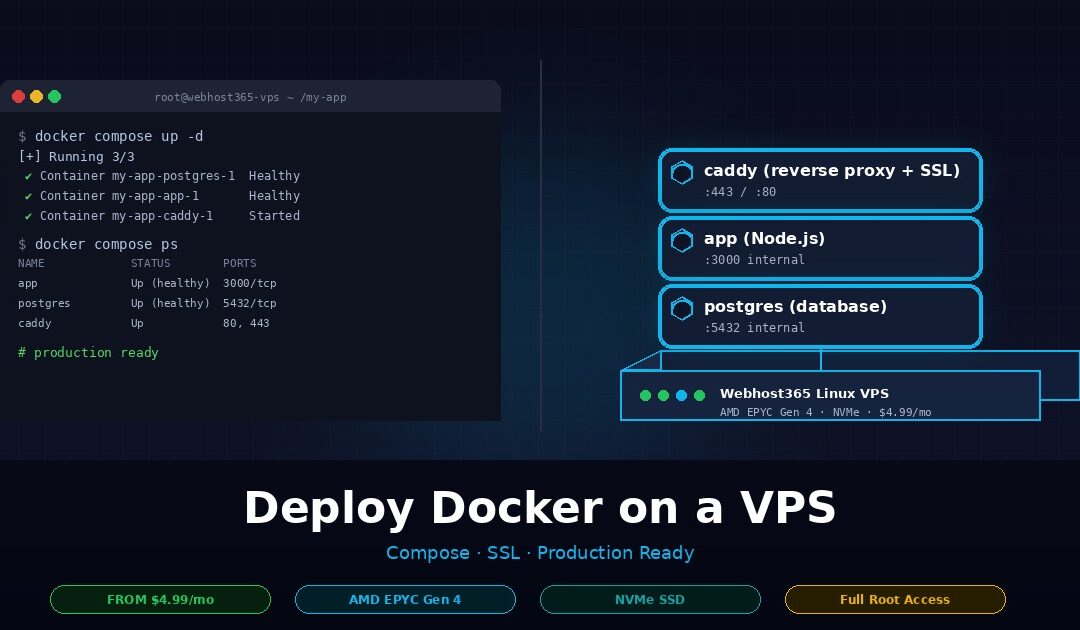
To deploy Docker containers on a VPS, install Docker Engine and Docker Compose, upload your compose file to the server, set up a reverse proxy with SSL, and start the stack with docker compose up -d. A Webhost365 Linux VPS runs Docker workloads from $4.99 per month with AMD EPYC Gen 4 processors, NVMe SSD storage, and full root access. There are no licensing fees, no per-container surcharges, and no cold starts between requests.
This guide walks through the full path from a working local Compose file to a production Docker stack. You will learn how to pick the right VPS specs, install Docker the right way, and deploy a three-service stack with a database and a reverse proxy. You will also add automatic SSL, configure logging and healthchecks, and run the stack like a production service with backups and auto-restart. Every command shown works on Ubuntu 22.04 or 24.04, which is the default on a Linux VPS at Webhost365.
Why a VPS is the right home for Docker containers
A VPS gives you the root access Docker needs and the single-tenant resources your containers depend on. Shared hosting cannot run Docker at all. Managed container platforms can, but they charge a premium and lock you into their deployment model. A VPS sits in the middle. It is cheap, it is capable, and it is yours to configure.
Shared hosting puts your account inside a user directory on a server shared with hundreds of other customers. You do not get root access. Then You cannot install system packages. You cannot load kernel modules or open arbitrary ports. Docker needs all three.
The Docker daemon requires root privileges to manage Linux namespaces, cgroups, and the overlay filesystem that isolates containers. On shared hosting, none of that is available to you. This is why shared hosting providers never advertise Docker support. If a host claims “Docker-compatible shared hosting,” they are usually running a stripped-down proxy or mislabelling their product. Real Docker needs a real Linux server.
Why a VPS fits Docker naturally
A VPS gives you a dedicated slice of a physical server with a full Linux kernel, root access, a public IP, and isolated CPU and RAM. Every ingredient Docker needs ships in the base image. On a Linux VPS, you get Ubuntu with systemd, full access to /etc/docker/, the ability to set kernel parameters, and the freedom to run whatever container runtime you prefer.
Dedicated resources also matter here. Docker containers on a VPS do not share RAM with neighbours. A memory-hungry database container will not starve because another tenant is running a memory leak. Your NVMe I/O is yours alone, which matters enormously for any container that writes to disk frequently. For a broader look at why a VPS sits above shared plans in the hosting ladder, see our guide on Linux VPS vs cloud hosting.
VPS versus managed PaaS (Render, Railway, Fly.io)
Managed Docker platforms such as Render, Railway, and Fly.io will happily run your image. They handle the server, the TLS certificates, and the deploy pipeline. The tradeoff is cost and lock-in.
A small Compose stack that costs $4.99 per month on a VPS will typically cost $25 to $75 per month on a PaaS. That gap grows once you factor in service counts, RAM tiers, and bandwidth. PaaS cold starts also become a problem for low-traffic apps. Your container hibernates after idle minutes, and the first request after hibernation takes 20 to 60 seconds to wake. A VPS container is always running, because the host is always on.
VPS versus Kubernetes-as-a-Service
Managed Kubernetes services like GKE, EKS, and DigitalOcean Kubernetes make sense when you run 50+ containers, need multi-region failover, or have multiple teams deploying independently. For everyone else, Kubernetes is operational overhead you do not need.
A single VPS running Docker Compose handles the workload of most web apps, SaaS backends, and self-hosted tools, and it does so with a fraction of the complexity. Most readers of this guide will never need Kubernetes. If you eventually do, you will know, because the pain of running without it will be obvious.
Choosing VPS specs for Docker workloads
The minimum VPS for running Docker in production is 2 vCPU and 4 GB RAM. Anything below that starves on context switches and swaps to disk the moment you add a database container. The table below matches five common workload types to the VPS tier that handles them comfortably, with exact Webhost365 pricing.
| Workload | Recommended VPS | Monthly cost |
|---|---|---|
| Single container (static site, landing page) | 1 vCPU, 2 GB RAM, 25 GB NVMe | $4.99 |
| Small Compose stack (app + DB + proxy) | 2 vCPU, 4 GB RAM, 50 GB NVMe | $9.99 |
| Multi-service stack (n8n, Nextcloud, WordPress + Redis + Postgres) | 4 vCPU, 8 GB RAM, 80 GB NVMe | $14.99 |
| AI or LLM container stack (Ollama + API + vector DB) | 4 vCPU, 16 GB RAM, 120 GB NVMe | $19.99 |
| Heavy production (20+ containers, high traffic) | 8 vCPU, 32 GB RAM, 240 GB NVMe | $39.99+ |
Pick the tier that matches your actual workload, not the one that matches your aspirations. A $4.99 VPS running a single small container comfortably is a better production setup than a $19.99 VPS running the same container with 90% of its RAM unused.
Why NVMe matters more than you think for Docker
Docker does more disk I/O than most developers realise. Every docker pull writes a multi-layer image to disk. It build stacks cached layers. Every running database container writes transaction logs on every commit. Every application container writes logs to the json-file driver by default.
On older SATA SSDs, a busy Docker host can bottleneck on disk I/O before it runs out of CPU or RAM. NVMe storage delivers roughly 7x the random-read IOPS of SATA SSD, which translates directly into faster image pulls, faster container startup, and faster database containers under load. For a deeper look at why this matters for web workloads, see our guide on NVMe SSD and why it makes your site faster. Webhost365 ships NVMe on every VPS tier as standard, so this is not an upsell decision you have to make.
RAM matters more than CPU for most Compose stacks
Most Docker workloads are memory-bound, not CPU-bound. A Postgres container with 500 MB of indexed data and a few hundred connections will use more RAM than CPU. A Node.js API container serving 200 requests per second will rarely saturate a single vCPU but will happily use 400 MB of RAM. A WordPress container will idle at 300 MB and spike during traffic.
When you are sizing a VPS for Docker, add up the peak RAM each container will use, then double it. Half of that doubled figure goes to the containers themselves. The other half goes to the host OS, the Docker daemon, kernel buffers, and the filesystem cache that keeps your NVMe fast. A 4 GB VPS comfortably runs a stack that peaks at 2 GB of container memory. It will struggle with a stack that peaks at 3.5 GB.
Bandwidth and image pulls
Docker images add up fast. A typical three-service Compose stack might pull 2 to 4 GB of image data on first deploy. Routine updates add another 100 to 500 MB per rebuild. If you deploy frequently or run CI that pulls images to the VPS, bandwidth usage can reach tens of gigabytes per month.
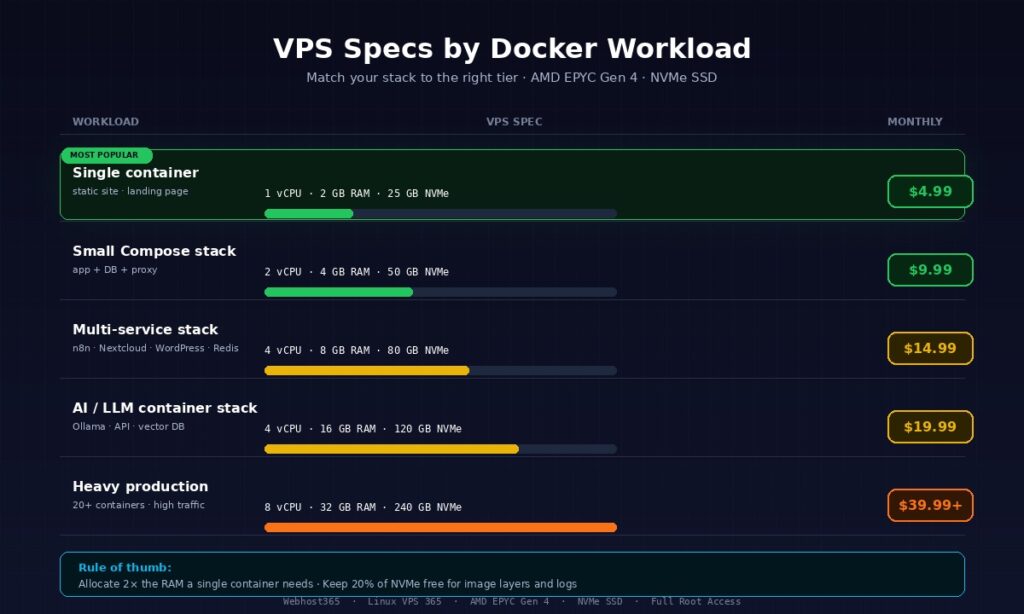
Every Webhost365 Linux VPS includes generous bandwidth with a 10 Gbps network connection, so image pulls complete in seconds rather than minutes. This is also where the rule of thumb lives: allocate at least 2x the RAM a single container needs for the host, and keep at least 20% of your NVMe free for image layers, volume growth, and log files.
Install Docker and Docker Compose on your VPS
On Ubuntu 22.04 or 24.04, which is the default on a Webhost365 Linux VPS, Docker Engine installs in four commands via the official apt repository. Docker Compose now ships as a plugin, so you no longer need a separate Python package. The whole process takes under five minutes on a fresh VPS.
SSH into your VPS as a non-root user
Your Webhost365 VPS ships with SSH enabled on port 22 and a root password delivered to your portal inbox. Log in from your local terminal using the IP address from your VPS dashboard.
bash
ssh root@your-vps-ipRunning Docker as root is a bad habit. Create a dedicated user instead and give them sudo access.
bash
adduser deploy
usermod -aG sudo deploy
Switch to the new user and add them to the docker group so they can run container commands without sudo on every line.
bash
su - deploy
sudo usermod -aG docker deploy
Log out and log back in for the group change to take effect. For stronger security, set up SSH key authentication and disable password login entirely, which is covered in most server-hardening guides and takes about ten minutes to configure.
Install Docker Engine (official convenience script vs apt)
You have two good ways to install Docker on Ubuntu. The convenience script is the fastest path. The official apt repository gives you cleaner upgrades and better production control.
For a quick setup, the convenience script is one command.
bash
curl -fsSL https://get.docker.com | shFor production, use the apt repository instead. It takes a few more steps but keeps Docker in the same package manager as the rest of your system.
bash
sudo apt update
sudo apt install -y ca-certificates curl gnupg
sudo install -m 0755 -d /etc/apt/keyrings
curl -fsSL https://download.docker.com/linux/ubuntu/gpg | \
  sudo gpg --dearmor -o /etc/apt/keyrings/docker.gpg
echo "deb [arch=$(dpkg --print-architecture) signed-by=/etc/apt/keyrings/docker.gpg] \
  https://download.docker.com/linux/ubuntu $(lsb_release -cs) stable" | \
  sudo tee /etc/apt/sources.list.d/docker.list > /dev/null
sudo apt update
sudo apt install -y docker-ce docker-ce-cli containerd.io docker-buildx-plugin docker-compose-plugin
Verify the installation by running the canonical test container.
bash
docker run hello-worldIf you see the “Hello from Docker!” message, the daemon is running and your user has permission to talk to it. Enable Docker to start automatically on reboot so your stack survives any VPS restart.
bash
sudo systemctl enable docker
sudo systemctl enable containerd
For the latest install commands and platform-specific notes, the official Docker installation documentation is the authoritative source and is updated whenever Docker ships a new release.
Install Docker Compose v2 (the plugin, not the old binary)
The apt install above already includes Compose v2 via the docker-compose-plugin package. There is nothing separate to install. Verify the plugin is working with the version command.
bash
docker compose versionYou should see something like Docker Compose version v2.x.x. Notice the command is docker compose with a space, not docker-compose with a hyphen. The old hyphenated binary was a separate Python package that Docker officially deprecated. It still works on many systems, but it is no longer maintained and it does not receive the same features or bug fixes as the v2 plugin.
Many older tutorials and Stack Overflow answers still reference docker-compose. Ignore them. If a command in this guide or elsewhere uses the hyphen, substitute the space version and everything will work the same. Your VPS is now ready to run a real Compose stack.
Deploy your first container stack
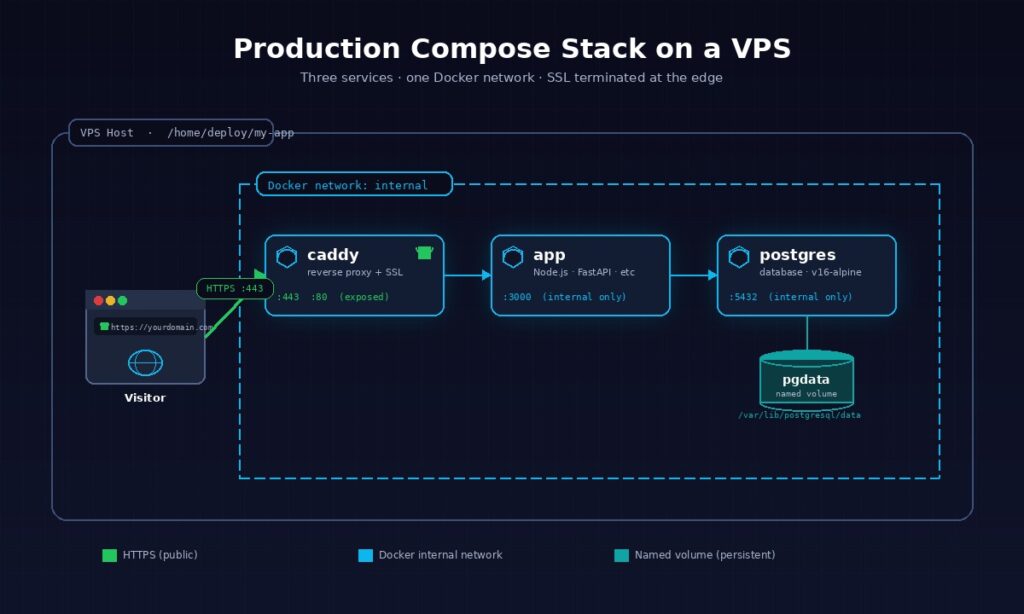
A realistic production stack has three services: your application, a database, and a reverse proxy. This walkthrough deploys all three with a single Compose file, a shared private network, and persistent volumes for your data. You can adapt the pattern to almost any web app by swapping the application image for your own.
The compose.yml file
Create a new directory for your stack and drop a compose.yml file inside it. The directory is important because Compose names resources after the folder it runs in, and you want those names to be meaningful.
bash
mkdir -p ~/my-app && cd ~/my-app
nano compose.yml
Paste this three-service stack as your starting point. It runs a Node.js application, a PostgreSQL database, and a Caddy reverse proxy, all on an isolated Docker network with named volumes for persistent data.
yaml
services:
  app:
    image: node:20-alpine
    working_dir: /app
    volumes:
      - ./src:/app
    command: node server.js
    env_file: .env
    networks:
      - internal
    restart: unless-stopped
    healthcheck:
      test: ["CMD", "wget", "-qO-", "http://localhost:3000/health"]
      interval: 30s
      timeout: 5s
      retries: 3

  postgres:
    image: postgres:16-alpine
    environment:
      POSTGRES_DB: appdb
      POSTGRES_USER: appuser
      POSTGRES_PASSWORD_FILE: /run/secrets/db_password
    volumes:
      - pgdata:/var/lib/postgresql/data
    secrets:
      - db_password
    networks:
      - internal
    restart: unless-stopped
    healthcheck:
      test: ["CMD-SHELL", "pg_isready -U appuser -d appdb"]
      interval: 10s
      timeout: 5s
      retries: 5

  caddy:
    image: caddy:2-alpine
    ports:
      - "80:80"
      - "443:443"
    volumes:
      - ./Caddyfile:/etc/caddy/Caddyfile
      - caddy_data:/data
      - caddy_config:/config
    networks:
      - internal
    restart: unless-stopped
    depends_on:
      app:
        condition: service_healthy

networks:
  internal:
    driver: bridge

volumes:
  pgdata:
  caddy_data:
  caddy_config:

secrets:
  db_password:
    file: ./db_password.txt
A few patterns in this file are worth calling out. The networks block creates a private bridge where the three services can reach each other by name. Your application connects to the database at the hostname postgres, not localhost, and Caddy proxies to app:3000 over the same network. Nothing except ports 80 and 443 is exposed to the public internet.
The env_file: .env directive keeps secrets out of the compose file. Create a .env next to compose.yml with your database connection string and any API keys. Add both .env and db_password.txt to your .gitignore immediately so they never reach version control. The POSTGRES_PASSWORD_FILE pattern is cleaner than inlining the password because Docker mounts the secret as a temporary file the container reads at startup.
Every service has restart: unless-stopped. This is the right policy for production. Containers restart automatically if they crash or if the VPS reboots, but they stay down if you explicitly stop them with docker compose down.
Start the stack and verify
With the compose file in place, bring the stack up in detached mode so it runs in the background.
bash
docker compose up -dThe first run pulls the three images from Docker Hub, creates the network, and mounts the named volumes. On a Webhost365 VPS with a 10 Gbps connection, the whole pull completes in under a minute. Check that every service is running.
bash
docker compose psYou should see all three containers with a running status and the app and postgres containers showing healthy once their healthchecks pass. If something is wrong, follow the logs for a specific service in real time.
bash
docker compose logs -f appThree errors come up often on first deploy. A port conflict means something else on the VPS is already bound to port 80 or 443, usually a leftover Nginx or Apache install that you can stop with sudo systemctl stop nginx. A missing env var shows up as a crash loop in the app container logs, and the fix is to add the variable to your .env and run docker compose up -d again. A database-not-ready error in the app logs means your application is trying to connect before Postgres finishes starting, and the depends_on: condition: service_healthy block in the Caddy service above is the pattern that fixes it for any container chain.
Persistent volumes and data safety
When the stack is running, your database data lives in the pgdata named volume. This is the single most important concept to get right in production Docker, because if you get it wrong, you will lose data the first time you run docker compose down -v.
Named volumes like pgdata persist across container restarts, image updates, and full stack recreations. Anonymous volumes, which are what you get if you write - /var/lib/postgresql/data without a name, can be silently orphaned when a container is removed. Always name the volumes that hold data you care about. Bind mounts, written as - ./local/path:/container/path, are better when you want to edit config files from the host, as this stack does with the Caddyfile. They are worse for database storage because they often lack the performance tuning that Docker’s volume driver provides.
Docker stores named volume data at /var/lib/docker/volumes/ on the host. On a Webhost365 VPS, that path lives on NVMe storage, which is exactly what a database container wants for write-heavy workloads. You can inspect a volume’s real path on disk with docker volume inspect pgdata if you need to know where the bytes actually live for backup purposes, which is the exact topic of a later section in this guide.
Reverse proxy and automatic SSL
In production, your containers should never be directly exposed on a public port. A reverse proxy sits in front of your stack, terminates SSL, and routes incoming traffic to the right container over Docker’s internal network. You have three good choices, and picking the right one depends on how many services you plan to run and how much configuration you want to manage.
Caddy — zero-config automatic HTTPS
Caddy is the easiest reverse proxy to run in front of Docker, and it is what the compose file in the previous section already uses. It automatically provisions Let’s Encrypt certificates on first start, renews them before they expire, and redirects all HTTP traffic to HTTPS without any extra configuration. For solo developers and small stacks, there is no better option.
Create a Caddyfile in the same directory as your compose.yml with your domain and the internal service it should proxy to.
yourdomain.com {
    reverse_proxy app:3000
    encode gzip zstd
}
Before you run docker compose up -d with this file in place, point your domain’s A record at your VPS IP in your DNS provider. Once DNS propagates, Caddy detects the domain, requests a certificate from Let’s Encrypt, and starts serving HTTPS within seconds. The Caddy container’s caddy_data volume stores the certificates so they survive restarts and rebuilds.
Caddy wins on simplicity. The configuration is readable, the defaults are sane, and there is nothing to forget. The Caddy documentation covers advanced features like load balancing, rate limiting, and custom TLS configuration if you need them later. For most Compose stacks with fewer than five services, Caddy is the right answer and you can stop reading this section here.
Nginx with Certbot — maximum control
Nginx is the battle-tested choice. It has been deployed in front of more production web services than any other reverse proxy, which means its behaviour under load is well documented and its configuration language is understood by almost every DevOps engineer. The tradeoff is that you have to configure SSL separately, either through Certbot on the host or through a dedicated companion container.
Swap the Caddy service in your compose file for this Nginx service.
yaml
nginx:
  image: nginx:alpine
  ports:
    - "80:80"
    - "443:443"
  volumes:
    - ./nginx.conf:/etc/nginx/conf.d/default.conf
    - ./certs:/etc/letsencrypt
  networks:
    - internal
  restart: unless-stopped
  depends_on:
    app:
      condition: service_healthy
A minimal nginx.conf that proxies to your app container and supports HTTP/2 looks like this.
nginx
server {
    listen 443 ssl http2;
    server_name yourdomain.com;

    ssl_certificate /etc/letsencrypt/live/yourdomain.com/fullchain.pem;
    ssl_certificate_key /etc/letsencrypt/live/yourdomain.com/privkey.pem;

    location / {
        proxy_pass http://app:3000;
        proxy_set_header Host $host;
        proxy_set_header X-Real-IP $remote_addr;
        proxy_set_header X-Forwarded-For $proxy_add_x_forwarded_for;
        proxy_set_header X-Forwarded-Proto $scheme;
    }
}
For the initial certificate, run Certbot directly on the host with the webroot plugin, then mount the resulting /etc/letsencrypt directory into the Nginx container as shown above. The official Nginx Docker image documentation covers the base configuration patterns that this example builds on. Mounting the config as a bind mount means you can edit nginx.conf and reload with docker compose exec nginx nginx -s reload, without rebuilding the image every time you tweak a rule.
Nginx is the right choice when you need fine-grained control over caching, rate limiting, or HTTP header manipulation. It is overkill for a three-service stack that Caddy handles in four lines.
Traefik — when you have ten or more services
Traefik reads Docker labels to automatically discover services and issue certificates. Instead of writing a config file per domain, you attach labels to each container and Traefik routes traffic based on them.
yaml
labels:
  - "traefik.enable=true"
  - "traefik.http.routers.myapp.rule=Host(`yourdomain.com`)"
  - "traefik.http.routers.myapp.entrypoints=websecure"
  - "traefik.http.routers.myapp.tls.certresolver=letsencrypt"
This label-based model is powerful when you run many services on the same VPS, deploy frequently, or spin containers up and down often. Traefik discovers the new service the moment it starts, requests a certificate, and begins routing traffic without any restart or config reload.
For fewer than five services or a stack that rarely changes, Traefik adds more complexity than it removes. Caddy handles the same scenarios with less to configure and less to learn. Reach for Traefik when you feel the pain of editing static proxy configs for the tenth time in a month, not before.
Production essentials — logging, monitoring, auto-restart, backups
A container running in production needs five things that a local Compose file does not: automatic restart on failure, log rotation, real healthchecks, an off-server backup strategy, and monitoring of host resources. These four subsections cover the first four. Monitoring is a deep topic that deserves its own guide, but for a single VPS, docker stats and a free Netdata or Grafana Cloud agent cover the basics.
Restart policies and systemd for Compose
The restart: unless-stopped policy you already set on every service handles the common cases. A container that crashes restarts automatically. A VPS that reboots brings the Docker daemon back up, which brings the stack back up. The policy does not apply if you explicitly stop a container with docker compose down, which is the behaviour you want during planned maintenance.
For extra reliability, wrap the Compose stack itself in a systemd unit. This ensures the stack starts before any dependent service on the host, and it gives you standard systemctl commands for lifecycle management. Create /etc/systemd/system/my-app.service.
ini
[Unit]
Description=My App Docker Compose Stack
Requires=docker.service
After=docker.service

[Service]
Type=oneshot
RemainAfterExit=yes
WorkingDirectory=/home/deploy/my-app
ExecStart=/usr/bin/docker compose up -d
ExecStop=/usr/bin/docker compose down
User=deploy

[Install]
WantedBy=multi-user.target
Enable it once with sudo systemctl enable my-app.service and from that point on, your stack is a first-class service on the VPS.
Log rotation and aggregation
Docker’s default json-file log driver writes container stdout and stderr to disk with no size cap. A chatty application can fill your NVMe in days. The fix lives in /etc/docker/daemon.json.
json
{
  "log-driver": "json-file",
  "log-opts": {
    "max-size": "10m",
    "max-file": "3"
  }
}
Restart the Docker daemon with sudo systemctl restart docker for the change to apply. Each container now keeps a maximum of three 10 MB log files and rotates older ones automatically. For production stacks with multiple services, ship logs off the VPS entirely by pointing the log driver at Loki, a syslog endpoint, or a hosted service like Grafana Cloud. Centralised logs survive disk failures and make debugging a distributed stack dramatically easier.
Healthchecks that actually help
A healthcheck is only useful if it tests the thing that matters. Checking that a TCP port is open tells you the process is running. Checking that an HTTP endpoint returns 200 tells you the application can actually respond. Always prefer the second.
yaml
healthcheck:
  test: ["CMD", "wget", "-qO-", "http://localhost:3000/health"]
  interval: 30s
  timeout: 5s
  retries: 3
  start_period: 40s
The start_period matters more than most developers realise. It gives a slow-booting container time to warm up before failed healthchecks start counting against the retry limit, which prevents phantom restart loops on services that need 20 to 30 seconds to fully initialise. Chain dependent containers with depends_on: condition: service_healthy, as the starter compose.yml already does, and Docker will wait for the database to accept connections before starting the app that needs it.
Backups — volumes, not just the compose file
The most common production mistake is backing up the compose.yml and thinking the job is done. Your compose file is replaceable in minutes. Your database volume is not. Back up what is irreplaceable.
For a Postgres container, use the database’s own dump tool, not a volume snapshot. Snapshots of hot databases produce corrupted backups because writes are in flight when the snapshot happens.
bash
docker compose exec -T postgres pg_dump -U appuser appdb | gzip > backup-$(date +%F).sql.gzSchedule this in cron nightly and push the resulting file off the VPS to object storage with rclone or to a second VPS with rsync. For non-database volumes, a tar archive of the volume works fine because the data is at rest.
bash
docker run --rm -v caddy_data:/data -v $(pwd):/backup alpine \
  tar czf /backup/caddy-$(date +%F).tar.gz /data
Webhost365 provides daily server-level backups on every VPS, which protects you against disk failure and accidental rm -rf. Application-level dumps on top of that protect you against data corruption, which server snapshots cannot undo. Run both.
Security hardening checklist
Default Docker on a default VPS is reasonably safe out of the box, but seven specific hardening steps close the gaps that real attacks exploit. Walk this checklist once when you set up a new VPS, and then revisit it every quarter.
1. Never run containers as root. Add a USER directive to your Dockerfile or a user: key to your compose service so the process inside the container runs as a non-privileged UID. A root-inside-container process that breaks out of its namespace is root on the host. A UID-1000 process is just another user.
2. Drop all capabilities by default and add only what you need. Most containers do not need the 14 Linux capabilities Docker grants by default. Set cap_drop: [ALL] in your compose service and add specific capabilities back only when an image documents that it needs them.
3. Use read-only root filesystems where possible. Adding read_only: true to a service forces any writes to go to explicit volumes, which makes unauthorised filesystem modification impossible. Most stateless containers run fine in read-only mode with a tmpfs mount for /tmp.
4. Do not mount the Docker socket into containers. A container with /var/run/docker.sock mounted has full control over the Docker daemon, which means full control over the host. Management tools like Portainer genuinely need it. Almost nothing else does.
5. Firewall everything except 80 and 443. Install UFW, allow SSH on 22, allow HTTP and HTTPS, and block everything else — including the Docker daemon ports 2375 and 2376 if they are ever exposed by accident.
bash
sudo ufw default deny incoming
sudo ufw allow 22/tcp
sudo ufw allow 80/tcp
sudo ufw allow 443/tcp
sudo ufw enable
6. Patch Docker and base images on a schedule. Run sudo apt upgrade monthly on the host and rebuild your application images against fresh base images on the same cadence. Unpatched base images are the most common source of real-world Docker vulnerabilities.
7. Scan images before you deploy them. Run docker scout cves your-image:tag or use Trivy to audit any image before it reaches production. The official Docker security documentation covers every setting mentioned here in more depth, plus advanced topics like user namespaces and seccomp profiles.
When to outgrow a single VPS — Swarm, Kubernetes, or horizontal VPS
A single well-specced Webhost365 Linux VPS handles most Compose workloads comfortably. The signs that you have outgrown it are not dramatic. Deploys start causing visible downtime. A single container uses more than half the host’s RAM. One failed host takes down the business for hours, not minutes. Until you see those signals, do not add complexity you do not need.
When you do hit the ceiling, scale up before you scale out. Moving from a 4 GB VPS to a 16 GB VPS is a ten-minute upgrade in the Webhost365 portal, and it solves 90% of capacity problems without any architectural change. Horizontal scaling adds operational overhead that a larger single host avoids entirely.
When vertical scaling is no longer enough, Docker Swarm is the underrated next step. Swarm turns two or three VPS into a single logical Docker host using the same Compose file syntax you already know. There is no new YAML dialect to learn, no control plane to operate, and no ingress controller to configure. For teams that need high availability without Kubernetes complexity, Swarm is genuinely excellent and deserves more attention than it gets.
Kubernetes is the right answer when you run 50 or more containers, deploy across multiple teams with isolated namespaces, or need sophisticated traffic shaping and multi-region failover. It is the wrong answer when you run five containers and a developer who read about Kubernetes on Hacker News last week. The honest take — and most experienced operators will agree — is that the vast majority of web applications in production today would run better, cheaper, and with less downtime on a single large VPS than on a managed Kubernetes cluster.
Frequently asked questions about deploying Docker on a VPS
Can I run Docker on shared hosting?
No, you cannot run Docker on shared hosting. Docker requires root access to manage Linux namespaces, cgroups, and the overlay filesystem, and shared hosting accounts are strictly non-root by design. Any plan that claims “Docker-compatible shared hosting” is either mislabelled or severely limited. For real Docker support, you need a VPS or dedicated server where you control the full Linux kernel. Webhost365 Linux VPS plans start at $4.99 per month.
Do I need a Windows VPS or a Linux VPS for Docker?
Use a Linux VPS for Docker. Docker was built around Linux kernel features, production container images are almost exclusively Linux-based, and every Docker Compose file, Kubernetes manifest, and CI pipeline assumes a Linux host. Windows Server supports Windows containers, but they represent less than 5% of production deployments and have a much smaller ecosystem. Unless you specifically need Windows containers for legacy .NET Framework applications, pick Linux every time.
What is the cheapest VPS that can actually run Docker?
The cheapest VPS that runs Docker comfortably is a 1 vCPU, 2 GB RAM instance, which Webhost365 offers at $4.99 per month with AMD EPYC Gen 4 processors and NVMe storage. That spec handles a single lightweight container or a small static site stack. For a realistic production Compose setup with an application, a database, and a reverse proxy, step up to 2 vCPU and 4 GB RAM at $9.99 per month.
Docker Compose vs Kubernetes: which do I need?
Most applications need Docker Compose, not Kubernetes. Compose is the right tool when you run fewer than 20 containers on a small number of hosts and want minimal operational overhead. Kubernetes earns its complexity only at 50 or more containers, multi-team deployments, or multi-region failover requirements. For solo developers, small teams, and the majority of production web apps, a single VPS running Docker Compose is faster to operate, cheaper to run, and easier to debug.
How much RAM does a Docker container use?
A Docker container uses roughly the same RAM as the same process would use natively, plus a small overhead of 5 to 15 MB per container for the runtime. A typical Node.js API container uses 150 to 400 MB, a Postgres container uses 200 to 500 MB under moderate load, and a Redis container uses 50 to 150 MB. Sum the peak usage of every container and size your VPS RAM at roughly double that total.
Is Docker safe on a VPS exposed to the public internet?
Docker on a public VPS is safe when you follow basic hardening: run containers as non-root users, drop unnecessary Linux capabilities, keep base images patched, never expose the Docker daemon socket, and firewall all ports except 80 and 443. Default Docker is reasonably secure, but the seven-step hardening checklist covered earlier in this guide closes the gaps that real attacks exploit. Scan images with docker scout or Trivy before every deploy.
Can I run WordPress in Docker on a VPS?
Yes, you can run WordPress in Docker on a VPS using a three-container stack: the official wordpress image, a MySQL or MariaDB container for the database, and a reverse proxy like Caddy or Nginx for SSL. A 2 vCPU, 4 GB RAM Webhost365 VPS at $9.99 per month runs a production WordPress site comfortably. For a managed WordPress experience without Docker — with automatic updates, staging environments, and LiteSpeed caching included — Webhost365 WordPress Hosting starts at $2.49 per month.
What is the difference between docker-compose and docker compose?
The hyphenated docker-compose is the original Python-based tool, and the space-separated docker compose is the modern Go-based plugin that ships with Docker Engine v20.10 and later. Docker officially deprecated the hyphenated version in 2023. Both commands accept the same compose.yml syntax, but only the plugin version receives new features, bug fixes, and security patches. Always use docker compose with a space for new deployments.
How do I update a running container without downtime?
To update a running container without downtime, pull the new image and recreate only the affected service. The command docker compose pull app && docker compose up -d app rebuilds just the application container while the database and reverse proxy keep running. For true zero-downtime deployment across every request, run two replicas of the app container behind your reverse proxy and recreate them one at a time with a brief drain window between replacements.
Where are Docker volumes stored on a VPS?
Docker stores named volumes at /var/lib/docker/volumes/ on the host VPS by default. Each named volume gets its own subdirectory containing the actual data files. Run docker volume inspect volumename to see the exact path for a specific volume. On a Webhost365 VPS, this path lives on NVMe SSD storage, which delivers the fast random I/O that database containers and any write-heavy workload need for consistent production performance.
Ready to deploy your Docker stack?
The three-service Compose stack you just learned to deploy runs comfortably on a Webhost365 Linux VPS from $4.99 per month, with AMD EPYC Gen 4 processors, NVMe SSD storage, full root access, and a 10 Gbps network connection. Every plan includes free DDoS protection, daily server-level backups, and a 30-day money-back guarantee, so you can spin up a VPS, port your containers across, and keep everything you built in this guide running at production quality — without the cold starts, per-container surcharges, or licensing fees that managed Docker platforms charge. Browse Linux VPS plans to pick the tier that matches your workload.