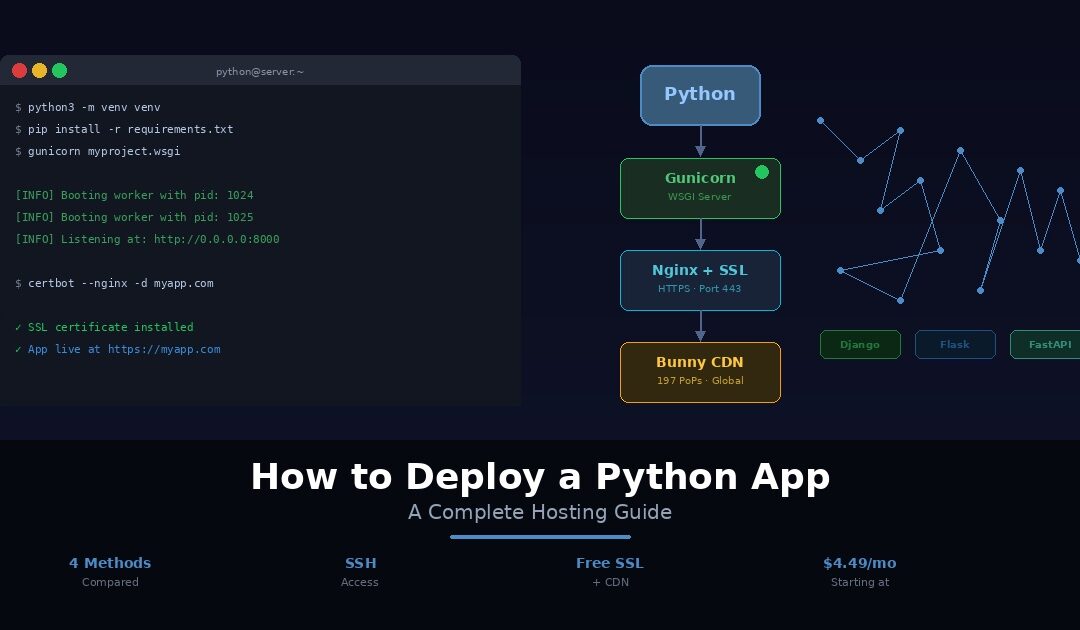
Your Python app runs perfectly on localhost. Django serves your pages without a hiccup. Flask handles your API routes cleanly. FastAPI processes requests at impressive speed. Everything works on your development machine. Now comes the part that frustrates even experienced Python developers: getting it live on the internet where real users can actually reach it.
Python deployment is more involved than deploying a static site or a PHP application. Your framework does not serve HTTP requests directly. You need a WSGI server like Gunicorn sitting between the web server and your code. You need Nginx as a reverse proxy to handle SSL and static files. You need a virtual environment to isolate your dependencies. You need a process manager to keep everything running after you close your SSH session. And before any of that, you need to choose where to host it.
Should you spin up a VPS and configure Nginx, Gunicorn, and systemd yourself? Use a platform like Render or Heroku that handles the infrastructure? Go serverless with AWS Lambda? Or choose managed Python hosting that gives you SSH access without the DevOps overhead?
Each path comes with trade-offs in cost, complexity, control, and scalability. This guide cuts through the noise. We start with what your Python app actually needs to run on a live server. Then we compare four deployment methods side by side with honest pros and cons for each. We walk through the key steps for the most common approaches, including Nginx configuration and Gunicorn setup. And we finish with a seven-point production checklist covering virtual environments, security settings, static file handling, CDN configuration, and the other things most deployment tutorials skip entirely.
Whether you are deploying a Django web application, a Flask API, a FastAPI microservice, or a Streamlit dashboard, this guide gives you a clear path from localhost to production. If you also work with JavaScript, our companion guide covers how to deploy a Node.js app using the same hosting infrastructure.
What Your Python App Needs to Run in Production
Before choosing a hosting platform, it helps to understand what your Python web app actually requires at the infrastructure level. Every deployment method handles these requirements differently. Some make you configure each piece manually. Others handle most of them automatically. Knowing what the pieces are helps you evaluate which approach fits your situation.
A server with Python installed. Your app needs the correct Python runtime version. Python 3.10 or higher is recommended for production in 2026. The server must support pip for package installation and virtual environments for dependency isolation. If your host only provides Python 2.x or an outdated 3.x version, your modern Django or FastAPI app will not run.
A WSGI or ASGI server. This is where Python deployment differs from Node.js or PHP. Django and Flask do not include a production-ready HTTP server. Their built-in development servers are single-threaded, insecure, and designed for local testing only. A WSGI server like Gunicorn or uWSGI sits between the web server and your Python application, translating HTTP requests into Python function calls and handling concurrency. For async frameworks like FastAPI, an ASGI server like Uvicorn fills the same role.
A reverse proxy. Gunicorn listens on an internal port, typically 8000. Visitors expect to reach your site on port 80 or 443. Nginx sits in front of Gunicorn, accepts traffic on standard ports, terminates SSL, serves static files directly, and forwards dynamic requests to Gunicorn. Without Nginx, your app cannot serve HTTPS traffic or handle static file delivery efficiently.
SSL/TLS certificates. Every production app needs HTTPS. Browsers flag HTTP sites as insecure. OAuth providers reject callback URLs without HTTPS. Let’s Encrypt provides free SSL certificates, and Certbot automates the renewal process on Nginx.
Configuration and deployment essentials
A virtual environment. Production apps must run inside a virtual environment created with python3 -m venv venv to isolate dependencies from the system Python. This prevents version conflicts between projects and ensures your app uses exactly the packages listed in requirements.txt. Never install packages globally on a production server.
Environment variables. Database credentials, Django’s SECRET_KEY, API tokens, and DEBUG settings must live in environment variables. Hardcoding them in settings.py is a security risk. Use python-decouple or django-environ to load variables from a .env file locally, and configure them through your hosting platform’s environment settings in production. Never commit .env files to Git.
A process manager. If you start Gunicorn directly from an SSH session and close the connection, the process terminates. Systemd or Supervisor keeps Gunicorn running as a background daemon, restarts it automatically after crashes, and launches it on server boot. Without a process manager, a single unexpected error takes your app offline until you notice and reconnect.
Static file handling. Django and Flask serve static files through the development server, but this does not work in production. Django requires python manage.py collectstatic to gather all static files into a single directory. Nginx then serves those files directly without involving Gunicorn. For global performance, a CDN delivers static assets from edge servers worldwide instead of from your origin server.
A production database. SQLite works for development but cannot handle concurrent writes in production. PostgreSQL is the standard for Django deployments. MySQL is another common choice. The database can run on the same server or as a managed service.
A domain name. Your app needs a registered domain pointed to your server’s IP address via a DNS A record.
On a raw VPS, you configure every one of these components yourself. On managed hosting, most are handled for you. The method you choose determines how much of this stack you build and how much is built for you.
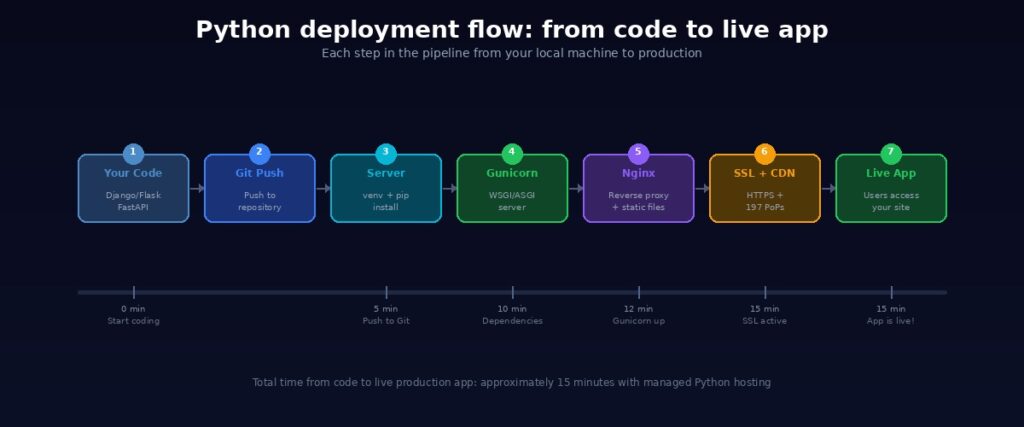
4 Ways to Deploy a Python App
Every deployment method falls into one of four categories. Each offers a different balance of control, complexity, and cost. Here is how they compare, starting with the most hands-on and ending with the simplest.
Method 1: VPS with Nginx, Gunicorn, and Let’s Encrypt
This is the classic Python developer approach. You provision a virtual private server, SSH in, and configure every layer of the stack yourself. It demands the most effort upfront, but in return, you get complete control over your environment.
Setting up the server
First, provision a VPS from a provider like DigitalOcean, Linode, Vultr, or Webhost365 Linux VPS. Once your server is ready, SSH into it and install Python 3.x, pip, and the venv module. Then clone your application from Git or upload it via SFTP.
Create a virtual environment and install your dependencies:
python3 -m venv venv
source venv/bin/activate
pip install -r requirements.txt
This isolates your app’s packages from the system Python, preventing version conflicts and ensuring clean reproducibility.
Configuring Gunicorn and Nginx
Install Gunicorn inside your virtual environment with pip install gunicorn. Test it manually to confirm your app starts correctly:
For Django: gunicorn --bind 0.0.0.0:8000 myproject.wsgi For Flask: gunicorn --bind 0.0.0.0:8000 app:app For FastAPI: gunicorn -k uvicorn.workers.UvicornWorker --bind 0.0.0.0:8000 main:app
Once Gunicorn runs your app successfully, create a systemd service file so it runs as a background daemon. This ensures Gunicorn starts on boot, restarts after crashes, and persists after SSH disconnect.
Next, install Nginx and configure it as a reverse proxy. Create a server block that forwards dynamic requests to Gunicorn and serves static files directly:
server {
    server_name yourdomain.com;

    location /static/ {
        alias /var/www/myapp/static/;
    }

    location / {
        proxy_pass http://unix:/run/gunicorn.sock;
        proxy_set_header Host $host;
        proxy_set_header X-Real-IP $remote_addr;
        proxy_set_header X-Forwarded-For $proxy_add_x_forwarded_for;
    }
}
For Django apps, run python manage.py collectstatic to gather all static files into the directory Nginx serves. Test the Nginx configuration with sudo nginx -t and reload to apply.
Adding SSL and going live
Point your domain to the server’s IP address by creating a DNS A record with your registrar. Once DNS propagates, install Certbot and run sudo certbot --nginx -d yourdomain.com to generate a free Let’s Encrypt SSL certificate. Certbot configures Nginx for HTTPS automatically and sets up renewal so your certificate stays valid.
Who this method is best for
The VPS approach gives you complete freedom. You can run any Python version, any framework, any database, and host multiple apps on a single server. However, that freedom comes with responsibility. You manage updates, security patches, backups, and monitoring entirely on your own. If Gunicorn crashes at 3am, you are the on-call engineer. There is also no built-in scaling or CDN. Adding capacity means provisioning additional servers and configuring load balancing manually.
Best for: Python developers who want full control over every layer of the stack and are comfortable managing server infrastructure long-term.
Method 2: PaaS (Render, Railway, Heroku, PythonAnywhere)
Platform-as-a-Service providers remove server management from the equation entirely. Instead of configuring Nginx, Gunicorn, and systemd, you connect a Git repository and the platform handles deployment automatically. For Python developers who want to ship quickly without touching a server, PaaS is the fastest path to a live URL.
How PaaS deployment works for Python
The workflow is consistent across most platforms. You connect your GitHub or GitLab repository, specify your Python version and dependencies (via requirements.txt), define your start command (typically gunicorn myproject.wsgi or gunicorn app:app), and set environment variables through the platform dashboard. The platform builds a container, installs your dependencies, starts your WSGI server, configures SSL, and assigns a URL. From that point forward, every Git push triggers an automatic redeployment.
Comparing the major platforms
Heroku pioneered Python PaaS deployment. Its Procfile-based workflow remains the most polished developer experience for Django and Flask apps. However, Heroku removed its free tier in 2022. Paid plans start at $7 per month for basic dynos. Eco dynos sleep after inactivity, adding cold-start delays.
Render offers a free tier for web services, making it popular for small Flask and Django APIs. Free-tier services sleep after 15 minutes of inactivity though. Cold starts take 30 to 60 seconds, which can break webhook integrations and frustrate users. Paid plans start at $7 per month.
Railway provides $5 of free credit monthly. Deployment is fast and the dashboard is clean. On the other hand, heavy usage can exhaust credit before the month ends, pausing your services without warning.
PythonAnywhere is purpose-built for Python. It offers a free tier for small Flask and Django apps with a web-based console for file management and terminal access. The interface is beginner-friendly and setup is minimal. In contrast, customisation is limited compared to other platforms. You cannot run Docker, install system packages, or use non-standard configurations.
The trade-offs to consider
PaaS platforms make deployment remarkably fast. You can go from a local Django project to a live URL in under ten minutes. SSL is automatic, logging is built in, and you never touch Nginx or systemd.
At the same time, the limitations are real. Free tiers come with sleeping instances, credit caps, and cold starts. Costs scale with usage, so a moderately popular app quickly outgrows the free tier. Most platforms lack a built-in CDN, meaning you need Cloudflare or a similar service for global static asset delivery. Additionally, migrating away from a PaaS requires reworking your deployment configuration since each platform has its own conventions.
Best for: Python developers who want fast deployment without server management and are building prototypes, side projects, or small production apps where PaaS limitations are acceptable.
Method 3: Serverless (AWS Lambda, Google Cloud Functions)
Serverless takes a fundamentally different approach to hosting Python apps. Instead of running Gunicorn as a persistent process on a server, your code executes as individual functions triggered by HTTP requests, events, or schedules. There is no server to manage because the cloud provider handles provisioning, scaling, and availability.
How serverless works with Python frameworks
Traditional Django and Flask apps are not designed to run as serverless functions out of the box. Tools like Zappa bridge this gap for Django and Flask by packaging your entire WSGI application and deploying it to AWS Lambda behind API Gateway. Mangum does the same for FastAPI and other ASGI frameworks. You write your app using familiar framework patterns, and the adapter handles translating Lambda events into WSGI or ASGI requests.
The deployment workflow involves configuring a settings file, running a deploy command, and the tool packages your code with dependencies, uploads it to Lambda, and creates API Gateway endpoints automatically. Updates are a single command that replaces the running function with your new code.
Where serverless shines for Python
The pricing model is the biggest draw. You pay per invocation, not per month. If your API receives zero traffic for a week, you pay nothing. When traffic spikes to a million requests, Lambda scales instantly without intervention. This makes serverless excellent for webhook handlers, scheduled data processing scripts, lightweight APIs, and event-driven microservices where traffic is unpredictable.
Where serverless struggles with Python
Cold starts are a particular concern for Python. When a function has not run recently, Lambda must load the Python runtime and your dependencies before executing. This adds 300ms to 1.5 seconds of latency on the first request, depending on package size. Django apps with many dependencies experience the worst cold starts.
Beyond latency, serverless is a poor fit for long-running processes, WebSocket connections, file uploads, and stateful applications. Debugging is more complex since you cannot SSH into a server and inspect logs directly. Database connection management requires careful handling because each Lambda invocation may create a new connection. Furthermore, the 15-minute execution limit on Lambda means background tasks and data pipelines need a different architecture.
Best for: Python API endpoints, webhook handlers, and event-driven microservices where pay-per-use pricing and automatic scaling matter more than consistent latency and architectural simplicity.
Method 4: Managed Python Hosting (Simplest Path)
Managed Python hosting sits in the sweet spot between a raw VPS and a PaaS. You get SSH access and server-level control like a VPS, but the hosting provider handles the infrastructure layers that consume the most time: reverse proxying, SSL, CDN, and server maintenance. You focus on your Python code. They focus on keeping the platform fast, secure, and available.
How it differs from a VPS
On a raw VPS, you install Python, configure Gunicorn, create systemd service files, set up Nginx, obtain SSL certificates, and maintain everything indefinitely. That stack takes 30 to 60 minutes to configure correctly for a single app, and you carry the maintenance burden permanently. With managed Python hosting, the runtime environment comes pre-configured. You select your Python version, upload your app, set your startup file, and the hosting platform handles the web server, SSL, and process management.
How it differs from a PaaS
Unlike Render or Heroku, managed hosting gives you direct SSH access to your server environment. You can run pip commands, manage virtual environments, inspect logs, debug issues, and configure your application exactly the way you need. There are no sleeping instances, no credit caps, and no cold starts. Your app runs continuously on dedicated hardware with predictable monthly pricing.
Deploying on Webhost365
The process is straightforward. Sign up for a Python hosting plan starting at $4.49 per month. Access your hosting panel and navigate to the Python app selector. Choose your Python version, set your application root directory and startup file, then upload your code via Git clone, SFTP, or the File Manager.
The platform creates a virtual environment for your app automatically. Install your dependencies through the terminal provided in the hosting panel. Set your environment variables through the interface. Your application is live with HTTPS, a custom domain, and Bunny CDN delivering static assets from 197 global edge locations.
What comes included
Every Webhost365 Python hosting plan includes AMD EPYC Gen4 processors with DDR5 RAM for consistent performance. NVMe SSD storage handles fast database queries and file operations. Unlimited bandwidth means traffic growth never triggers overage charges. Bunny CDN is integrated at the platform level, so your CSS, JavaScript, images, and fonts are cached and served globally without configuring a separate CDN service.
Free SSL certificates are auto-renewing, eliminating the Certbot setup that VPS deployments require. Annual plans include a free domain. SSH access gives you full control over your Python environment. The Python app selector supports multiple versions so you can match your production environment to your development setup. And 24/7 expert support means you are not debugging deployment issues alone at midnight.
The pricing stays the same at renewal. The $4.49 per month Breeze plan renews at $4.49. There are no introductory discounts hiding an inflated renewal rate. Read more about why transparent pricing matters and how it compares to competitors who raise prices after the first term.
The trade-offs
Managed hosting does not offer Git-push automatic deployment like a PaaS. You deploy through SSH or the File Manager, which adds a step compared to Render or Heroku. Scaling requires upgrading your plan rather than happening automatically. For most Python apps that do not need instant auto-scaling, a plan upgrade takes minutes and preserves all your files and configuration.
Best for: Python developers who want SSH-level control without configuring Nginx, Gunicorn as a systemd service, and SSL manually. Ideal for Django web apps, Flask APIs, FastAPI microservices, and any Python project that needs reliable, affordable production hosting with predictable costs.
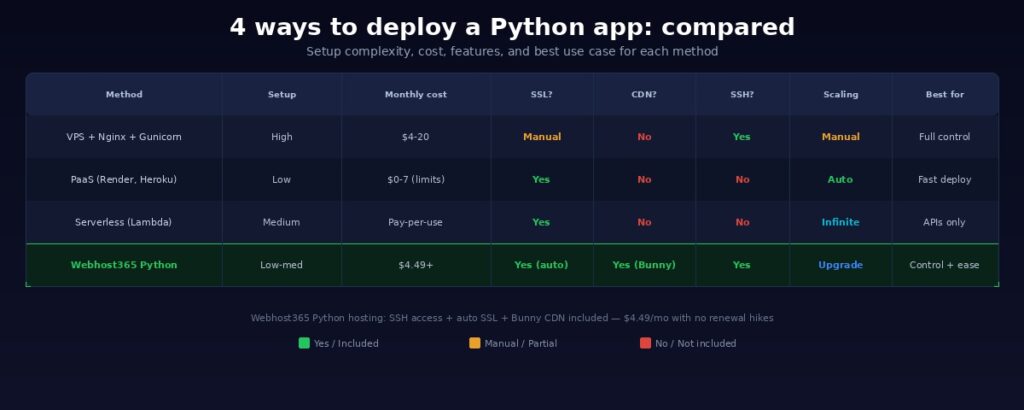
Comparison Table: All 4 Methods Side by Side
Choosing a deployment method is easier when you can see the trade-offs in one view. Here is how all four approaches compare across the factors that matter most when putting a Python app into production.
| Method | Setup complexity | Monthly cost | SSL included | CDN included | SSH access | Scaling | Best for |
|---|---|---|---|---|---|---|---|
| VPS + Nginx + Gunicorn | High | $4–20 | Manual (Let’s Encrypt) | No | Yes | Manual | Full control |
| PaaS (Render, Heroku) | Low | $0–7 (free tiers limited) | Yes | No | No | Automatic | Fast deployment |
| Serverless (Lambda) | Medium | Pay-per-use | Yes | No | No | Infinite | APIs, microservices |
| Managed Python hosting | Low–medium | $4.49+ | Yes (auto-renewing) | Yes (Bunny CDN) | Yes | Plan upgrade | Control + simplicity |
The patterns mirror what we see across hosting in general. The VPS approach gives you maximum control but demands the most setup and ongoing maintenance. PaaS platforms offer the fastest path to a live URL but strip away SSH access and charge unpredictably as traffic grows. Serverless scales infinitely yet struggles with cold starts and forces you to redesign your app around individual functions. Python cold starts on Lambda are particularly painful because of the runtime and dependency loading overhead.
Managed Python hosting on Webhost365 is the only option in this comparison that combines SSH access, automatic SSL, and built-in CDN in a single plan. You get the developer control of a VPS without the Nginx and systemd overhead, and the convenience of a PaaS without sleeping instances and credit caps.
For a full breakdown of how Webhost365 compares across all hosting types, see every plan side by side.
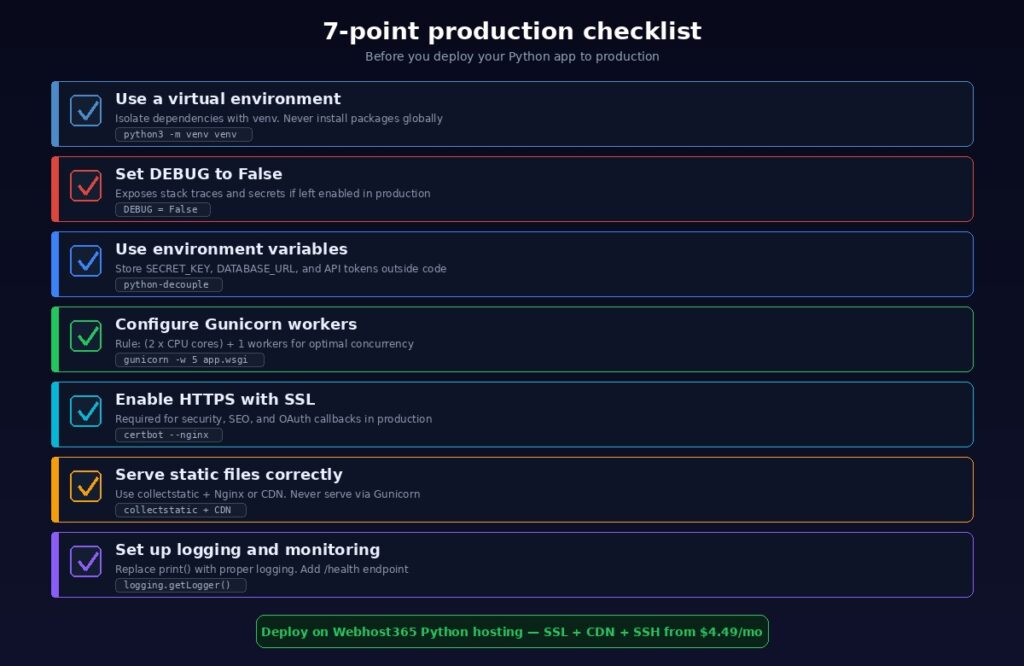
Production-Ready Checklist: Before You Go Live
Getting your Python app running on a server is only half the job. The other half is making sure it stays running, handles errors gracefully, and does not expose sensitive information to the internet. Most deployment tutorials end at “your app is live.” Run through these seven checks before you point real users at your application.
1. Use a Virtual Environment
Never install Python packages globally on a production server. Global installations create version conflicts between projects and make it impossible to reproduce your environment reliably. Create a virtual environment for every project:
python3 -m venv venv
source venv/bin/activate
pip install -r requirements.txt
Keep your requirements.txt up to date by running pip freeze > requirements.txt after adding or updating any package. This file is your single source of truth for dependencies. If you need to rebuild the environment on a new server, requirements.txt ensures you get the exact same package versions.
2. Set DEBUG to False and Configure Allowed Hosts
This is the most critical security setting and the one most commonly forgotten. Django’s DEBUG = True exposes full stack traces, database queries, template paths, and your SECRET_KEY to anyone who triggers an error. In production, set DEBUG = False in settings.py and configure ALLOWED_HOSTS = ['yourdomain.com'] to prevent host header attacks.
For Flask, ensure your app does not run with debug=True. Set debug mode through an environment variable so it is active in development and disabled in production automatically.
Running with debug mode enabled in production is not just a performance issue. It is a security vulnerability that hands attackers a blueprint of your application internals.
3. Use Environment Variables for All Secrets
Django’s SECRET_KEY, DATABASE_URL, API tokens, email credentials, and third-party service keys must live in environment variables. Hardcoding them in settings.py means anyone with access to your Git repository can see every credential your app uses.
Use python-decouple or django-environ to load variables from a .env file during local development. In production, configure environment variables through your hosting panel or server configuration. Create a .env.example file in your repository that lists every required variable without exposing actual values. This helps other developers set up the project without guessing which variables are needed. Never commit .env files to Git. Add .env to your .gitignore immediately.
4. Configure Gunicorn Workers Correctly
The number of Gunicorn workers directly affects how many concurrent requests your app can handle. Too few workers and requests queue up during traffic spikes. Too many and your server runs out of memory.
The standard rule of thumb is workers = (2 × CPU cores) + 1. On a 2-core server, that means 5 workers. On a 4-core server, 9 workers. Each worker handles one request at a time for synchronous frameworks like Django and Flask.
For FastAPI and other async frameworks, use Uvicorn workers inside Gunicorn: gunicorn -k uvicorn.workers.UvicornWorker main:app. This gives you the process management of Gunicorn with the async performance of Uvicorn.
On managed hosting like Webhost365 Python plans, the hosting environment handles process management for you. You configure your startup file and the platform manages worker processes, restarts, and resource allocation.
5. Enable HTTPS with SSL
Every production app must run over HTTPS. Browsers display “Not Secure” warnings on HTTP sites. OAuth providers reject callback URLs without encryption. Search engines favour secure sites in their rankings. On a VPS, install Certbot and run sudo certbot --nginx -d yourdomain.com to generate a free Let’s Encrypt certificate with automatic renewal. On managed hosting like Webhost365, SSL is included and renews automatically with nothing to install or configure. Either way, redirect all HTTP traffic to HTTPS so no visitor ever lands on an insecure connection.
6. Serve Static Files Correctly
This catches many Python developers off guard. Django and Flask serve static files through the development server, but Gunicorn is not designed for this. Serving static files through Gunicorn wastes worker processes on file delivery instead of handling dynamic requests.
For Django, run python manage.py collectstatic to gather all static files into a single directory. Then configure Nginx to serve that directory directly, bypassing Gunicorn entirely. Alternatively, use the whitenoise package to serve static files from Django itself without Nginx configuration.
For the best global performance, serve static assets through a CDN. On Webhost365 Python hosting, Bunny CDN with 197 global edge locations caches and delivers your CSS, JavaScript, images, and fonts from the nearest edge server automatically. Your Gunicorn workers handle only dynamic requests while the CDN handles everything else.
7. Set Up Logging and Monitoring
Replace print statements with proper logging. Configure Django’s logging framework or Flask’s app.logger to write structured logs to files, not just the console. Include timestamps, log levels, and request context so you can trace issues when they occur in production.
Create a /health endpoint that returns a 200 OK response. This simple endpoint serves as the heartbeat of your application. Use an uptime monitoring service like UptimeRobot, Pingdom, or a custom n8n workflow to ping this endpoint every few minutes. If it fails, you receive an alert before your users start reporting problems.
Monitor your server’s CPU usage, memory consumption, and disk space regularly. A Django app with a memory leak will slowly consume all available RAM until the server crashes. Catching resource trends early prevents outages.
Deploy Your Python App Today
Your Python app deserves production-grade infrastructure without the DevOps overhead. Whether you are launching a Django web application, a Flask API, a FastAPI microservice, or a Streamlit data dashboard, the right hosting makes deployment straightforward and keeps your app fast, secure, and reliable long after launch day.
A raw VPS gives you maximum control but demands ongoing server management. PaaS platforms offer fast deployment but limit your access and charge unpredictably as you grow. Serverless works for specific architectures but adds cold-start latency and forces you to restructure your app around individual functions. Managed Python hosting gives you the best of both worlds: SSH access and developer control without the Nginx, Gunicorn systemd, and SSL configuration overhead.
Webhost365 Python hosting plans give you SSH access, AMD EPYC Gen4 processors, NVMe SSD storage, Python version selector, Bunny CDN with 197 global edge locations, free auto-renewing SSL, and 24/7 expert support. Plans start at $4.49 per month with no renewal price hikes. The price you see today is the price you pay at every renewal.
For developers who also work with JavaScript, our companion guide covers how to deploy a Node.js app using the same hosting infrastructure.
Your app works on localhost. Now make it work for the world.
View Python Hosting Plans — from $4.49/mo | Compare All Hosting Plans | Linux VPS — from $4.99/mo | Cloud Hosting — from $3.49/mo
Frequently Asked Questions
What is the best hosting for a Python app?
It depends on your priorities. If you want full server control and are comfortable with Linux administration, a VPS with Nginx and Gunicorn gives you maximum flexibility. If speed of deployment matters more than server access, a PaaS like Render handles the infrastructure for you. For production apps that need SSH access, built-in CDN, and automatic SSL without the overhead of configuring Nginx and systemd, managed Python hosting on Webhost365 offers the strongest balance of control and simplicity. Plans start at $4.49 per month with AMD EPYC processors, NVMe SSD, and Bunny CDN included.
Traditional PHP-based shared hosting does not support Django. Django requires the Python runtime, pip, virtual environments, a WSGI server like Gunicorn, and the ability to run long-lived processes. Standard shared hosting provides none of these. Webhost365 Python hosting plans are built specifically for Python frameworks. They include a Python app selector with multiple version support, SSH access, virtual environment management, NVMe storage, and Bunny CDN on an environment designed for Django, Flask, and FastAPI workloads.
Do I need Nginx for a Python app?
On a raw VPS, yes. Nginx acts as a reverse proxy between the internet and Gunicorn. It accepts traffic on port 80 and 443, terminates SSL, serves static files directly, and forwards dynamic requests to your Python application. Without Nginx, Gunicorn cannot serve HTTPS traffic and wastes worker processes on static file delivery. On managed hosting platforms like Webhost365, the hosting environment handles reverse proxying and SSL termination for you. You deploy your app and it is accessible over HTTPS on your domain without touching Nginx configuration files.
What is Gunicorn and why do I need it?
Gunicorn (Green Unicorn) is a WSGI HTTP server for Python web applications. Django and Flask do not include a production-ready HTTP server. Their built-in development servers are single-threaded, insecure, and will crash under real traffic. Gunicorn spawns multiple worker processes to handle concurrent requests reliably. The standard formula for worker count is (2 × CPU cores) + 1. For async frameworks like FastAPI, Uvicorn fills the same role as an ASGI server. You can combine them by running Uvicorn workers inside Gunicorn: gunicorn -k uvicorn.workers.UvicornWorker main:app. This gives you the process management benefits of Gunicorn with the async performance of Uvicorn.
Can I deploy FastAPI on Python hosting?
Yes. FastAPI runs on Python and can be deployed on any hosting that supports the Python runtime with SSH access. Use Uvicorn as the ASGI server with uvicorn main:app --host 0.0.0.0 --port 8000 for testing. For production, wrap Uvicorn inside Gunicorn for proper process management: gunicorn -k uvicorn.workers.UvicornWorker main:app. On Webhost365 Python hosting, this works with the Python app selector, SSH access, free SSL, and Bunny CDN included. Set your startup file in the hosting panel and your FastAPI app is live with HTTPS and global CDN delivery.