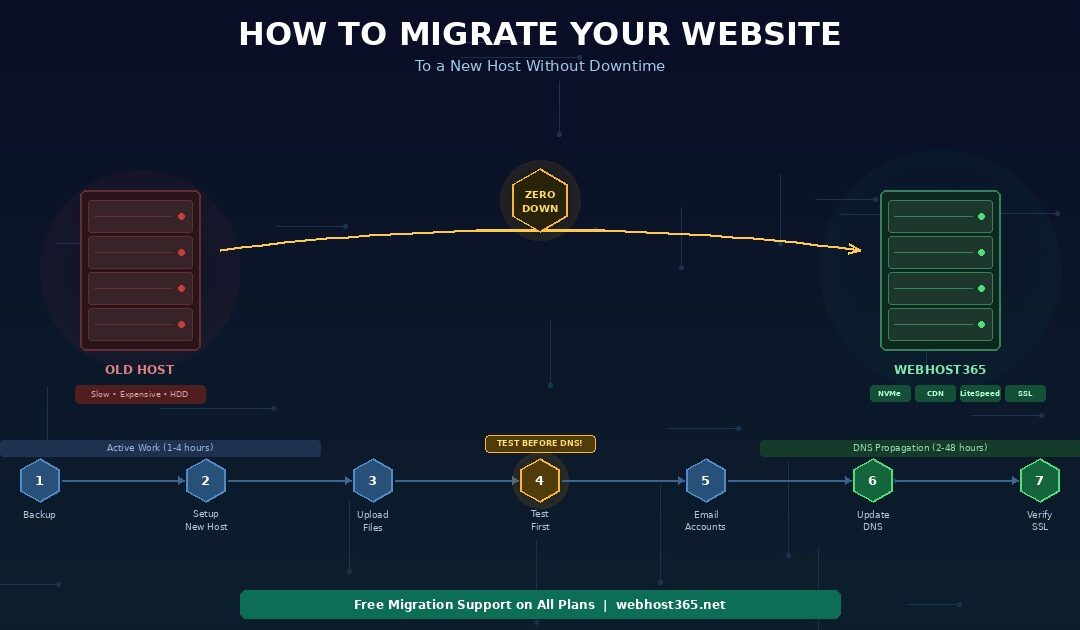
You can migrate your website to a new hosting provider without a single minute of downtime if you follow seven steps in the right order. First, create a full backup of your current site including files and database. Second, set up your account on the new host. Third, upload your files and import your database. Fourth, configure your site to work on the new server. Fifth, test everything using a temporary URL before touching DNS. Sixth, update your DNS records to point to the new server. Seventh, verify SSL, email, and CDN after propagation completes.
The entire website migration process takes 1 to 4 hours of active work, followed by 2 to 48 hours of DNS propagation during which both servers serve your site simultaneously. As a result, no visitor sees downtime at any point. However, the most common migration failures — broken databases, missing email, lost SSL certificates, and temporary SEO ranking dips — happen when people skip steps or change DNS before testing on the new server.
This guide walks through every step for any website, whether you run WordPress, static HTML, a custom PHP application, or a Node.js backend. In addition, it includes a WordPress-specific migration path using free plugins and directly addresses the three fears that keep people on bad hosting: downtime, email loss, and SEO damage. If you are ready to migrate your website to Webhost365, free migration support is included on all plans — along with NVMe SSD, Bunny CDN with 197 edge locations, free SSL, and pricing that never increases at renewal.
Before you migrate your website — the pre-migration checklist
Website migration failures almost always trace back to something the person did not check before starting. Consequently, running through this checklist before you begin prevents hours of troubleshooting later. Each item takes under a minute to verify.
Verify access to your current hosting account
You need FTP, SFTP, or SSH access to download your website files. In addition, you need phpMyAdmin or command-line MySQL access to export your database. Log into your current hosting control panel and confirm that both access methods work. Note your FTP credentials, database name, database username, and database password — you will need all four during the migration.
If your current host uses cPanel, both file access and database access are available from the cPanel dashboard. If your host uses a custom panel, check their documentation for file download and database export options. Without these credentials, you cannot create the backup that Step 1 requires.
Confirm where your domain DNS is managed
Your domain’s DNS settings live at your domain registrar — the company where you purchased the domain. This is often a different company from your hosting provider. For example, you might have bought your domain at GoDaddy or Namecheap but host your website at a different provider.
Knowing where your DNS is managed matters because Step 6 requires you to update DNS records at the registrar, not at your hosting provider. Log into your registrar account and verify you can access DNS settings. While you are there, check whether the domain has a transfer lock enabled — some registrars lock DNS changes by default, which can delay your migration.
List all email accounts on your domain
If your hosting includes email (addresses like you@yourdomain.com), make a complete list of every email account, including the address and password for each one. This step is critical because email accounts must be recreated on the new host before you change DNS. Forgetting even one account means that person stops receiving email during migration.
However, if your email is handled by Google Workspace, Microsoft 365, or Zoho Mail, your email is unaffected by hosting migration. Those services use their own MX records that point to the email provider rather than your hosting server. In that case, skip this checklist item.
Confirm SSL and site configuration details
Note whether your current site uses SSL (https:// in the address bar) and how it was provisioned. On Webhost365, SSL auto-provisions via Let’s Encrypt once DNS points to the server, so you will not need to manually install a certificate after migration. Also note your current PHP version, any custom server configurations, and .htaccess rules — these may need to be replicated on the new host.
Furthermore, if your website uses a CMS like WordPress, note your WordPress version, active theme, and list of active plugins. This information helps troubleshoot any compatibility issues that surface after migration.
The 7 steps to migrate your website with zero downtime
These seven steps work for any website — WordPress, static HTML, custom PHP, Node.js, or any other CMS. Follow them in order. Specifically, do not skip ahead to DNS changes before completing Steps 1 through 5. The zero-downtime strategy depends on having a fully working copy on the new server before any visitor is directed there.
Step 1 — Back up your entire website
Before you migrate your website, create a complete backup that includes every file and your full database. This backup serves two purposes: it provides the files you will upload to the new server, and it acts as insurance if anything goes wrong during migration.
For any website: Download all files from your current server via FTP or SFTP. Use an FTP client like FileZilla and download the entire public_html or www directory to your local computer. Then export your database through phpMyAdmin — select your database, click Export, choose SQL format, and download the file. Store both the file backup and database export in a local folder and additionally copy them to cloud storage (Google Drive, Dropbox) for redundancy.
For WordPress specifically: Install the All-in-One WP Migration plugin or Duplicator on your current WordPress site. These plugins create a single downloadable package containing your files, database, theme, plugins, and configuration. As a result, you get a complete, portable backup in one file rather than managing files and database separately. This WordPress-specific backup also handles URL serialisation, which matters when your site moves between servers.
Regardless of which method you use, verify your backup before proceeding. Check that the downloaded file sizes match expectations — a WordPress site with images typically produces a backup between 200 MB and 2 GB. If the backup seems unusually small, files may be missing.
Step 2 — Set up your new hosting account
Sign up for hosting on your new provider and add your domain to the account. Importantly, do not change your DNS at this point — your domain should still point to your old host throughout this step. Setting up the account simply creates a space on the new server where your site will live.
On Webhost365, this means choosing a plan — General Hosting at $1.49/mo for simple sites, WordPress Hosting at $3.49/mo for WordPress with LiteSpeed caching, or Cloud Hosting for sites that need dedicated resources. Add your domain to the account through the control panel. The server allocates NVMe storage, assigns resources, and prepares the environment for your site.

Next, create your database on the new server. Note the database name, database username, database password, and database host (typically “localhost”). You will need these credentials in Step 3 when you update your site’s configuration file. Also note the new server’s IP address — you will need it for testing in Step 4 and DNS changes in Step 6.
Step 3 — Upload files and import your database
Transfer your site files to the new server via FTP, SFTP, or the hosting control panel’s file manager. Upload them to the public_html or www directory. For a typical WordPress site, this includes the wp-content directory (your themes, plugins, and uploads), wp-admin, wp-includes, and root files like wp-config.php and .htaccess.
Then import your database. Open phpMyAdmin on the new server, select the database you created in Step 2, click Import, and upload the SQL file from your backup. Depending on the database size, this takes a few seconds to several minutes.
After the import completes, update your site’s configuration file with the new database credentials. For WordPress, open wp-config.php and change DB_NAME, DB_USER, DB_PASSWORD, and DB_HOST to match the new server’s database details. For other CMS platforms or frameworks, update the equivalent configuration file — .env for Laravel, config.php for custom applications, or settings.php for Drupal.
For WordPress plugin migration: If you used All-in-One WP Migration in Step 1, the process is simpler. Install fresh WordPress on the new server using the one-click installer. Then install the All-in-One WP Migration plugin on the fresh installation. Import your backup package through the plugin interface. The plugin handles the database, files, URL replacement, and configuration automatically — consequently, you skip the manual file upload and database import entirely.
Step 4 — Test your site on the new server before changing DNS
This is the most important step in the entire website migration process, and it is the one most people skip. Testing on the new server before updating DNS is what separates zero-downtime migration from the “fingers crossed” approach that causes broken sites.
Method 1 — Temporary URL: Most hosting providers offer a temporary URL or IP-based access to your site. On Webhost365, you can access your site directly using the server IP address or a temporary staging URL. If images or links appear broken because they reference your domain name, that is expected — the full test comes from Method 2.
Method 2 — Hosts file override: Edit your local computer’s hosts file to point your domain to the new server’s IP address. On Windows, edit C:\Windows\System32\drivers\etc\hosts. On Mac or Linux, edit /etc/hosts. Add a line like 123.456.789.0 yourdomain.com (replacing the IP with your new server’s IP). Save the file and clear your browser cache.
Now when you type your domain in your browser, your computer loads the site from the new server while everyone else in the world still sees the old server. As a result, you can test every page, form, image, and link exactly as visitors will see it — without affecting anyone else.
What to check during testing: Verify that all pages load without errors. Confirm that images display correctly. Test contact forms and checkout flows. Check that your WordPress admin panel works. Verify database queries by loading dynamic pages. Look for mixed content warnings in the browser console. If anything fails, fix it now — before proceeding to DNS changes.
Do not move to Step 5 until the site works correctly on the new server.
Step 5 — Recreate email accounts on the new host
If your email runs through your hosting provider — addresses like you@yourdomain.com managed via webmail or IMAP — you must recreate every email account on the new server before changing DNS or MX records. This ordering is critical because changing DNS first means incoming email arrives at the new server, but if the accounts do not exist there yet, those emails bounce.
Log into your new hosting control panel. Create each email account using the same address and a secure password. Send a test email between the accounts to confirm they work. Only after verifying that all accounts are functional should you proceed to Step 6.
If your email is managed by an external provider like Google Workspace or Microsoft 365, skip this step entirely. External email services are not affected by hosting migration because their MX records point to the email provider’s servers, not to your web hosting server. Therefore, your email continues flowing normally throughout the entire migration process regardless of DNS changes to your website.
Step 6 — Update DNS to point to the new server
Log into your domain registrar — the company where you purchased your domain (GoDaddy, Namecheap, Cloudflare, or similar). Navigate to DNS management for your domain. Update the A record to point to your new server’s IP address. If you have a CNAME record for “www”, update it to point to your domain or the new server as well. Additionally, update MX records only if your email is hosted on the new server — do not change MX records if you use external email.
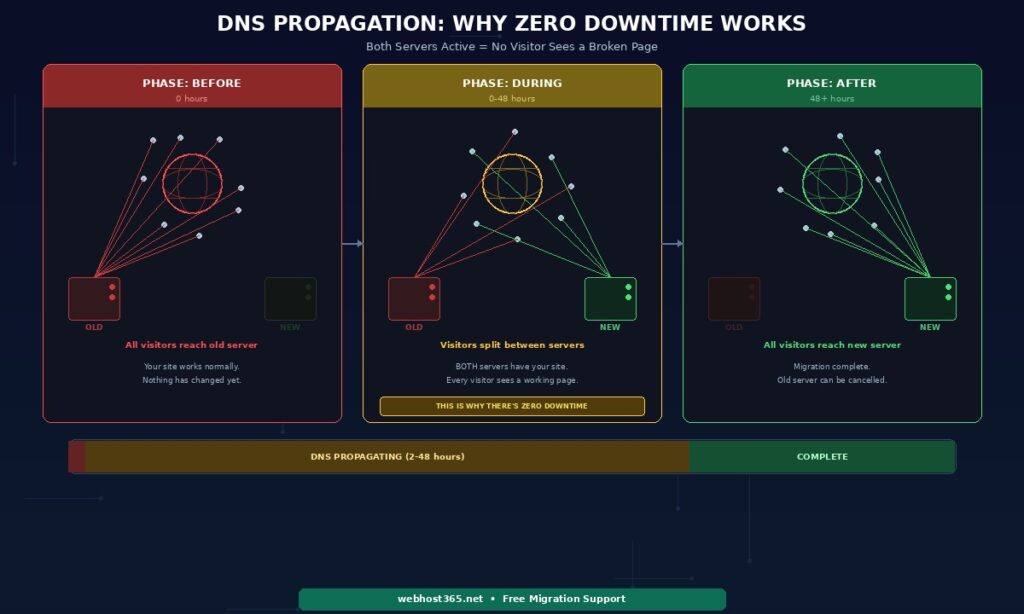
Understanding DNS propagation: After you save the DNS changes, the update propagates across global DNS servers over a period of 2 to 48 hours. During this window, some visitors are directed to your old server and some are directed to your new server. This is completely normal.
Why this produces zero downtime: Because you uploaded and tested your site on the new server in Steps 3 and 4, both servers now have identical, working copies of your website. A visitor who reaches the old server sees the working site. A visitor who reaches the new server sees the same working site. Consequently, no visitor encounters a broken page regardless of which server handles their request. This overlap is the entire secret to zero-downtime website migration.
You can check propagation progress at whatsmydns.net by entering your domain and checking the A record. When all global DNS servers show your new IP address, propagation is complete.
Step 7 — Verify SSL, email, and CDN after DNS propagation
Once DNS has fully propagated, verify three things on the new server. First, confirm that SSL is active — on Webhost365, Let’s Encrypt certificates auto-provision once DNS resolves to the server. Visit your site at https:// and check for the padlock icon in the browser. Second, send and receive test emails on every account to confirm email is flowing through the new server. Third, verify that your CDN is active — on Webhost365, Bunny CDN activates automatically when DNS points to the server.
After confirming all three, run a speed test at Google PageSpeed Insights to measure the performance improvement. If you migrated from HDD hosting without a CDN to NVMe hosting with Bunny CDN, expect a significant improvement in TTFB and LCP scores — the reason you migrated in the first place.
Furthermore, check Google Search Console for any crawl errors over the following 48 hours. Temporary fluctuations are normal during DNS propagation and resolve quickly. If your server IP changed substantially, consider using Search Console’s change of address tool to notify Google.
Keep your old hosting account active for 7 to 14 days after full propagation as a safety net. If anything goes wrong, reverting DNS to the old server’s IP instantly restores the previous version. Once you have confirmed everything works on the new host, cancel the old account.
How to migrate a WordPress website using plugins
If your site runs WordPress, free migration plugins reduce the entire website migration process to three steps: install the plugin on the old site, export a backup package, and import it on the new site. The plugin handles files, database, URL serialisation, and configuration automatically. As a result, you skip the manual file upload and database import described in Steps 1 and 3 above.
All-in-One WP Migration (best for sites under 500 MB)
Install the plugin on your current WordPress site from the Plugins dashboard. Go to the plugin’s Export page and choose “Export To File.” The plugin creates a single downloadable archive containing your entire WordPress installation — database, themes, plugins, uploads, and configuration. Download this file to your computer.
On the new server, install a fresh copy of WordPress using the one-click installer. Then install All-in-One WP Migration on the fresh installation and go to the Import page. Upload the backup file you exported from the old site. The plugin automatically replaces the database, copies all files, updates URLs from the old domain to the new one, and configures wp-config.php. Consequently, the entire migration happens inside the WordPress dashboard without touching FTP, phpMyAdmin, or configuration files.
The free version handles sites up to approximately 500 MB. For larger sites, the paid extension removes the size limit. Most WordPress sites with moderate content and optimised images fall comfortably within the free tier.
Duplicator (best for larger sites and custom configurations)
Duplicator works differently. Instead of importing through the WordPress dashboard, it creates an installer package that runs independently. On your current site, install Duplicator and build a package. This produces two files: an installer.php file and an archive.zip file.
Upload both files to the new server’s root directory via FTP. Then open installer.php in your browser (yourdomain.com/installer.php using your hosts file override from Step 4). The installer walks you through a guided process: it creates the database, imports your data, updates URLs, and writes the wp-config.php file. Because the installer runs outside WordPress, it handles larger databases and complex configurations more reliably than dashboard-based import tools.
Duplicator’s free version covers most migration scenarios. The Pro version adds scheduled backups, multisite support, and cloud storage integration.
What to check after plugin migration
Regardless of which plugin you used, verify these items immediately after the import finishes. Navigate to Settings, then Permalinks, and click Save Changes — this regenerates your .htaccess file and prevents 404 errors on interior pages. Check your Media Library to confirm images load correctly. Test your contact forms by submitting a test entry. If your site runs WooCommerce, verify that products display, the cart functions, and the checkout process completes.
Additionally, review any hardcoded URLs in your theme files or custom CSS. Migration plugins handle database URLs automatically, but URLs written directly into template files or inline styles may still reference the old server. Use the Better Search Replace plugin to find and fix any remaining old URLs in the database.
For a comprehensive list of WordPress speed optimisations to apply on your new hosting, see our guide on how to speed up your WordPress site.
Will you lose Google rankings when you migrate your website?
Changing hosting providers does not hurt your Google rankings — provided your URLs stay the same. Google does not factor your server’s IP address into rankings. Your content, your URLs, your internal links, and your backlinks determine your search position. However, the specific details of your migration determine whether SEO is preserved, damaged, or actually improved.
Same domain, same URLs, new host — no SEO impact
This is the standard migration scenario, and it is what this guide describes. You keep the same domain name and the same URL structure. The only thing that changes is the server that delivers your pages. In this case, Google sees no meaningful difference. Your content is identical. Your URLs are identical. Your backlinks still resolve.
Temporary ranking fluctuations during DNS propagation are normal. Some Google crawlers may hit the old server while others hit the new server during the 2 to 48 hour window. These fluctuations resolve within 24 to 72 hours once propagation completes and Google consistently reaches the new server. If your server IP changed substantially, use Google Search Console’s change of address tool to notify Google of the infrastructure change.
To preserve SEO during migration, keep your permalink structure identical. Verify that www versus non-www redirects work the same way on the new host. Confirm that canonical tags in your page headers point to the correct URLs. Check that your XML sitemap is accessible and accurate on the new server.
Different URLs after migration — this causes SEO damage
If your URL structure changes during migration — for example, /blog/post-name becomes /post-name, or you switch from one CMS to another with different URL patterns — you must set up 301 redirects from every old URL to its new equivalent. Without redirects, Google crawls the old URLs, finds 404 errors, and removes those pages from the index. Backlinks pointing to old URLs lose their SEO value because they lead nowhere.
This scenario is entirely preventable. If you are migrating between the same CMS (WordPress to WordPress, for instance), your URL structure stays identical by default. URL changes only happen when you deliberately alter your permalink settings or switch platforms. If you must change URLs, create a complete redirect map before migrating and implement 301 redirects in your .htaccess file or Nginx configuration on the new server.
The speed bonus — migration that improves SEO
If you are migrating from slow hosting to fast hosting, your Core Web Vitals scores improve after migration. Better TTFB from NVMe storage. Lower LCP from Bunny CDN with 197 edge locations. Faster server response from LiteSpeed with server-level caching. Google uses these metrics as ranking signals through its Core Web Vitals assessment.
As a result, migrating to faster hosting does not just preserve your SEO — it actively improves it. Sites that migrate from HDD hosting without a CDN to NVMe hosting with a global CDN typically see measurable ranking improvements over the following 2 to 4 weeks as Google re-evaluates their page experience scores. The migration itself is neutral. The infrastructure upgrade is a positive ranking signal.
If your current site is slow and you are not sure whether hosting is the bottleneck, see our diagnostic guide on why websites load slowly and how to fix each cause.
What can go wrong during website migration — and how to fix it
Every migration problem has a specific cause and a straightforward fix. Knowing these common issues in advance means you resolve them in minutes rather than spending hours troubleshooting in a panic. None of these problems cause permanent damage if caught quickly.
“Error establishing a database connection”
This is the most common error after migrating a website. The cause is almost always a mismatch between the database credentials in your configuration file and the actual database on the new server. Open wp-config.php (WordPress) or your CMS equivalent and verify that DB_NAME, DB_USER, DB_PASSWORD, and DB_HOST exactly match the database name, username, password, and host you created in Step 2. Even a single extra space or wrong character causes this error.
If the credentials match and the error persists, verify that the database was imported successfully. Open phpMyAdmin on the new server and check that your tables exist and contain data. An empty database or a failed import produces the same error message.
Images are broken or missing
Broken images after migration typically have one of two causes. Either the uploads directory was not transferred completely, or image paths in the database reference the old server. First, verify that the /wp-content/uploads/ directory (WordPress) exists on the new server and contains your media files. Compare the folder size on the new server with your backup — if it is significantly smaller, files were lost during transfer and need to be re-uploaded.
If the files are present but images still appear broken, the database contains hardcoded references to the old server’s URL or IP. Install the Better Search Replace plugin and replace all instances of the old URL with the new URL in the database. This fixes image paths, internal links, and any other URL-dependent content.
Email stopped working after migration
Email failures during migration almost always result from the ordering problem described in Step 5. If you changed DNS or MX records before creating email accounts on the new host, incoming mail has nowhere to go and bounces. The fix is immediate: create the missing email accounts on the new server using the same addresses.
If email accounts exist but still are not receiving mail, check your MX records at the domain registrar. Verify they point to the new host’s mail server. However, if you use external email (Google Workspace, Microsoft 365), confirm that the MX records were not overwritten during migration — they should still point to your email provider, not to your web host.
SSL shows “not secure” warning
A “not secure” warning after migration means the SSL certificate has not provisioned on the new server yet. Let’s Encrypt certificates require DNS to point to the new server before they can be issued. Therefore, this warning is expected during DNS propagation — the certificate cannot provision until propagation completes.
On Webhost365, SSL auto-provisions via Let’s Encrypt once DNS fully resolves to the server. If the certificate does not activate within one hour of complete propagation, clear the SSL cache in your hosting control panel or contact support. In the meantime, the site is accessible via HTTP — visitors can still reach your content, although they will see the “not secure” indicator until HTTPS activates.
Site loads slowly after migration
If your site feels slower immediately after migration, two likely causes exist. First, DNS may still be partially resolving to the old server — check propagation at whatsmydns.net. Second, the server-side cache on the new host has not built up yet. LiteSpeed cache generates cached copies on the second visit to each page. Consequently, the first visitor to each page after migration triggers a cache build, and subsequent visitors receive the cached version at full speed.
Clear your browser cache and test again after 24 hours of normal traffic. By then, LiteSpeed has cached your most-visited pages and Bunny CDN has populated edge caches globally. The true performance of your new hosting shows after this warm-up period — not on the first test immediately after migration.
Migrate your website to faster hosting today
Migration is the one-time effort that separates you from faster page loads, better uptime, and honest renewal pricing. The process takes a few hours of active work. The performance improvement lasts for every visitor, every page load, and every Google crawl from that point forward.
If your current host is slow because of outdated hardware, overcharging at renewal, or missing infrastructure that should be standard — NVMe SSD, a global CDN, server-level caching — migration fixes all of it in a single move. Every Webhost365 plan includes free migration support, so you do not have to do it alone.
General Hosting — from $1.49/mo | WordPress Hosting — from $3.49/mo | Cloud Hosting — from $3.49/mo | Linux VPS — from $4.99/mo | Free Hosting — $0/mo | Compare All Plans
Frequently asked questions
How long does it take to migrate a website?
Active work takes 1 to 4 hours depending on your site’s size and complexity. A simple WordPress site migrated with the All-in-One WP Migration plugin requires under 30 minutes of hands-on effort. A larger site with a custom database, multiple email accounts, and specific server configurations may take 2 to 4 hours. After the active migration work, DNS propagation takes 2 to 48 hours. During propagation, both the old and new servers serve your site simultaneously, so no visitor experiences downtime. The total elapsed time from starting the process to full completion on the new host is typically 4 to 24 hours, with most of that time being passive DNS propagation requiring no action on your part. You can monitor propagation progress at whatsmydns.net and continue with your day while it completes.
Will my website go down during migration?
Not if you follow the zero-downtime strategy described in this guide. The key is uploading your site to the new server and testing it thoroughly before changing DNS records. During DNS propagation, both servers run identical copies of your site. Visitors who reach the old server see the working site. Visitors who reach the new server see the same working site. As a result, no visitor encounters a broken page at any point. The only scenarios where downtime occurs are deleting files from the old server before DNS fully propagates, or changing DNS before the new server is ready. Keep the old server running with its current content until you have verified everything on the new host and propagation is complete.
Will I lose my Google rankings when I change hosts?
No, provided your URLs remain the same. Google does not use your server IP address as a ranking factor. Your content, URLs, internal linking structure, and backlinks determine your search position — none of which change during a standard hosting migration. Temporary ranking fluctuations during the DNS propagation window are normal and resolve within 24 to 72 hours. If your URLs change during migration (different permalink structure or platform switch), set up 301 redirects from every old URL to its new equivalent to preserve link equity. Additionally, use Google Search Console’s change of address tool to notify Google of the server change. Migrating to faster hosting often improves rankings because better Core Web Vitals scores are a positive ranking signal.
How do I migrate my email when I change hosting providers?
If your email runs through your web hosting provider (you@yourdomain.com via webmail or IMAP), recreate every email account on the new host before changing DNS or MX records. Create each account with the same address. Then update MX records at your domain registrar to point to the new host’s mail server. The critical ordering is: create accounts first, change MX records second. If you reverse this order, incoming emails arrive at the new server but have nowhere to go because the accounts do not exist yet. However, if your email is handled by Google Workspace, Microsoft 365, or Zoho Mail, your email is completely unaffected by hosting migration. Those services use their own MX records pointing to the email provider’s servers, so incoming mail continues flowing normally throughout the entire migration process regardless of web hosting changes.
Can I test my site on the new host before switching DNS?
Yes, and you should always test before committing to the DNS switch. Two methods work reliably. First, most hosting providers offer a temporary URL or direct IP access that lets you browse your site on the new server without affecting public DNS. Second, you can edit your local computer’s hosts file to point your domain to the new server’s IP address. This makes your browser load the site from the new server while every other visitor continues seeing the old server. Both methods let you verify that pages load, images display, forms submit, database queries work, and the admin panel functions — all before any public-facing change. Never skip this testing step. It is the single most effective way to prevent migration failures.
Does Webhost365 offer free website migration support?
Yes. Free migration support is included on every Webhost365 hosting plan at no additional cost. The support team handles the technical process — file transfer, database import, configuration, DNS guidance, and post-migration verification. You can also self-migrate using this guide if you prefer hands-on control over the process. For WordPress sites specifically, the plugin-based migration path using All-in-One WP Migration or Duplicator is the fastest self-service option and completes in under 30 minutes for most sites. Whether you use free migration support or migrate yourself, every Webhost365 plan includes NVMe SSD for fast database performance, Bunny CDN with 197 edge locations for global speed, free SSL via Let’s Encrypt, professional email, and pricing that stays the same at renewal — the infrastructure that made you want to migrate in the first place.